File Retention Lock and Snapshot Retention Lock are great new features on ZFSSA that can help protect your backups from deletion and help you meet regulatory requirements. Whether it be an accidental deletion or a bad actor attempting to corrupt your backups they are protected.
In this post I am going to walk through how to implement File Retention and Snapshot Retention together to protect an RMAN incremental merge backup from being deleted .
Why do I need both?
The first question you might have is why do I need both File Retention and Snapshot Retention to protect my backups ? RMAN incremental merge backups consists of 3 types of backup pieces.
FILE IMAGE COPIES - Each day when the backup job is executed the same image copy of each datafile file is updated by recovering the datafile with an incremental backup. This moves the image copy of each datafile forward one day using the changed blocks from the incremental backup. The backup files containing the image copy of the datafiles needs to be updatable by RMAN.
INCREMENTAL BACKUP- Each day a new incremental backup (differential) is taken. This incremental backup contains the blocks that changed in the database files since the previous incremental backup. Once created this file does not change.
ARCHIVE LOG BACKUPS- Multiple times a day, archive log backups (also known as log sweeps) are taken. These backup files contain the change records for the database and do not change once written.
How to leverage both retention types
SNAPSHOT RETENTION can be used to create a periodic restorable copy of a share/project by saving the unique blocks as of the "snapshot" time a new snapshot is taken. Each of these periodic snapshots can be scheduled on a regular basis. With snapshot retention, the snapshots are locked from being deleted, and the schedule itself is locked to prevent tampering with the snapshots. This is perfect for ensuring we have a restorable copy of the datafile images each time they are updated by RMAN.
FILE RETENTION can be used to lock both the incremental backups and the archive log backups. Both types of backup files do not change once created and should be locked to prevent removal or tampering with for the retention period.
How do I implement this ?
First I am going create a new project for my backups named "DBBACKUPS". Of course you could create 2 different projects.
Within this project I am going to create 2 shares with different retention settings.
FULLBACKUP - Snapshot retention share
My image copy backups are going to a share that is protected with snapshot retention. The documentation on where to start with snapshot retention can be found here.
In the example below I am keeping 5 days of snapshots, and I am locking the most recent 3 days of snapshots. This configuration will ensure that I have locked image copies of my database files for the last 3 days.
NOTE: Snapshots only contain the unique blocks since the last snapshot, but still provide a FULL copy of each datafile. The storage used to keep each snapshots is similar to the storage needed for each incremental backup.
DAILYBACKUPS - File Retention share
My incremental backups and archivelog backups are going to a share with File Retention. The files (backup pieces) stored on this share will be locked from being modified or deleted. The documentation on where to start with File Retention can be found here.
NOTE: I chose the "Privileged override" file retention policy. I could have chosen "Mandatory" file retention policy if I wanted to lock down the backup pieces even further.
In the example below I am retaining all files for 6 days.
DAILY BACKUP SCRIPT
Below is the daily backup script I am using to perform the incremental backup, and the recovery of the image copy datafiles with the changed blocks. You can see that I am allocating channels to "/fullbackup" which is the share configured with Snapshot Retention, and the image copy backups are going to this share. The incremental backups are going to "/dailybackups" which is protected with File Retention.
run {
  ALLOCATE CHANNEL Z1 TYPE DISK  format '/fullbackup/radb/DATA_%N_%f.dbf';
  ALLOCATE CHANNEL Z2 TYPE DISK  format '/fullbackup/radb/DATA_%N_%f.dbf';
  ALLOCATE CHANNEL Z3 TYPE DISK  format '/fullbackup/radb/DATA_%N_%f.dbf';
  ALLOCATE CHANNEL Z4 TYPE DISK  format '/fullbackup/radb/DATA_%N_%f.dbf';
  ALLOCATE CHANNEL Z5 TYPE DISK  format '/fullbackup/radb/DATA_%N_%f.dbf';
  ALLOCATE CHANNEL Z6 TYPE DISK  format '/fullbackup/radb/DATA_%N_%f.dbf';

  backup
    section size 32G
    incremental level 1
    for recover of copy with tag 'DEMODBTEST' database FORMAT='/dailybackups/radb/FRA_%d_%T_%U.bkp';
  recover copy of database with tag 'DEMODBTEST' ;
  RELEASE CHANNEL Z1;
  RELEASE CHANNEL Z2;
  RELEASE CHANNEL Z3;
  RELEASE CHANNEL Z4;
  RELEASE CHANNEL Z5;
  RELEASE CHANNEL Z6;
}
ARCHIVELOG BACKUP SCRIPT
Below is the log sweep script that will perform the periodic backup of archive logs and send them to the "/dailybackups" share which has File Retention configured.
run {
  ALLOCATE CHANNEL Z1 TYPE DISK  format '/dailybackups/radb/ARCH_%U.bkup';
  ALLOCATE CHANNEL Z2 TYPE DISK  format '/dailybackups/radb/ARCH_%U.bkup';
  ALLOCATE CHANNEL Z3 TYPE DISK  format '/dailybackups/radb/ARCH_%U.bkup';
  ALLOCATE CHANNEL Z4 TYPE DISK  format '/dailybackups/radb/ARCH_%U.bkup';
  ALLOCATE CHANNEL Z5 TYPE DISK  format '/dailybackups/radb/ARCH_%U.bkup';
  ALLOCATE CHANNEL Z6 TYPE DISK  format '/dailybackups/radb/ARCH_%U.bkup';


  backup
    section size 32G
    filesperset 32
    archivelog all;
  RELEASE CHANNEL Z1;
  RELEASE CHANNEL Z2;
  RELEASE CHANNEL Z3;
  RELEASE CHANNEL Z4;
  RELEASE CHANNEL Z5;
  RELEASE CHANNEL Z6;
}
RESULT:
This strategy will ensure that I have 5 days of untouched full backups available for recovery. It also ensures that I have 6 days of untouched archive logs, and incremental backups that can be applied if necessary. This will protect my RMAN incremental merge backups using a combination of Snapshot Retention for backup pieces that need to be updated, and File Retention for backup pieces that will not change.
OCI Object Storage provides both lifecycle rules and retention lock. How to take advantage of both these features isn't always as easy as it looks.
In this post I will go through an example customer request and how to implement a backup strategy to accomplish the requirements.
This image above gives you an idea of what they are looking to accomplish.
Requirements
RMAN retention is to keep a 14 day point in time recovery window
All long term backups beyond 14 days are cataloged as KEEP backups
All buckets are protected with a retention rule to prevent backups from being deleted before they become obsolete
Backups are moved to lower tier storage when appropriate to save costs.
Backup strategy
A full backup is taken every Sunday at 5:30 PM and this backup is kept for 6 weeks.
Incremental backups are taken Monday through Saturday at 5:30 PM and are kept for 14 days
Archive log sweeps are taken 4 times a day and are kept for 14 days
A backup is taken the 1st day of the month at 5:30 PM and this backup is kept for 13 months.
A full backup is taken following the Tuesday morning bi-weekly payroll run and is kept for 7 years
This sounds easy enough. If you look at the image above you can what this strategy looks like in general. I took this strategy and mapped it to the 4 buckets, how they would be configured, and what they would contain. This is the image below.
Challenges
As I walked through this strategy I found that it involved some challenges. My goal was limit the number of full backups to take advantage of current backups. Below are the challenges I realized exist with this schedule
The weekly full backup taken every Sunday is kept for longer than the incremental backups and archive logs. This caused 2 problems
I wanted to make this backup a KEEP backup that is kept for 6 weeks before becoming obsolete. Unfortunately KEEP backups are ignored as part of an incremental backup strategy. I could not create a weekly full backup that was both a KEEP backup and also be used as part of incremental backup strategy.
Since the weekly full backup is kept longer than the archive logs, I need to ensure that this backup contains the archive logs needed to defuzzy the backup without containing too many unneeded archive logs
The weekly full backup could fall on the 1st of the month. If this is the case it needs to be kept for 13 months otherwise it needs to be kept for 6 weeks.
I want the payrun backups to be immediately placed in archival storage to save costs. When doing a restore I want to ignore these backups as they will take longer to restore.
When restoring and recovering the database within the 14 day window I need to include channels allocated to all the buckets that could contain those buckets. 14_DAY, 6_WEEK, and 13_MONTH.
Solutions
I then worked through how I would solve each issue.
Weekly full backup must be both a normal incremental backup and KEEP backup - After doing some digging I found the best way to handle this issue was to CHANGE the backup to be a KEEP backup with either a 6 week retention, or a 13 month retention from the normal NOKEEP type. By using tags I can identify the backup I want change after it is no longer needed as part of the 14 day strategy.
Weekly full backup contains only archive logs needed to defuzzy - The best way to accomplish this task is to perform an archive log backup to the 14_DAY bucket immediately before taking the weekly full backup
Weekly full backup requires a longer retention - This can be accomplished by checking if the the full backup is being executed on the 1st of the month. If it is the 1st, the full backup will be placed in the 13_MONTH bucket. If it is not the 1st, this backup will be placed in the 6_WEEK bucket. This backup will be created with a TAG with a format that can be used to identify it later.
Ignore bi-weekly payrun backups that are in archival storage - I found that if I execute a recovery and do not have any channels allocated to the 7_YEAR bucket, it will may try to restore this backup, but it will not find it and move to the next previous backup. Using tags will help identify that a restore from the payrun backup was attempted and ultimately bypassed.
Include all possible buckets during restore - By using a run block within RMAN I can allocate channels to different buckets and ultimately include channels from all 3 appropriate buckets.
Then as a check I drew out a calendar to walk through what this strategy would look like.
Backup examples
Finally I am including examples of what this would look like.
Mon-Sat 5:30 backup job
dg=$(date +%Y%m%d)
rman <<EOD
run {
ALLOCATE CHANNEL daily1 DEVICE TYPE     'SBT_TAPE' PARMS  'SBT_LIBRARY=/home/oracle/cloudbackup/lib/libopc.so ENV=(OPC_PFILE=/home/oracle/ociconfig/config/14_DAY.ora)';
ALLOCATE CHANNEL daily2 DEVICE TYPE     'SBT_TAPE' PARMS  'SBT_LIBRARY=/home/oracle/cloudbackup/lib/libopc.so ENV=(OPC_PFILE=/home/oracle/ociconfig/config/14_DAY.ora)';
backup incremental level 1 database tag="incr_backup_${dg}" plus archivelog tag="arch_backup_${dg}";
   }
exit
EOD
Sat 5:30 backup job schedule
1) Clean up archive logs first
dg=$(date +%Y%m%d:%H)
rman <<EOD
run {
ALLOCATE CHANNEL daily1 DEVICE TYPE     'SBT_TAPE' PARMS  'SBT_LIBRARY=/home/oracle/cloudbackup/lib/libopc.so ENV=(OPC_PFILE=/home/oracle/ociconfig/config/14_DAY.ora)';
ALLOCATE CHANNEL daily2 DEVICE TYPE     'SBT_TAPE' PARMS  'SBT_LIBRARY=/home/oracle/cloudbackup/lib/libopc.so ENV=(OPC_PFILE=/home/oracle/ociconfig/config/14_DAY.ora)';
backup archivelog tag="arch_backup_${dg}";
   }
exit
EOD
2a) If this 1st of the month then execute this script to send the full backup to the 13_MONTH bucket
dg=$(date +%Y%m%d)
rman <<EOD
run {
ALLOCATE CHANNEL monthly1 DEVICE TYPE     'SBT_TAPE' PARMS  'SBT_LIBRARY=/home/oracle/cloudbackup/lib/libopc.so ENV=(OPC_PFILE=/home/oracle/ociconfig/config/13_MONTH.ora)';
ALLOCATE CHANNEL monthly2 DEVICE TYPE     'SBT_TAPE' PARMS  'SBT_LIBRARY=/home/oracle/cloudbackup/lib/libopc.so ENV=(OPC_PFILE=/home/oracle/ociconfig/config/13_MONTH.ora)';
backup incremental level 1 database tag="full_backup_${dg}" plus archivelog tag="full_backup_${dg}";
   }
exit
EOD
2b) If this is NOT the 1st of the month execute this script and send the full backup to the 6_WEEK bucket
dg=$(date +%Y%m%d)
rman <<EOD
run {
ALLOCATE CHANNEL weekly1 DEVICE TYPE     'SBT_TAPE' PARMS  'SBT_LIBRARY=/home/oracle/cloudbackup/lib/libopc.so ENV=(OPC_PFILE=/home/oracle/ociconfig/config/6_WEEK.ora)';
ALLOCATE CHANNEL weekly2 DEVICE TYPE     'SBT_TAPE' PARMS  'SBT_LIBRARY=/home/oracle/cloudbackup/lib/libopc.so ENV=(OPC_PFILE=/home/oracle/ociconfig/config/6_WEEK.ora)';
backup incremental level 1 database tag="full_backup_${dg}" plus archivelog tag="full_backup_${dg}";
   }
exit
EOD
3a) If today is the 15th then change the full backup to a 13 month retention
dg=$(date --date "-14 days" +%Y%m%d)
rman <<EOD
CHANGE BACKUPSET TAG="full_backup_${dg}" keep until time 'sysdate + 390';
EOD
3b) If today is NOT the 14th then change the full backup to a 6 week retention
dg=$(date --date "-14 days" +%Y%m%d)
rman <<EOD
CHANGE BACKUPSET TAG="full_backup_${dg}" keep until time 'sysdate + 28';
EOD
Tuesday after payrun backup job
1) Clean up archive logs first
dg=$(date +%Y%m%d:%H)
rman <<EOD
run {
ALLOCATE CHANNEL daily1 DEVICE TYPE     'SBT_TAPE' PARMS  'SBT_LIBRARY=/home/oracle/cloudbackup/lib/libopc.so ENV=(OPC_PFILE=/home/oracle/ociconfig/config/14_DAY.ora)';
ALLOCATE CHANNEL daily2 DEVICE TYPE     'SBT_TAPE' PARMS  'SBT_LIBRARY=/home/oracle/cloudbackup/lib/libopc.so ENV=(OPC_PFILE=/home/oracle/ociconfig/config/14_DAY.ora)';
backup archivelog tag="arch_backup_${dg}";
   }
exit
EOD
2) Execute the keep backup
dg=$(date +%Y%m%d)
rman <<EOD
run {
ALLOCATE CHANNEL yearly1 DEVICE TYPE     'SBT_TAPE' PARMS  'SBT_LIBRARY=/home/oracle/cloudbackup/lib/libopc.so ENV=(OPC_PFILE=/home/oracle/ociconfig/config/7_YEAR.ora)';
ALLOCATE CHANNEL yearly2 DEVICE TYPE     'SBT_TAPE' PARMS  'SBT_LIBRARY=/home/oracle/cloudbackup/lib/libopc.so ENV=(OPC_PFILE=/home/oracle/ociconfig/config/7_YEAR.ora)';
backup database tag="payrun_backup_${dg}" plus archivelog tag="full_backup_${dg}" keep until time 'sysdate + 2555';
   }
exit
EOD
Restore example
Now in order to restore, I need to allocate channels to all the possible buckets. Below is the script I used to validate this with a "restore database validate" command.
run {
ALLOCATE CHANNEL daily1 DEVICE TYPE     'SBT_TAPE' PARMS  'SBT_LIBRARY=/home/oracle/cloudbackup/lib/libopc.so ENV=(OPC_PFILE=/home/oracle/ociconfig/config/14_DAY.ora)';
ALLOCATE CHANNEL daily2 DEVICE TYPE     'SBT_TAPE' PARMS  'SBT_LIBRARY=/home/oracle/cloudbackup/lib/libopc.so ENV=(OPC_PFILE=/home/oracle/ociconfig/config/14_DAY.ora)';
ALLOCATE CHANNEL weekly1 DEVICE TYPE     'SBT_TAPE' PARMS  'SBT_LIBRARY=/home/oracle/cloudbackup/lib/libopc.so ENV=(OPC_PFILE=/home/oracle/ociconfig/config/6_WEEK.ora)';
ALLOCATE CHANNEL weekly2 DEVICE TYPE     'SBT_TAPE' PARMS  'SBT_LIBRARY=/home/oracle/cloudbackup/lib/libopc.so ENV=(OPC_PFILE=/home/oracle/ociconfig/config/6_WEEK.ora)';
ALLOCATE CHANNEL monthly1 DEVICE TYPE     'SBT_TAPE' PARMS  'SBT_LIBRARY=/home/oracle/cloudbackup/lib/libopc.so ENV=(OPC_PFILE=/home/oracle/ociconfig/config/13_MONTH.ora)';
ALLOCATE CHANNEL monthly2 DEVICE TYPE     'SBT_TAPE' PARMS  'SBT_LIBRARY=/home/oracle/cloudbackup/lib/libopc.so ENV=(OPC_PFILE=/home/oracle/ociconfig/config/13_MONTH.ora)';
restore database validate;
    }
Below is what I am seeing in the RMAN log because I picked a point in time where I want it to ignore the 7_YEAR backups.
In this case you can see that it tried to retrieve the Payrun backup but failed back to the previous backup with tag "FULL_073122". This is the backup I want.
channel daily1: starting validation of datafile backup set
channel daily1: reading from backup piece h613o4a4_550_1_1
channel daily1: ORA-19870: error while restoring backup piece h613o4a4_550_1_1
ORA-19507: failed to retrieve sequential file, handle="h613o4a4_550_1_1", parms=""
ORA-27029: skgfrtrv: sbtrestore returned error
ORA-19511: non RMAN, but media manager or vendor specific failure, error text:
   KBHS-07502: File not found
KBHS-01404: See trace file /u01/app/oracle/diag/rdbms/acmedbp/acmedbp/trace/sbtio_4819_140461854265664.log for det
failover to previous backup

channel daily1: starting validation of datafile backup set
channel daily1: reading from backup piece gq13o3rm_538_1_1
channel daily1: piece handle=gq13o3rm_538_1_1 tag=FULL_073122
channel daily1: restored backup piece 1
channel daily1: validation complete, elapsed time: 00:00:08
That's all there is to it. Tags are very help helpful to identify the correct backups.
ZFSSA replication can be used to create locked offsite backups. In this post I will show you how to take advantage of the new "Locked Snapshot" feature of ZFSSA and the ZFS Image in OCI to create an offsite backup strategy to OCI.
If you haven't heard of the locked snapshot feature of ZFSSA I blogged about here. In this post I am going to take advantage of this feature and show you how you can leverage it to provide a locked backup in the Oracle Cloud using the ZFS image available in OCI.
In order to demonstrate this I will start by following the documentation to create a ZFS image in OCI as my destination. Here is a great place to start with creating the virtual ZFS appliance in OCI.
Step 1 - Configure remote replication from source ZFSSA to ZFS appliance in OCI.
By enabling the "Remote Replication" service with a named destination, "downstream_zfs" in my example, I can now replicate to my ZFS appliance in OCI.
Step 2 - Ensure the source project/share has "Enable retention policy for Scheduled Snapshots" turned on
For my example I created a new project "Blogtest". On the "snapshots" tab I put a checkmark next to "Enable retention policy for Scheduled Snapshots". By checking this, the project will adhere to preventing the deletion of any locked snapshots. This property is replicated to the downstream and will cause the replicated project shares to also adhere to locking snapshots. This can also be set at the individual share level if you wish to control the configuration of locked snapshots for individual shares.
Below you can see where this is enabled for snapshots created within the project.
Step 3 - Create a snapshot schedule with "locked" snapshots
The next step is to create locked snapshots. This can be done at the project level (affecting all shares) or at the share level. In my example below I gave the scheduled snapshots a label "daily_snaps". Notice for my example I am only keeping only 1 snapshot and I am locking the snapshot at the source. In order for the snapshot to be locked at the destination
Retention Policy MUST be enabled for the share (or inherited from the project).
The source snapshot MUST be locked when it is created
Step 4 - Add replication to downstream ZFS in OCI
The next step is to add replication to the project configuration to replicate the shares to my ZFS in OCI. Below you can see the target is my "downstream_zfs" that I configured in the "Remote Replication" service.
You can also see that I am telling the replication to "include snapshots", which are my locked snapshots, and also to "Retain user snapshots on target". Under "Disaster Recovery" you can see that I am telling the downstream to keep a 30 day recovery point. Even though I am only keeping 1 locked snapshot on the source, I want to keep 30 days of recovery on the downstream in OCI.
Step 5 - Configure snapshots to replicate
In this step I am updating the replication action to replicate the locked scheduled snapshot to the downstream. Notice that I changed the number of snapshots from 1 (on the source) to 30 on the destination, and I am keeping the snapshot retention locked. This will ensure that the daily locked snapshot taken on the source will replicate to the destination as a locked snapshot, and 30 snapshots on the destination will remain locked. The 31st snapshot is no longer needed.
Step 6 - Configure the replication schedule
The last step is to configure the replication schedule. This ensures that on a daily basis the snapshots that are configured to be replicated will be replicated regularly to the downstream. You can make this more aggressive than daily if you wish the downstream to be more in sync in the primary. In my example below I configured the replication to occur every 10 minutes. This means that the downstream should have all updates as of 10 minutes ago or less. If I need to go back in time, I will have daily snapshots for the last 30 days that are locked and cannot be removed.
Step 7 - Validate the replication
Now that I have everything configured I am going to take a look at the replicated snapshots on my destination. I navigate to "shares" and I look under "replicat" and find my share. By clicking on the pencil and looking at the "snapshots" tab I can see my snapshot replicated over.
And when I click on the pencil next to the snapshot I can see that the snapshot is locked and I can't unlock it.
From there I can clone the snap and create a local snapshot, back it up to object storage, or reverse the replication if needed.
File Retention Lock was recently released on ZFSSA and I wanted to take the time to explain how to set the retention time and view the retention of locked files.
Below is an example of what happens. You can see that the files are locked until January 1st 2025
The best place to start for information on how this works is by looking at my last blog post on authorizations.
First I will go through the settings that available at the share/project level
Grace period
The grace period is used to automatically lock a file when there has not been updates to the file for this period of time.
If the automatic file retention grace period is "0" seconds, then the default retention is NOT in effect.
NOTE: even with a grace period of "0" seconds files can be locked by manually setting a retention period.
Also, once a grace period is set (> "0") it cannot be increased or disabled.
Finally, if you set the grace period to a long period (to ensure all writes are to a file are completed), you can lock the file by removing the write bit. This does the same thing as expiring the grace period.
Below is an example
chmod ugo-w *
Running the "chmod" will remove the write bit, and immediate cause all files to lock.
Default retention
The most common method to implement file retention is by using the default retention period. This causes the file to be locked for the default retention when the grace period expires for a file.
Note that the file is locked as of the time the grace period expires. For example, if I have a grace period of 1 day (because I want the ability to clean up a failed backup) and a default file retention period of 14 days, the file will be locked for 14 days AFTER the 1 day grace period. The lock on the file will expire 15 days after the file was last written to.
In the example above you can see that all files created on this share are created with a default retention of 1 day (24 hours).
NOTE: If the grace period is not > "0' these settings will be ignored and files will not be locked by default.
.
Minimum/Maximum File retention
The second settings you see on the image above are the "minimum file retention period" and the "maximum file retention period".
These control the retention settings on files which follows the rules below.
The default retention period for files MUST be at least the minimum file retention period, and not greater than the maximum file retention period.
If the retention date is set manually on a file, the retention period must fall within the minimum and maximum retention period.
Display current Lock Expirations.
In order to display the lock expiration on Linux the first thing you need to do is to change the share/project setting "Update access time on read" to off . Through the CLI this is "set atime=false" on the share.
Once this settings is made, the client will then display the lock time as the "atime". In my example at the top of the blog, you can see by executing "ls -lu" the file lock time is displayed.
NOTE: you can also use the find command to search for files using the "atime" This will allow to find all the locked files.
Below is an example of using the find command to list files that have an lock expiration time in the future.
It is possible to set a specific date/time that a file is locked until. You can even set the retention date on a file that currently locked (it must be a date beyond the current lock data).
NOTE: If you try to change the retention date on a specific file, the new retention date has to be greater than current retention date (and less than or equal to the maximum file retention period). This makes sense. You cannot lower the retention period for a locked file.
Now how do you manually set the retention date ? Below is an example of how it is set for a file.
Setting File retention lock
There are 3 steps that are needed to lock the file with a specific lock expiration date.
1. Touch the file and set the access date. This can be done with
"-a" to change the access date/time
"-d" or "-t" to specify the date format
2. Remove the write bit with chmod guo-2
3. execute a cmod to make the file read only.
Below is an example where I am taking a file that does not contain retention, and setting the date to January 1, 2025.
First I am going to create a file and touch it setting the atime to a future data.
ZFS File Retention authorizations is important to understand if you plan on implementing retention lock on ZFS. This feature was added in release OS8.8.46. and there is a MOS note explaining how it works (2867335.1 - Understanding ZFS Appliance File Retention Policy).
In order to start using the new features, you need to grant some new authorizations that manage who can administer the new settings. Be aware that these new authorizations are NOT granted to the administrator role. You must add them to the administrator role or create an additional role.
The image above shows the File Retention Policies that can be set and which authorization is needed to administer each setting.
NOTE: The share must be created with file retention in order to have these settings take effect. You cannot add file retention to an existing Project/Share.
Now let's go through the 3 Authorizations and what they allow the administrator to do.
retentionPeriods
When an administrator is granted the "retentionPeriods" authorization they are given the authority to administer 3 of the setting for file retention
"Minimum file retention period" - This is the minimum amount of time in the future that you can set a file retention to be. If you set the file retention date manually the retention time must be at least this far if not longer in the future. If you set the "Default file retention period", it must be at least the "Minimum file retention period" if not longer. The default value for this setting is "0 seconds".
"Maximum file retention period"- This is the maximum amount of time in the future that you can set a file retention to be. If you set the file retention date manually the retention time must at most this far if not shorter in the future. If you set the "Default file retention period", it must be at most the "maximum file retention period" if not shorter. The default value for this setting is "5 years".
"Default file retention period"- This is the default amount of time in the future that you can set a file retention to be. This value has to fall within the minimum and maximum file retention period. Unless this value is set to a value greater than "0 seconds" no files are locked by default.
NOTE : The most common method used to lock files is to set the "Default file retention period" to a value greater than '0 seconds". When this is set (and file retention is turned on) any files created will be locked for this period of time.
retentionAuto
When an administrator is granted the "retentionAuto" authorization they are given the authority to set the Automatic file retention grace period.
This value controls how long after the last access time the ZFS waits to lock the file. The default setting is "0 seconds". Until this value is set to a value greater than "0 seconds" no files are automatically locked (using the Default file retention period). The only method to lock files when this value is left as "0", the default, is to manually lock files.
NOTE: A very important item to understand is that the ZFS locks the file once it has not been updated for this period of time. If you have a process that holds a file open without writing to it, for example an RMAN channel, it may lock the file before it is closed.
Be sure to set the grace period to be longer than the amount of time a process may pause writing to a file. DO NOT set it too short. If you wish to lock a file immediately after you have finished writing to it (because you have a long grace period) you can remove the "w" bit from the files using chmod. This will bypass the grace period.
If the share is configured with mandatory retention, the automatic grace period cannot be increased, it can only be lowered.
retentionMandatory
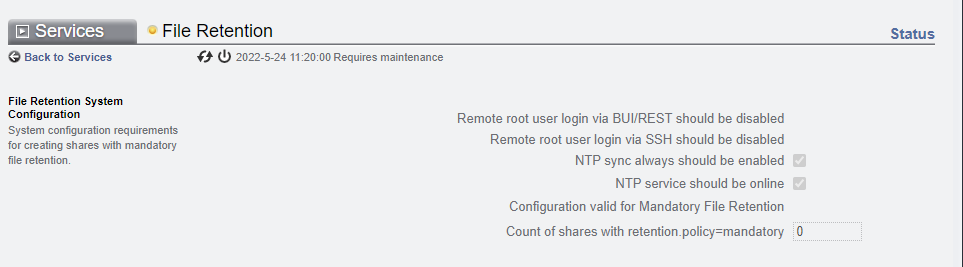
When an administrator is granted the "retentionMandatory" authorization they are given the authority to create a share with a "mandatory (no override)" file retention. This authorization is not necessary to create a "privileged override" file system.
Be aware that in order to create a file system with "mandatory" file retention the ZFS must be configured with the following settings. The "file retention" service must be running, and the file system needs to be a mirrored configuration
Remote root user login via the BUI/REST needs to be turned off in the HTTPS service
Remote root login via SSH needs to be turned off in the SSH service
NTP sync needs to be configured in the NTP service
NTP service needs to be on-line.
NOTE : You must ensure that the ZFS administrator is granted these authorizations before attempting to configure file retention. If the administration user is not granted the proper authorization you will permission errors like below.
"You are not authorized to perform this action. If you wish to proceed, contact an administrator to obtain the proper credentials.
Migrating an Oracle database from on-premise to OCI is especially challenging when the database is quite large. In this blog post I will walk through the steps to migrate to OCI leveraging an on-disk local backup copied to object storage.
The basic steps to perform this task are on on the image above.
Step #1 - Upload backup pieces to object storage.
The first step to migrate my database (acmedb) is to copy the RMAN backup pieces to the OCI object storage using the OCI Client tool.
In order to make this easier, I am breaking this step into a few smaller steps.
Step #1A - Take a full backup to a separate location on disk
This can also be done by moving the backup pieces, or creating them with a different backup format. By creating the backup pieces in a separate directory, I am able to take advantage of the bulk upload feature of the OCI client tool. The alternative is to create an upload statement for each backup piece.
For my RMAN backup example (acmedb) I am going to change the location of the disk backup and perform a disk backup. I am also going to compress my backup using medium compression (this requires the ACO license). Compressing the backup sets allows me to make the backup pieces as small as possible when transferring to the OCI object store.
Below is the output from my RMAN configuration that I am using for the backup.
RMAN> show all;

RMAN configuration parameters for database with db_unique_name ACMEDBP are:


CONFIGURE CONTROLFILE AUTOBACKUP ON;
CONFIGURE DEVICE TYPE DISK PARALLELISM 4 BACKUP TYPE TO COMPRESSED BACKUPSET;
CONFIGURE CHANNEL DEVICE TYPE DISK FORMAT   '/acmedb/ocimigrate/backup_%d_%U';
CONFIGURE COMPRESSION ALGORITHM 'MEDIUM' AS OF RELEASE 'DEFAULT' OPTIMIZE FOR LOAD TRUE;
I created a new level 0 backup including archive logs and below is the "list backup summary" output showing the backup pieces.
List of Backups
===============
Key     TY LV S Device Type Completion Time #Pieces #Copies Compressed Tag
------- -- -- - ----------- --------------- ------- ------- ---------- ---
4125    B  A  A DISK        21-JUN-22       1       1       YES        TAG20220621T141019
4151    B  A  A DISK        21-JUN-22       1       1       YES        TAG20220621T141201
4167    B  0  A DISK        21-JUN-22       1       1       YES        TAG20220621T141202
4168    B  0  A DISK        21-JUN-22       1       1       YES        TAG20220621T141202
4169    B  0  A DISK        21-JUN-22       1       1       YES        TAG20220621T141202
4170    B  0  A DISK        21-JUN-22       1       1       YES        TAG20220621T141202
4171    B  0  A DISK        21-JUN-22       1       1       YES        TAG20220621T141202
4172    B  0  A DISK        21-JUN-22       1       1       YES        TAG20220621T141202
4173    B  0  A DISK        21-JUN-22       1       1       YES        TAG20220621T141202
4174    B  0  A DISK        21-JUN-22       1       1       YES        TAG20220621T141202
4175    B  0  A DISK        21-JUN-22       1       1       YES        TAG20220621T141202
4176    B  0  A DISK        21-JUN-22       1       1       YES        TAG20220621T141202
4208    B  A  A DISK        21-JUN-22       1       1       YES        TAG20220621T141309
4220    B  F  A DISK        21-JUN-22       1       1       YES        TAG20220621T141310
From the output you can see that there are a total of 14 backup pieces
3 Archive log backup sets (two created before the backup of datafiles, and one after).
TAG20220621T141019
TAG20220621T141201
TAG20220621T141309
10 Level 0 datafile backups
TAG20220621T141202
1 controlfile backup
TAG20220621T141310
Step #1B - Create the bucket in OCI and configure OCI Client
Now we need a bucket to upload the 14 RMAN backup pieces to.
Before I can upload the objects, I need to download and configure the OCI Client tool. You can find the instructions to do this here.
Once the client tool is installed I can create the bucket and verify that the OCI Client tool is configured correctly.
The command to create the bucket is.
Below is the output when I ran it for my compartment and created the bucket "acmedb_migrate"
Step #2 - Create the manifest for the backup pieces.
The next step covers creating the "metadata.xml" for each object which is the manifest the the RMAN library uses to read the backup pieces.
Again this is broken down into a few different steps.
Step #2A - Download an configure the Oracle Database Cloud Backup Module.
The link for the instructions (which includes the download can be found here.
I executed the jar file which downloads/created the following files.
libopc.so - This is the library used by the Cloud Backup module, and I downloaded it into "/home/oracle/ociconfig/lib/" on my host
acmedb.ora - This is the configuration file for my database backup. This was created in "/home/oracle/ociconfig/config/" on my host
This information is used to allocate the channel in RMAN for the manifest.
Step #2b - Generate the manifest create for each backup piece.
The next step is to dynamically create the script to build the manifest for each backup piece. This needs to be done for each backup piece, and the command is
The script I am using to complete this uses backup information from the controlfile of the database, and narrows the backup pieces to just the pieces in the directory I created for this backup.
Step #2c - Execute the script with an allocated channel.
The next step is to execute the script in RMAN within a run block after allocating a channel to the bucket in object storage. This needs to be done for each backup piece. You create a run block with one channel allocation followed by "send" commands.
NOTE: This does not have be executed on the host that generated the backups. In the example below, I set my ORACLE_SID to "dummy" and performed create manifest with the "dummy" instance started up nomount.
Below is an example of allocating a channel to the object storage and creating the manifest for one of the backup pieces.
export ORACLE_SID=dummy
 rman target /
RMAN> startup nomount;

startup failed: ORA-01078: failure in processing system parameters
LRM-00109: could not open parameter file '/u01/app/oracle/product/19c/dbhome_1/dbs/initdummy.ora'

starting Oracle instance without parameter file for retrieval of spfile
Oracle instance started

Total System Global Area    1073737792 bytes

Fixed Size                     8904768 bytes
Variable Size                276824064 bytes
Database Buffers             780140544 bytes
Redo Buffers                   7868416 bytes

RMAN> run {
          allocate channel t1 device type sbt parms='SBT_LIBRARY=/home/oracle/ociconfig/lib/libopc.so ENV=(OPC_PFILE=/home/oracle/ociconfig/config/acmedb.ora)';
       send channel t1 'export backuppiece backup_RADB_3r10k6ec_123_1_1';
        }
2> 3> 4>
allocated channel: t1
channel t1: SID=19 device type=SBT_TAPE
channel t1: Oracle Database Backup Service Library VER=23.0.0.1

sent command to channel: t1
released channel: t1
Step #2d - Validate the manifest is created.
I logged into the OCI console, and I can see that there is a directory called "sbt_catalog". This is the directory containing the manifest files. Within this directory you will find a subdirectory for each backup piece. And within those subdirectories you will find a "metadata.xml" object containing the manifest.
Step #3 - Catalog the backup pieces.
The next step covers cataloging the backup pieces in OCI. You need to download the controlfile backup from OCI and start up mount the database.
Again this is broken down into a few different steps.
Step #3A - Download an configure the Oracle Database Cloud Backup Module.
The link for the instructions (which includes the download can be found here.
Again, you need to configure the backup module (or you can copy the files from your on-premise host).
Step #3b - Catalog each backup piece.
The next step is to dynamically create the script to build the catalog each backup piece. This needs to be done for each backup piece, and the command is
"catalog device type 'sbt_tape' backuppiece <object name>';
The script I am using to complete this uses backup information from the controlfile of the database, and narrows the backup pieces to just the pieces in the directory I created for this backup.
Step #3c - Execute the script with a configured channel.
I created a configure channel command, and cataloged the backup pieces that in the object store.
RMAN> CONFIGURE CHANNEL DEVICE TYPE 'SBT_TAPE' PARMS  'SBT_LIBRARY=/home/oracle/ociconfig/lib/libopc.so ENV=(OPC_PFILE=/home/oracle/ociconfig/config/acmedb.ora)';


  run {
           catalog device type 'sbt_tape' backuppiece 'backup_RADB_3r10k6ec_123_1_1';
          catalog device type 'sbt_tape' backuppiece 'backup_RADB_3s10k6hh_124_1_1';
          catalog device type 'sbt_tape' backuppiece 'backup_RADB_3t10k6hj_125_1_1';
          catalog device type 'sbt_tape' backuppiece 'backup_RADB_3u10k6hj_126_1_1';
          catalog device type 'sbt_tape' backuppiece 'backup_RADB_3v10k6hj_127_1_1';
          catalog device type 'sbt_tape' backuppiece 'backup_RADB_4010k6hj_128_1_1';
          catalog device type 'sbt_tape' backuppiece ' backup_RADB_4110k6hk_129_1_1';
          catalog device type 'sbt_tape' backuppiece 'backup_RADB_4210k6id_130_1_1';
          catalog device type 'sbt_tape' backuppiece 'backup_RADB_4310k6ie_131_1_1';
          catalog device type 'sbt_tape' backuppiece 'backup_RADB_4410k6ie_132_1_1';
          catalog device type 'sbt_tape' backuppiece 'backup_RADB_4510k6jh_133_1_1';
        }

old RMAN configuration parameters:
CONFIGURE CHANNEL DEVICE TYPE 'SBT_TAPE' PARMS  'SBT_LIBRARY=/home/oracle/ociconfig/lib/libopc.so ENV=(OPC_PFILE=/home/oracle/ociconfig/config/acmedb.ora)';
new RMAN configuration parameters:
CONFIGURE CHANNEL DEVICE TYPE 'SBT_TAPE' PARMS  'SBT_LIBRARY=/home/oracle/ociconfig/lib/libopc.so ENV=(OPC_PFILE=/home/oracle/ociconfig/config/acmedb.ora)';
new RMAN configuration parameters are successfully stored
starting full resync of recovery catalog
full resync complete

RMAN>
RMAN> 2> 3> 4> 5> 6> 7> 8> 9> 10> 11> 12> 13>
allocated channel: ORA_SBT_TAPE_1
channel ORA_SBT_TAPE_1: SID=406 device type=SBT_TAPE
channel ORA_SBT_TAPE_1: Oracle Database Backup Service Library VER=23.0.0.1
allocated channel: ORA_SBT_TAPE_2
channel ORA_SBT_TAPE_2: SID=22 device type=SBT_TAPE
channel ORA_SBT_TAPE_2: Oracle Database Backup Service Library VER=23.0.0.1
allocated channel: ORA_SBT_TAPE_3
channel ORA_SBT_TAPE_3: SID=407 device type=SBT_TAPE
...
...
...
channel ORA_SBT_TAPE_4: SID=23 device type=SBT_TAPE
channel ORA_SBT_TAPE_4: Oracle Database Backup Service Library VER=23.0.0.1
channel ORA_SBT_TAPE_1: cataloged backup piece
backup piece handle=backup_RADB_4510k6jh_133_1_1 RECID=212 STAMP=1107964867

RMAN>
Step #3d - List the backups pieces cataloged
I performed a list backup summary to view the newly cataloged tape backup pieces.
RMAN> list backup summary;


List of Backups
===============
Key     TY LV S Device Type Completion Time #Pieces #Copies Compressed Tag
------- -- -- - ----------- --------------- ------- ------- ---------- ---
4220    B  F  A DISK        21-JUN-22       1       1       YES        TAG20220621T141310
4258    B  A  A SBT_TAPE    21-JUN-22       1       1       YES        TAG20220621T141019
4270    B  A  A SBT_TAPE    21-JUN-22       1       1       YES        TAG20220621T141201
4282    B  0  A SBT_TAPE    21-JUN-22       1       1       YES        TAG20220621T141202
4292    B  0  A SBT_TAPE    21-JUN-22       1       1       YES        TAG20220621T141202
4303    B  0  A SBT_TAPE    21-JUN-22       1       1       YES        TAG20220621T141202
4315    B  0  A SBT_TAPE    21-JUN-22       1       1       YES        TAG20220621T141202
4446    B  0  A SBT_TAPE    21-JUN-22       1       1       YES        TAG20220621T141202
4468    B  0  A SBT_TAPE    21-JUN-22       1       1       YES        TAG20220621T141202
4490    B  0  A SBT_TAPE    21-JUN-22       1       1       YES        TAG20220621T141202
4514    B  0  A SBT_TAPE    21-JUN-22       1       1       YES        TAG20220621T141202
4539    B  0  A SBT_TAPE    21-JUN-22       1       1       YES        TAG20220621T141202

RMAN>
Step #4 - Restore the database.
The last step is restore the cataloged backup pieces. Remember you might have to change the location of the datafiles.
The process above can be used to upload and catalog both additional archive logs (to bring the files forward) and incremental backups to bring the database forward.
The latest release of ZFSSA software OS8.8.45 includes file retention locking, joining object retention lock and snapshot retention lock providing both versatility and protection of your data.
3 types of retention lock
Legal Hold
You might need to preserve certain business data in response to potential or on-going lawsuits. A legal hold does not have a defined retention period and remains in effect until removed. Once the legal hold is removed, all protected data is immediately eligible for deletion unless other retention rules still apply.
NOTE: Both Data Governance and Regulatory Compliance can be use to protect from any kind of cyber/ransomware attack.
Data Governance
Data Governance locks data sets (snapshot, object or file) for a period of time protecting the data from deletion. You might need to protect certain data sets as a part of internal business process requirements or protect data sets as part of your cyber protection strategy. Data Governance allows for adjustments in the retention strategy from privileged users.
Regulatory Compliance
Your industry might require you to retain a certain class of data for a defined length of time. Your data retention regulations might also require that you lock the retention settings. Regulatory compliance only allows you to increase the retention time if at all. Regulatory Compliance is the most restrictive locking strategy and often does not allow anyone, even an administrator, to make changes affecting retention.
3 implementations of retention lock
Object storage
Object storage retention is managed through the OCI client tool and Object retention is enforced through the API. Current retention settings are applied to all objects when they are accessed. Adding a rule immediately takes affect for all objects.
Administration of retention rules can be managed through the use of RSA certificates. It is recommended to create a separation of duties between a security administrator, and the object owner.
Retention on object storage is implemented in the following way based on the retention lock type.
Legal hold
Legal holds are implemented by placing an indefinite retention rule on a bucket. Creating this rule ensures that all objects within the bucket can not be deleted, and cannot be changed. Only new objects can be stored.
Data Governance
Data Governance is implemented by placing a time bound retention rule on a bucket. The rule sets a lock on all objects for a set length of time. The rule can be later deleted. For cyber protection it is recommended to implement this with a separation of duties.
Regulatory Compliance
Regulatory Compliance is implemented by placing a locked time bound retention rule on a bucket with a grace period. When a locked time bound retention rule is created it immediately takes effect, but there is a grace period of at least 14 days before the rule becomes permanent which allows you to test the rule. Once the grace period expires (defined by a specific date and time) the rule cannot be deleted even by an administrator.
Snapshots
Snapshot locking is managed the BUI, or CLI. Individual snapshots can be locked, and scheduled snapshots can be created and automatically locked. Permission for controlling snapshot locking can be assigned to ZFSSA users allowing you to create a separation of duties. Shares or projects cannot be removed if they contained locked snapshots.
Retention on snapshots is implemented in the following way based on the retention lock type.
Legal hold
Because snapshots only affect data that is on the project/share when the snapshot is taken, it is not possible to lock all new data as it is written. Manual snapshots can be used to provide a mechanism to capture the content of a share as of the current time. This could suffice for a Legal Hold. A manual snapshot can be created with a "retention lock" of UNLOCKED creating a snapshot that cannot be removed. The only way to remove the snapshot is by changing the "retention lock" to OFF, unlocking it for deletion. This creates a hold on the current data for an indefinite period of time. Permissions for releasing the hold on a the snapshot can be assigned to specific individual account allowing for a separation of duties.
Data Governance
Data governance of snapshots is handled through the use of scheduled locked snapshots and enabling the retention policy for scheduled snapshots. A LOCKED schedule is created with both a retention, and "keep at most" setting. This allows you to manage snapshots for a locked number of snapshots, while automatically cleaning up snapshots that are past the retention number. The snapshots within the retention number can not be unlocked, and the schedule can not be removed as long as there is data contained in the snapshot.
Regulatory Compliance
Regulatory compliance of snapshots is handled through the same method as Data Governance. Snapshots cannot be be removed when they are locked, and the schedule remains locked.
File Retention
File retention is set at the share or project level and controls updating and deletion of all data contained on the share/project. A default file retention length is set and all new files will inherit the default setting in effect when the file is created. It is also possible to manually set the retention on a file increasing the default setting inherited by the file.
Legal Hold
Legal Holds on files is implemented by manually increasing the retention on individual files. Because a Legal Hold may be required for an indefinitely period of time, it is recommended to periodically extend the retention on files needed within the legal hold. This allows the files retention to expire once the need the for the Legal Hold has passed.
Data Governance
Data governance is implemented by creating a NEW project and share with a file retention policy of privileged. Privileged mode allows you to create a default retention setting for all new files, and change that setting (longer or shorter) going forward. Files created inherit the retention setting in effect when they are created. Retention can also be adjusted manually to be longer by changing the unlock timestamp. Projects/shares cannot be deleted as long as they have locked files remaining on them.
Regulatory Compliance
Regulatory compliance is implemented by creating a NEW project and share with a file retention policy of mandatory (no override). Mandatory mode does not allow you to decrease the default file retention. Retention can also be adjusted manually to be longer by changing the unlock timestamp. Regulatory Compliance uses the same mechanisms as Data Governance but is much more restrictive. The project/share cannot be removed when locked files exist, and the storage pool cannot be removed when locked files exist within the pool. This mode also requires an NTP server be utilized, and root is locked out of any remote access.
The best way to explore these new features is by using the ZFSSA image in OCI to test different scenarios.