Showing posts with label encryption. Show all posts

Tuesday, January 9, 2024

RMAN create standby database - Restore or Duplicate ?

RMAN create standby database - Are you like me and use "restore database" for large databases, or like most people (based on my Linkedin poll) and use "duplicate for standby"? 

The table below shows you the 3 main differences between the 2 methods.


This post started with a discussion within my team around which method you use. I, being of the "restore database" camp, didn't realize how commonly used "duplicate for standby" is. 
I have also dug through the documentation, and there is no common method that is mentioned. Even the 21c documentation for creating a standby database doesn't mention using the duplicate command.
I also was pointed to a MOS note that goes through creating a standby directly from the primary across multiple nodes, and with encryption.  Creating a Physical Standby database using RMAN restore database from service (Doc ID 2283978.1)

Well in this post, I will explain why "restore database" has been my preference. 

NOTE : If you are creating a standby database that is encrypted and the source database is not (creating a standby database in OCI for example) then I have instructions at the end of this post for how to use "Restore Database" to create a hybrid standby database.

Duplicate database for standby


From the poll I ran, this is the most common way to create a standby database.  It is probably the simplest way also because a lot of the configuration of the standby database is done automatically as part of the automated process.
Below is the simplified steps to perform this process.

PRE work

  1. Create simple initfile on the standby host.  The real SPFILE will be brought over as part of the duplication process.  This may contain location parameters for datafiles and redo logs if different from the primary.
  2. Create directories on the standby host.  This includes the audit directory, and possibly the database file directories if they are different from the host.
  3. Startup nomount.

Duplicate 

The duplicate process automatically performs these major steps using the standby as an auxiliary instance.

  1.  Create an SPFILE. The process creates an SPFILE for the standby and sets parameters for the standby.
  2. Shutdown/Startup standby database. This will use the newly created SPFILE during the rest of the processing
  3. Restore backup controlfile for standby database. The controlfile for the standby database is put in place, and the spfile is updated to it's location
  4. Mount controlfile . Mount the controlfile that was restored
  5. Restore database . Restore the datafiles files for the CDB and PDBs to their new location on the standby
  6. Switch datafile . Uses the new location of the datafiles that were restored.
  7. Create standby redo logs.
  8. Set parameters for standby database. The parameters necessary to communicate with the primary database are set.
  9. Put standby in recover mode . By this time, you should have set the primary database to communicate with the standby database.

NOTES

If you noticed above, I highlighted the second step which forces a shutdown/startup of the standby database. Because of this step, it is not possible to use this method and restore across nodes in a RAC database.  This can cause the duplicate operation to take much longer for larger databases.
Then in step #5 you can see that the "Restore Database" is automatic in the processing and it is not possible to perform a "restore as encrypted" if you are migrating to OCI from a non-TDE database.  The duplicate process does support "restore as encrypted", but only for creating a new Database, not a standby database.

Restore Database


This is the method that I've always used.  There is no automation, but it gives you much more control over the steps.  

PRE work

  1. Restore copy of prod SPFILE to standby host.  For this process, it doesn't matter if it is an intifile or spfile.  In this file you set all the parameters that are needed for the standby database to communicate with the primary and store datafiles/logfiles in the correct location.
  2. Create directories on the standby host.  This includes the audit directory, and possibly the database file directories if they are different from the host.
  3. Startup nomount.
  4. Create copy of primary controlfile for standby. This will be used for the standby database, and should contain the backup catalog  of the primary database, and the RMAN settings including the  channel definitions.
  5. Copy standby controlfile to standby host. The controlfile is copied to the standby host, and may be put in ASM at this point. Ensure the spfile points to the controlfile (and/or srvctl).
  6. Alter database mount.  Mount the controlfile. 
  7. Start up ALL nodes in the RAC cluster in mount mode.  This will allow you to restore the database across ALL nodes in the RAC cluster, and include all the networking from these nodes.  For a large database hosted on multiple DB nodes this can make a HUGE difference when restoring the database.
  8. Create (or copy) TDE wallet.  If the standby database is going to be TDE, then include the wallet if the primary is TDE, or create a new wallet and key if the standby database is going to be TDE.

Restore Database 

The restore process is a manual process

  1.  RMAN Connect to database (and possibly RMAN catalog). Connect to the database and make sure you have access to the backups. For ZDLRA this may mean connecting to the RMAN catalog.
  2. Restore Database (as encrypted). This will restore the database to the new location.  With Restore Database, the database can be encrypted during the restore operation.  With 19c it is supported to have the standby database be encrypted without the primary database being encrypted (Hybrid dataguard).
  3. Switch datafile . Uses the new location of the datafiles that were restored.
  4. Recover database. This will use the archive logs that are cataloged to bring the standby database forward
  5. Create standby redo logs.
  6. Set parameters for standby database. The parameters necessary to communicate with the primary database are set.
  7. Put standby in recover mode . By this time, you should have set the primary database to communicate with the standby database.


NOTES

With the restore database, there are 2 sections I highlighted and these are the advantages that I love about using this method.
  • RMAN is restoring across multiple nodes in a RAC cluster which can make the restore operation much faster.
  • Restore as encrypted allows you take a database that may have TDE partially implemented, or not implemented and create a new standby database that is encrypted. With the duplicate method, TDE would have to be implemented separately.
If you are restoring a VERY large database (200 TB for example) that was not TDE from object storage to the Exadata Cloud Service, both of these advantages can make a HUGE difference when creating a standby database.

Comparison

The chart below compares the the differences between "Duplicate Database" and "Restore Database".

WARNING: When using a ZDLRA for backups, it is NOT recommended to use the "Restore Database" to clone a database as a new copy. Registering the restored copy can cause issues with the RMAN catalog because the "restore database" leaves entries in the RC_SITE table.


Data Guard Hybrid Cloud Configuration

The ability to create a hybrid cloud configuration was introduced in Version 19.16 and there is a great blog post from Glen Hawkins explaining this feature.
This feature allows you have your Primary database remain unencrypted (no ASO license), but still have the standby database in OCI be TDE encrypted.

In this section I want to talk about how you can use "Restore Database as Encrypted" to implement this configuration quickly.

If you want to implement this feature using "Duplicate for standby" you have to separately encrypt the datafiles once they are restored in OCI.  This can be done online, or offline, but it is still a time consuming task.

Prepare the primary and future standby databases

The first step is prepare the primary database and future standby database by creating a wallet file and setting encryption keys.  There is a great video put together by Peter Wahl (PM for TDE and OKV) that goes through a lot of the steps.

Below is a summary of the steps you need to perform.  You can follow along the steps in Peter's video and I will point out where in the video you will find each step.

  • Create the directories on the primary (3:40) -  Directories are specified in the video and need to be created on all nodes in a RAC cluster.
  • Create the directories on the standby database (4:18) -Directories are specified in the video and need to be created on all nodes in a RAC cluster.
  • Set the wallet_root in the primary (4:25) - This is set in the SPFILE only
  • Set tablespace_encryption to decrypt_only on primary (4:40) -  This is set in the SPFILE only
  • Set the default algorithm to AES256 on primary (4:50) - This is set in the SPFILE only
  • Set wallet_root on standby, tablespace_encryption to auto_enable, and default algorithm on standby --  This is set in the initfile that you create prior to performing the restore.  This step is different from the video because there is no standby at this point.
  • Bounce the primary database (5:50) - This can be in a rolling manner.
  • Create a password protected wallet on the primary (7:25) - This gets created in the default location specified from WALLET_ROOT
  • Create an auto open wallet on the primary (7:30) - This will make it automatically open for the database.
  • Set the encryption keys in the primary (7:40) - The keys will be created so that they can be used when restoring the datafiles on the standby database.
  • Copy the wallets from the primary to the standby (7:55) - This provides the standby database with the keys to encrypt.


Thursday, September 21, 2023

ZFS storing encryption keys in Oracle Key Vault (OKV)

 ZFS can be configured to use Oracle Key Vault (OKV)  as a KMIPs cluster to store it's encryption keys. In this blog post I will go through how to configure my ZFS replication pair to utilize my OKV cluster and take advantage of the Raw Crypto Replication mode introduced in 8.8.57.


OKV Cluster Environment:

First I am going to describe the environment I am using for my OKV cluster.

I have 2 OKV servers, OKVEAST1 ( IP:10.0.4.230)  and OKVEAST2 (IP: 10.0.4.254). These OKV servers are both running 21.6 (the current release as of writing this post).


ZFS replication Pair:

For my ZFS pair, I am using a pair of ZFS hosts that I have been running for awhile.  My first ZFS host is "testcost-a" (IP: 10.0.4.45)  and my second ZFS host is "zfs_s3"( IP: 10.0.4.206).  Both of these servers are running the 8.8.60 release.

For my replication, I already have "testcost-a" configured as my upstream, and "zfs_s3" configured as the downstream.

Steps to configure encryption using OKV

Documentation:

The documentation I am using to configure ZFS can be found in the 8.8.x Storage Administrators guide.  I did look through the documentation for OKV, and I didn't find anything specific that needs to be done when using OKV as a KMIP server.

Step #1 - Configure endpoints/wallets in OKV

The first step is to create 2 endpoints in OKV and assign a shared wallet between these 2 endpoints. 

 I am starting by creating a single wallet that I am going to use share the encryption keys between my 2 ZFS replication pairs.  I


The next step after creating the wallet is to create the 2 endpoints. Each ZFS host is an endpoint. Below is the screenshot for adding the first node.


After creating both endpoints I see them in the OKV console.


Then I click on each endpoint and ensure that 

  • The default wallet for each endpoint is the "ZFS_ENCRYPTION_KEYS" wallet
  • The endpoint has the ability to manage this wallet.


Then I go back to endpoint list in the console and save the "enrollment token" for each node and logout.

Server                    Enrollment Token

ZFS_S3        FdqkaimSpCUBfVqV

TESTCOST-A         uy59ercFNjBisU12

I then go to the main screen for OKV and click on the enrollment token download


Enter the Enrollment Token and click on "Submit Token"


You see that the token is validated. Then click on Enroll and it will download the token "okvclient.jar" which I am renaming to okvclient_{zfs server}.zip.  This will allow me to extract the certificates.

When completed, I have enrolled the endpoints and I am ready to add them to the ZFS.


Step #2 - Add the Certificates 

When I look at the .jar files that were created for the endpoints I can see all the files that are included in the endpoint enrollment. I need to add the certificates to the ZFS servers.  I can find those in the "ssl" directory contained in .jar file.


I start by uploading the "key.pem" for my first ZFS "testcost-a" in the Configuration=>SETTINGS=>Certificates=>System section of the BUI.


After uploading it I then add the "cert.pem" certificate in system also.


After uploading, I clicked in the pencil to see the details for the certificate.  

NOTE: The IP Address is the primary node in my OKV cluster.

Under Certificates=>Trusted I uploaded the CA.pem certificate.


After uploading this certificate, I click on the pencil and select "kmip" identifying this certificate to be used for the KMIP service.


The certificate should now appear as a trusted KMIP services certificate.


I can now upload the certificates for my other ZFS server (zfs_s3) the same way.


Step #3 - Add the OKV/KMIP service

I now navigate to the Shares=>ENCRYPTION=>KMIP section of the BUI to add the KMIP servers to my first ZFS host.  Because I have 2 possible KMIP servers (I am using an OKV cluster), I am going to uncheck the "Match Hostname against certificate subject" button.  I left the default to destroy the key when removing it from the ZFS.

I added the 2 OKV servers (if I had a more than 2 nodes in my cluster I would add those nodes also).  I added the port used for KMIP services on OKV (5696), and I chose the "Client TLS Authentication Certificate" I uploaded in the previous step (FLxULFbeMO).


I perform the same process on my second ZFS so that the paired ZFS servers are all configured to communicate with my OKV cluster to provide KMIP services.

NOTE: If you want to get the list of OKV hosts in the cluster you can look in the .jar file within the conf=>install.cfg file to see the OKV servers details. Below is the contents of my file.


Once I add the KMIP configuration to both of my ZFS servers I can look at my endpoints in OKV and see that they are both ENROLLED, and that OKV knows the IP address of my ZFS servers.


Step #4 - Add one or more keys.

On my upstream ZFS, I click on the "+" to add a new key and save it.


After adding it, the key appears in this section.


Step #5 - Add the keys to the shared wallet

I noticed that even though the wallet is the default wallet for the endpoints, the key did not get added to the wallet. I can see that both nodes have access to manage the wallet.


I clicked on the wallet, and then the "Add Contents", from there I am adding my new key to the wallet.


And now I login into the second ZFS (zfs_s3) and add the same key.  Make sure you add the same named key on the second ZFS so that they can match.

Step #6 - Create a new encrypted project/share

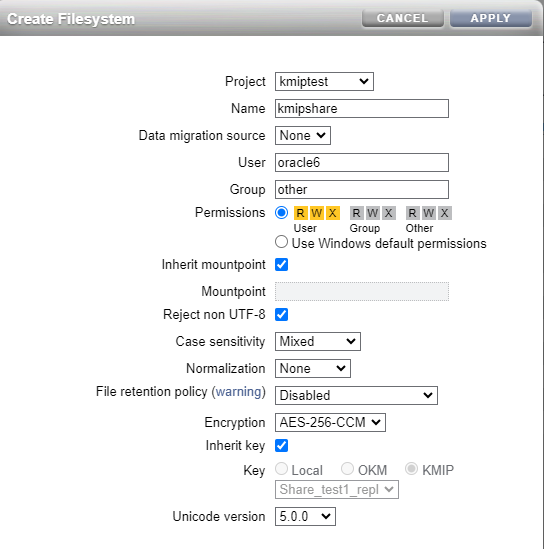
On my first ZFS (upstream - testcost-a) I am creating a new project and share that is encrypted using the key from the KMIP service.


Then within the share, I configure replication to my paired ZFS.
And now I am creating a share within this project.


Step #7 - Configure replication

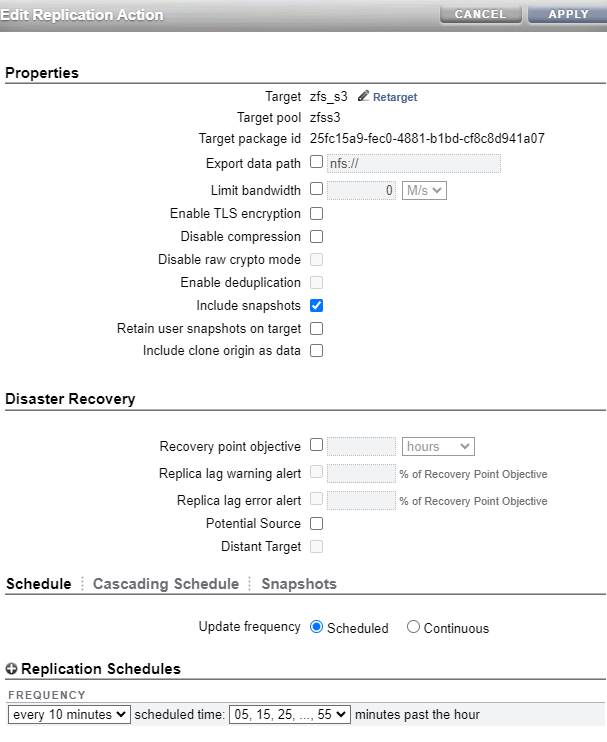
Finally I configured replication from my project in my upstream (testcost-a) to my downstream (zfs_s3).  Below are the settings for my replication processing to send a snapshot every 10 minutes.  Notice that I made sure that I did NOT disable raw Crypto Mode (which is what I am using for this replication).  You can follow this link to learn more about Raw Crypto Replication.


Result:


I now have replication on my encrypted share working between my upstream and downstream.  With this new feature, the blocks are sent in their original encrypted format, and are stored on the downstream encrypted.  Since both ZFS servers can access the encryption key, both servers are able to decrypt the blocks.

I did test shutting down one of my OKV hosts, and found that the ZFS severs were able to successfully connect to the surviving node.

I even mounted the share, stored some files, replicated it, mounted a snapshot copy, and ensured that both ZFS servers presented the shares readable.

Wednesday, May 10, 2023

ZDLRA real-time redo demonstrated

 One of the key features of the ZDLRA is the ability to capture changes from the database "real-time" just like a standby database does. In this blog post I am going to demonstrate what is happening during this process so that you can get a better understanding of how it works.

ZDLRA Real-time Redo


If you look at the GIF above, I will explain what is happening, and show what happens with a demo of the process.

The ZDLRA uses the same process as a standby database.  In fact if you look at the flow of the real-time redo you will notice the redo blocks are sent to BOTH the local redo log files, AND to the staging area on the ZDLRA.  The staging area on the ZDLRA acts just like a standby redo does on a standby database.

As the ZDLRA receives the REDO blocks from the protected database they are validated to ensure that they are valid Oracle Redo block information.  This ensures that a man-in-the-middle attack does not change any of the backup information.  The validation process also assures that if the database is attacked by ransomware (changing blocks), the redo received is not tainted.


The next thing that happens during the process is the logic when a LOG SWITCH occurs.  As we all know, when a log switch occurs on a database instance, the contents of the redo log are written to an archive log.  With real-time redo, this causes the contents of the redo staging area on the ZDLRA (picture a standby redo log) to become a backup set of an archive log.  The RMAN catalog on the ZDLRA is then updated with the internal location of the backup set.


Log switch operation

I am going to go through a demo of what you see happen when this process occurs.

ZDLRA is configured as a redo destination

Below you can see that my database has a "Log archive destination" 3 configured.  The destination itself is the database on the ZDLRA (zdl9), and also notice that the log information will be sent for ALL_ROLES, which will send the log information regardless if it is a primary database or a standby database.
Archive Dest


List backup of recent archive logs from RMAN catalog


Before I demonstrate what happens with the RMAN catalog, I am going to list out the current archive log backup. Below you see that the current archive log backed up to the ZDLRA has the "SEQUENCE #10".

archive log backups prior

Perform a log switch

As you see in the animation at the top of the post, when a log switch occurs, the contents of the redo log in the "redo staging area" are used to create an archive log backup that is stored and cataloged.  I am going to perform a log switch to force this process.

Log switch


List backup of archive logs from RMAN catalog

Now that the log switch occurred, you can see below that there is a new backup set created from the redo staging area.
There are a couple of interesting items to note when you look at the backup set created.

archive logs after


  1. The backup of the archive log is compressed.  As part of the policy on the ZDLRA you have the option to have the backup of the archive log compressed when it is created from the "staged redo". This does NOT require the ACO (Advanced Compression) license. The compressed archive log will be sent back to the DB compressed during a restore operation, and the DB host will uncompress it.  This is the default option (standard compression) and I recommend changing it.  If you decide to compress, then MEDIUM or Low is recommended. Keep this in mind that he this may put more workload on the client to uncompress  the backup sets which may affect recovery times.  NOTE: When using TDE, there will be little to no compression possible.
  2. The TAG is automatically generated. By looking at the timestamp in the RMAN catalog information, you can see that the TAG is automatically generated using the timestamp to make it unique.
  3. The handle begins with "$RSCN_", this is because the backup piece was generated by the ZDLRA itself, and archivelog backup sets will begin with these characters.

Restore and Recovery using partial log information


Now I am going to demonstrate what happens when the database crashes, and there is no time for the database to perform a log switch.

List the active redo log and current SCN

Below you can see that my currently active redo log is sequence # 12.  This is where I am going to begin my test.

begin test


Create a table 

To demonstrate what happens when the database crashes I am going to create a new table. In the table I am going to store the current date, and the current SCN. Using the current SCN we will be able to determine the redo log that contains the table creation.

table create


Abort the database


As you probably know, if I shut down the database gracefully, the DB will automatically clean out the redo logs and archive it's contents. Because I want to demonstrate what happens with crash I am going to shut the database down with an ABORT to ensure the log switch doesn't occur.  Then start the database mount so I can look at the current redo log information

abort


Verify that the log switch did not occur


Next I am going to look at the REDO Log information and verify that my table creation (SCN 32908369) is still in the active redo log and did not get archived during the shutdown.

Log switch doesn't occur

Restore the database


Next I am going to restore the database from backup.


restore

Recover the database


This is where the magic occurs so I am going to show that happens step by step.

Recover using archive logs on disk


The first step the database does is to use the current archive logs to recover the database. You can see in the screenshot below that the database recovers the database using archive logs on disk up to sequence #11 for thread 1.  This contains all the changes for this thread, but does not include what is in the REDO log sequence #12.  Sequence #12 contains the create table we are interested in.

archives on disk

Recover using partial redo log


This step is where the magic of the ZDLRA occurs.  You can see from the screen shot below that the RMAN catalog on the ZDLRA returns the redo log information for Sequence #12 even though it was never archived. The ZDLRA was able to create an archive log backup from the partial contents it had in the Redo Staging area.

rtr recovery

Open the database and display table contents.


This is where it all comes together.  Using the partial redo log information from Redo Log sequence #12, you can see that when the database is opened, the table creation transaction is indeed in the database even though the redo did not become an archive log.
'


Conclusion : I am hoping this post gives you a better idea of how Real-time redo works on the ZDLRA, and how it handles recovering transactions after a database crash

Friday, April 23, 2021

Enrolling my ExaCC RAC database using REST APIs

 This post will continue the process of automating the enrollment of my RAC database using the OKV REST API, and some automation scripts. the steps to create the scripts are in my previous post.


NOTE: These steps are for ExaCC specific.  If you want to learn about configuring OKV with Autonomous Database (ADB) when using ExaCC, the product manager, Peter Wahl has a great blog post on this topic.  He also has videos as part of the "Ask Tom" series if you want to learn more about OKV 21c, or just OKV in general.

The first step is to download the zip file I created in the previous post. I downloaded it onto the first DB host in my RAC cluster.  I unzipped it into /home/oracle/okv.

Below is what I am starting with.

.
 |-lib
 | |-okvrestcli.jar
 |-bin
 |-conf
 | |-okvrestcli_logging.properties
 | |-okvrestcli.ini
 | |-ewallet.p12.lck
 | |-ewallet.p12
 | |-cwallet.sso.lck
 | |-cwallet.sso
 | |-okvclient.ora
 |-setenv.sh
 |-run-me.sh

STEP #1 - Set the environment

First I am going to set my environment to the database instance I want to configure (jckey1), and then I am going to source the environment for my OKV install.


[oracle@exacc1]$ cd /home/oracle/okv
[oracle@exacc1]$ . oraenv
ORACLE_SID = [jckey1] ? jckey1
The Oracle base remains unchanged with value /u02/app/oracle
[oracle@exacc1]$ . ./setenv.sh
 
 
create environment variables OKV_RESTCLI_HOME and OKC_RESTCLI_CONFIG  
 
$OKV_RESTCLI_HOME    :  /home/oracle/okv 
$OKV_RESTCLI_CONFIG  :  /home/oracle/okv/conf/okvrestcli.ini 
 
Adding $OKV_RESTCLI_BIN to the $PATH  


STEP #2 - Execute the enrollment creation script

The next step is to execute the run-me.sh that I created in the previous post. This will create the enrollment script. At the end of the output you will see the script it creates (okv-ep.sh).

NOTE: It will default to my DBNAME for the wallet name.

[oracle@exacc1]$ ./run-me.sh
executing script with $OKV_RESTCLI_HOME=/home/oracle/okv DB Name is identified as jckey and ORACLE_SID is set to jckey1 setting Press enter to keep this default [jckey], or enter the DB Name DB Name [enter for Default] : Using DB Name : jckey #!/bin/bash mkdir -pv /u02/app/oracle/admin/jckey/wallet mkdir -pv /u02/app/oracle/admin/jckey/wallet/okv okv manage-access wallet create --wallet JCKEY --description "wallet for database JCKEY" --unique FALSE okv admin endpoint create --endpoint JCKEY1_on_exacc1 --description "exacc11, 10.136.106.36" --type ORACLE_DB --platform L INUX64 --unique FALSE okv manage-access wallet set-default --wallet JCKEY --endpoint JCKEY1_on_exacc1 expect << _EOF set timeout 120 spawn okv admin endpoint provision --endpoint JCKEY1_on_exacc1 --location /u02/app/oracle/admin/jckey/wallet/okv --auto -login FALSE expect "Enter Oracle Key Vault endpoint password: " send "change-on-install\r" expect eof _EOF

STEP #2 - Execute the enrollment script

[oracle@exacc1]$ ./okv-ep.sh
{
  "result" : "Success"
}
{
  "result" : "Success"
}
{
  "result" : "Success"
}
spawn okv admin endpoint provision --endpoint JCKEY1_on_exacc1 --location /u02/app/oracle/admin/jckey/wallet/okv --auto-login FALSE
Enter Oracle Key Vault endpoint password: 
{
  "result" : "Success",
  "value" : {
    "javaHome" : "/u02/app/oracle/product/19.0.0.0/dbhome_8/jdk"
  }
}


STEP #3 - We can verify what the enrollment script did


I am first going to look under $ORACLE_BASE/admin/$DBNAME/wallet where it placed the okv client.
[oracle@exacc1]$ pwd
/u02/app/oracle/admin/jckey/wallet
[oracle@exacc1]$ find . | sed -e "s/[^-][^\/]*\// |/g" -e "s/|\([^ ]\)/|-\1/"
.
  |-okv
 | |-bin
 | | |-okveps.x64
 | | |-okvutil
 | | |-root.sh
 | |-ssl
 | | |-ewallet.p12
 | |-csdk
 | | |-lib
 | | | |-liborasdk.so
 | |-jlib
 | | |-okvutil.jar
 | |-conf
 | | |-okvclient.ora
 | | |-logging.properties
 | | |-okvclient.lck
 | |-lib
 | | |-liborapkcs.so
 | |-log
 | | |-okvutil.deploy.log


Now I am going to verify in OKV and I can see the wallet got created for my database.

And I am going to look at the endpoint, and verify the default wallet is set.


STEP #4 Execute root.sh (only if this is the first install on this host).


I execute the root.sh script in the /bin directory as root.

[root@exacc1]# ./root.sh
Creating directory: /opt/oracle/extapi/64/hsm/oracle/1.0.0/
Copying PKCS library to /opt/oracle/extapi/64/hsm/oracle/1.0.0/
Setting PKCS library file permissions
Installation successful.


STEP #5 - Verify we can contact the OKV server


The next step is to execute the okvutil list command to verify we can contact the OKV host, and that the default wallet is configured.

[oracle@exacc1]$ ./okvutil list
Enter Oracle Key Vault endpoint password: 
Unique ID                               Type            Identifier
9E8BD892-D799-44B7-8289-94447E7ACC54    Template    Default template for JCKEY1_ON_ECC5C2N1

STEP #6 - change the OKV endpoint password 

[oracle@exacc1]$ /u02/app/oracle/admin/jckey/wallet/okv/bin/okvutil changepwd -t wallet -l /u02/app/oracle/admin/jckey/wallet/okv/ssl/
Enter wallet password: change-on-install
Enter new wallet password: {my new password}
Confirm new wallet password:  {my new password}
Wallet password changed successfully

STEP #7 Install the client and change the password on all nodes.


I followed the steps above on the other 3 nodes to install the client and change the password.

STEP #8 Upload the keys from the wallet file.

I uploaded the keys from the shared wallet files on ACFS.
[oracle@exacc1]$ /u02/app/oracle/admin/jckey/wallet/okv/bin/okvutil upload -t wallet -l /var/opt/oracle/dbaas_acfs/jckey/wallet_root/tde -v 2 -g JCKEY
okvutil version 21.1.0.0.0
Endpoint type: Oracle Database
Configuration file: /u02/app/oracle/admin/jckey/wallet/okv/conf/okvclient.ora
Server: 10.136.102.243:5696 
Standby Servers: 
Uploading from /acfs01/dbaas_acfs/jckey/wallet_root/tde
Enter source wallet password: 
Enter Oracle Key Vault endpoint password: 
ORACLE.SECURITY.DB.ENCRYPTION.Ab8Sv6Ezs08fv9Sy7/zZB8oAAAAAAAAAAAAAAAAAAAAAAAAAAAAA
ORACLE.SECURITY.KM.ENCRYPTION.Ab8Sv6Ezs08fv9Sy7/zZB8oAAAAAAAAAAAAAAAAAAAAAAAAAAAAA
ORACLE.SECURITY.KB.ENCRYPTION.
ORACLE.SECURITY.ID.ENCRYPTION.
ORACLE.SECURITY.KM.ENCRYPTION.ATQdCFHhVk9Yv7er6uZtDf8AAAAAAAAAAAAAAAAAAAAAAAAAAAAA
ORACLE.SECURITY.DB.ENCRYPTION.ATQdCFHhVk9Yv7er6uZtDf8AAAAAAAAAAAAAAAAAAAAAAAAAAAAA
ORACLE.SECURITY.DB.ENCRYPTION.MASTERKEY.BFF45EC14E46013BE053246A880A5564
ORACLE.SECURITY.DB.ENCRYPTION.MASTERKEY

Uploaded 2 TDE keys
Uploaded 0 SEPS entries
Uploaded 0 other secrets
Uploaded 4 opaque objects

Uploading private persona
Uploading certificate request
Uploading trust points

Uploaded 1 private keys
Uploaded 1 certificate requests
Uploaded 0 user certificates
Uploaded 0 trust points

Upload succeeded

STEP #9 Copy current wallet, and add OKV credentials.

Now you copy the current wallet file (from the ACFS location) to the tde directory (new OKV install)  next to the OKV install.
 In my case since my OKV client is installed in $ORACLE_BASE/admin/jckey/wallet (which will be the WALLET_ROOT),  the tde directory will be the file location for wallets.
I am also adding my password credentials to the local wallet.

NOTE: "OKV_PASSWORD" is used to open the wallet. "HSM_PASSWORD" is used to access the OKV server(s).


mkdir /u02/app/oracle/admin/jckey/wallet/tde_seps
mkdir /u02/app/oracle/admin/jckey/wallet/tde
cp /var/opt/oracle/dbaas_acfs/jckey/wallet_root/tde/* /u02/app/oracle/admin/jckey/wallet/tde/.
ADMINISTER KEY MANAGEMENT ADD SECRET 'Welcome1+' FOR CLIENT 'OKV_PASSWORD' TO LOCAL AUTO_LOGIN KEYSTORE '/u02/app/oracle/admin/jckey/wallet/tde_seps';
ADMINISTER KEY MANAGEMENT ADD SECRET 'Welcome1+' FOR CLIENT 'HSM_PASSWORD' TO AUTO_LOGIN KEYSTORE '/u02/app/oracle/admin/jckey/wallet/tde';


STEP # 10 Change the WALLET_ROOT

Since WALLET_ROOT can only be changed with a restart, I am going to shut down all instances in the cluster and perform the next few steps on the first node only.

SQL> alter system set WALLET_ROOT='/u02/app/oracle/admin/jckey/wallet' scope=spfile;

System altered.

SQL> shutdown immediate
startup mount;
ORA-01109: database not open


Database dismounted.
ORACLE instance shut down.
SQL> 
alter system set tde_configuration='KEYSTORE_CONFIGURATION=OKV|FILE' scope=both;

select b.name pdb_name,wrl_type,
wrl_parameter,
status,wallet_type,
keystore_mode,
fully_backed_up
from v$encryption_wallet a,v$containers b
where a.con_id = b.con_id(+);SQL> SQL> SQL> SQL> SQL> SQL> SQL>   2    3    4    5    6    7  

PDB Name   Type       WRL_PARAMETER					 Status 			WALLET_TYPE	     KEYSTORE Backed Up
---------- ---------- -------------------------------------------------- ------------------------------ -------------------- -------- ----------
CDB$ROOT   FILE       /u02/app/oracle/admin/jckey/wallet/tde/		 OPEN				AUTOLOGIN	     NONE     YES
CDB$ROOT   OKV								 OPEN_NO_MASTER_KEY		OKV		     NONE     UNDEFINED
PDB$SEED   FILE 							 OPEN				AUTOLOGIN	     UNITED   YES
PDB$SEED   OKV								 OPEN_NO_MASTER_KEY		OKV		     UNITED   UNDEFINED
JCKPDB	   FILE 							 OPEN				AUTOLOGIN	     UNITED   YES
JCKPDB	   OKV								 OPEN_NO_MASTER_KEY		OKV		     UNITED   UNDEFINED

SQL> shutdown immediate
startup ;


STEP # 11 Combine the local wallet File and OKV. 

  Next I need to migrate the keys using the local wallet. Note this will rekey the database.

ADMINISTER KEY MANAGEMENT SET ENCRYPTION KEY IDENTIFIED BY "-okv key" MIGRATE USING "-local wallet key-" WITH BACKUP;

STEP # 12 restart the instance and make sure the wallet open.


PDB Name   Type       WRL_PARAMETER                              Status              WALLET_TYPE     KEYSTORE Backed Up
---------- ---------- -------------------------------            ------------------- --------------- --------- ----------
CDB$ROOT   FILE       /u02/app/oracle/admin/jckey/wallet/tde/    OPEN                AUTOLOGIN       NONE     YES
CDB$ROOT   OKV                                                   OPEN                OKV             NONE     UNDEFINED
PDB$SEED   FILE                                                  OPEN                AUTOLOGIN       UNITED   YES
PDB$SEED   OKV                                                   OPEN                OKV             UNITED   UNDEFINED
JCKPDB     FILE                                                  OPEN                AUTOLOGIN       UNITED   YES
JCKPDB     OKV                                                   OPEN                OKV             UNITED   UNDEFINED


STEP # 13 rebuild the local wallet with the password

I deleted the original wallet files from the "tde" and "tde_seps" directories and recreated them using the exact same steps from step #9. The only addition is that I needed to create the wallet first


ADMINISTER KEY MANAGEMENT ADD SECRET 'Welcome1+' FOR CLIENT 'OKV_PASSWORD' TO LOCAL AUTO_LOGIN KEYSTORE '/u02/app/oracle/admin/jckey/wallet/tde_seps';
ADMINISTER KEY MANAGEMENT ADD SECRET 'Welcome1+' FOR CLIENT 'HSM_PASSWORD' TO AUTO_LOGIN KEYSTORE '/u02/app/oracle/admin/jckey/wallet/tde';

I then pushed executed the same commands to create the wallets on all the nodes in the clusters in the same location .

STEP # 14 - Bounce the database.

I bounced the database and made sure the wallet was open on all 4 nodes. Done.


INST_ID    PDB Name Type  WRL_PARAMETER                           Status               WALLET_TYPE   KEYSTORE Backed Up
-------- ---------- ----- ----------------------------------------  ------------------ -------------- -------- ---------
1        CDB$ROOT   OKV                                             OPEN               OKV            NONE     UNDEFINED
2        CDB$ROOT   OKV                                             OPEN               OKV            NONE     UNDEFINED
3        CDB$ROOT   OKV                                             OPEN               OKV            NONE     UNDEFINED
4        CDB$ROOT   OKV                                             OPEN               OKV            NONE     UNDEFINED
1        PDB$SEED   OKV                                             OPEN               OKV            UNITED   UNDEFINED
2        PDB$SEED   OKV                                             OPEN               OKV            UNITED   UNDEFINED
3        PDB$SEED   OKV                                             OPEN               OKV            UNITED   UNDEFINED
4        PDB$SEED   OKV                                             OPEN               OKV            UNITED   UNDEFINED
1        JCKPDB     OKV                                             OPEN               OKV            UNITED   UNDEFINED
2        JCKPDB     OKV                                             OPEN               OKV            UNITED   UNDEFINED
3        JCKPDB     OKV                                             OPEN               OKV            UNITED   UNDEFINED
4        JCKPDB     OKV                                             OPEN               OKV            UNITED   UNDEFINED
1        PDB$SEED   FILE                                            OPEN_NO_MASTER_KEY AUTOLOGIN      UNITED   UNDEFINED
1        CDB$ROOT   FILE  /u02/app/oracle/admin/jckey/wallet/tde/   OPEN_NO_MASTER_KEY AUTOLOGIN      NONE     UNDEFINED
2        CDB$ROOT   FILE  /u02/app/oracle/admin/jckey/wallet/tde/   OPEN_NO_MASTER_KEY AUTOLOGIN      NONE     UNDEFINED
3        CDB$ROOT   FILE  /u02/app/oracle/admin/jckey/wallet/tde/   OPEN_NO_MASTER_KEY AUTOLOGIN      NONE     UNDEFINED
4        CDB$ROOT   FILE  /u02/app/oracle/admin/jckey/wallet/tde/   OPEN_NO_MASTER_KEY AUTOLOGIN      NONE     UNDEFINED
1        PDB$SEED   FILE                                            OPEN_NO_MASTER_KEY AUTOLOGIN      UNITED   UNDEFINED
2        PDB$SEED   FILE                                            OPEN_NO_MASTER_KEY AUTOLOGIN      UNITED   UNDEFINED
3        PDB$SEED   FILE                                            OPEN_NO_MASTER_KEY AUTOLOGIN      UNITED   UNDEFINED
4        PDB$SEED   FILE                                            OPEN_NO_MASTER_KEY AUTOLOGIN      UNITED   UNDEFINED
1        JCKPDB     FILE                                            OPEN_NO_MASTER_KEY AUTOLOGIN      UNITED   UNDEFINED
2        JCKPDB     FILE                                            OPEN_NO_MASTER_KEY AUTOLOGIN      UNITED   UNDEFINED
3        JCKPDB     FILE                                            OPEN_NO_MASTER_KEY AUTOLOGIN      UNITED   UNDEFINED
4        JCKPDB     FILE                                            OPEN_NO_MASTER_KEY AUTOLOGIN      UNITED   UNDEFINED


That's all there is to it. I now have my ExaCC database configuring to use OKV as the key store, and autologin into the wallet on all instances !

Thursday, April 22, 2021

Configuring OKV automation using REST APIs

 This post will go through the process of creating a few simple scripts to automate OKV installation using the REST API capability of OKV.


NOTE: This information was provided by the product manager Peter Wahl who has a great blog on the features of OKV and some great "Ask Tom" sessions on OKV (and other security pieces),you can watch and learn more.


Step #1 Configure RESTful Services and download client tool

First you need to configure the OKV server for RESTful Services. The instructions can be found here. This is done by navigating to the System tab and clicking on RESTful Services.


This bring up the window below.


 There are three things you want to do from this window.
  1. Click on the "Enable" box to enable RESTful services
  2. Download the okvrestcliepackage.zip which are the client utilities.
  3. Save this setting to enable RESTful services.
Now that we have this file, we need to download it our client and start creating the scripts to automate this process.

I downloaded the zip file to my DB host to configure it. I unzipped it in /home/oracle/okv/rest

NOTE: you can also download it directly from the OKV hosts


Step #2 unzip and configure the client tool 


I unzipped the client tool into my home directory on a DB server so I can put together the automation scripts. In my case I unzipped it into /home/oracle/okv/rest. This creates 3 sub directories. I am going to format the output using this command.


Below is what the output looks like

.
 |-lib
 | |-okvrestcli.jar
 |-bin
 | |-okv.bat
 | |-okv
 |-conf
 | |-okvrestcli.ini
 | |-okvrestcli_logging.properties


Step #3 - Set the environment for the CLI

In order to configure OKV, I am going to need some variables set in my environment. I can do this manually, but in my case I decided to create a "setenv.sh" script that will set the variables and add the OKV script to my path to be executed.  The 2 main variables I will be using are

OKV_RESTCLI_HOME - Location of the scripts that I am going to be installing. If I source the setenv.sh script, it will set the home to this location.

OKV_RESTCLI_CONFIG - Name of the configuration file that contains the rest CLI configuration.


Step #4 - Set initialization parameters in okvrestcli.ini file


Next, I am going to configure the initialization parameters. These are found in the okvrestcli.ini file.
You can see that the file contains a "[Default]" profile and a few other example profiles. We will start with the default profile. In this we are going to set a few of the properties.

LOG_PROPERTY - Location of the logging properties. Default location is ./conf directory.

SERVER - IP address (or DNS) of one or more OKV hosts 

 OKV_CLIENT_CONFIG - location of the config file. Default location is ./conf directory

USER - OKV user that has authority to administer endpoints an wallets.

PASSWORD - Password for the user, or location of wallet containing the password. I am NOT going to use this as I am going to use a wallet file.

 CLIENT_WALLET - I am going to use a wallet to store the password, and this is the location of the wallet file. I will be creating the autologin wallet later.


Below is what my "[Default]" configuration file looks like after my changes. I am going to use the environmental variables I set in the setenv.sh script. 

NOTE: I am choosing to store my password in wallet rather than clear text in the .ini file.


[Default]
log_property=$OKV_RESTCLI_HOME/conf/okvrestcli_logging.properties
server=10.0.0.150
okv_client_config=$OKV_RESTCLI_HOME/conf/okvclient.ora
user=bgrenn
client_wallet=$OKV_RESTCLI_HOME/conf


Step #5 - Change the okv script to use the variables


Since I chose to use variables (OKV_RESTCLI_HOME) I am changing the OKV script to use those variables


Step #6 Create the wallet to save the password encrypted

Since I chose to put my password in a wallet, I now need to create that wallet. Using the instructions in the document (linked to at the beginning of this blog), I execute the command from the directory I installed into (/home/oracle/okv/rest)

cd /home/oracle/okv/rest
. ./setenv.sh


   create environment variables OKV_RESTCLI_HOME and OKC_RESTCLI_CONFIG

   $OKV_RESTCLI_HOME    :  /home/oracle/okv/rest
   $OKV_RESTCLI_CONFIG  :  /home/oracle/okv/rest/conf/okvrestcli.ini

   Adding $OKV_RESTCLI_BIN to the $PATH


okv admin client-wallet add --client-wallet $OKV_RESTCLI_HOME/conf --wallet-user bgrenn
Password: {my password}
{
  "result" : "Success"
}

Step #7 Create the run-me.sh script


The last step is to create the script that will be executed  on the host to create the provision script.  In my script, I took the default and did some checking. This script will
  • Ensure the variable OKV_RESTCLI_HOME is set before it can be executed.
  • Determine the DB_UNIQUE_NAME from the $ORACLE_BASE/diag/rdbms/*/$ORACLE_SID directory. Solving for the  * should give us the DB_UNIQUE_NAME
  • While executing, it tells you what it believes the DB_UNIQUE_NAME is, and gives you a chance to change it if incorrect.
  • It will validate if the wallet exists by accessing OKV. If the wallet already exists, it does not try to create it again. If it doesn't exist it will create the wallet and endpoint group.
  • It will install the client software in $ORACLE_BASE/admin/$DBUNQNAME/wallet/okv
Below is the script I am using.


Step #8 Zip it all up and place it in a location to be downloaded

Below is the scripts that will be part of the zip file.

.
 |-lib
 | |-okvrestcli.jar
 |-bin
 | |-okv.bat
 | |-okv
 |-conf
 | |-okvrestcli_logging.properties
 | |-ewallet.p12.lck
 | |-ewallet.p12
 | |-cwallet.sso.lck
 | |-cwallet.sso
 | |-okvrestcli.ini
 |-setenv.sh
 |-run-me.sh


Now I am ready to download this zip file to my Database Host and enroll a database.

NOTE: To change the script to work on another OKV all host I only had to make 3 changes.
  • Update the okvrestcli.ini file with OKV host IP
  • Update the okvrestcli.ini file with the the user
  • recreate the wallet file that contains the password for the OKV user