Showing posts with label zfssa. Show all posts

Wednesday, June 26, 2024

Using APEX to upload objects to ZFSSA

 When working on my latest project, I wanted to be able to provide an easy web interface that can be used to upload images into OCI object storage on ZFSSA by choosing the file on my local file system.

In this blog post, I will go through the series of steps I used to create a page in my APEX application that allows a user to choose a local file on their PC, and upload that file (image in my case) to OCI object storage on ZFSSA.


Below are the series of steps I followed.


Configure ZFSSA as OCI object storage

First you need to configure your ZFSSA as OCI object storage.  Below are a couple of links to get you started.

During this step you will

  • Create a user on ZFSSA that will be be the owner of the object storage
  • Add a share that is owned by the object storage user
  • Enable OCI API mode "Read/Write" as the protocol for this share
  • Under the HTTP service enable the service and enable OCI.
  • Set the default path as the share.
  • Add a public key for the object storage user under "Keys" within the OCI configuration.

NOTE: You can find an example of how to create public/private key pair here.

Create a bucket in the OCI object storage on ZFSSA

In order to create a bucket in the OCI object storage you need to use the "OCI cli" interface.
If you have not installed it already, you can use this link for instructions on how to install it.

Once installed, you need to configure the ~/.oci/config file and I explain the contents in my "OCI access to ZFS" section of this blog post.

Now you should have the oci cli installed, and the configuration file created, and we are ready for the command to create the bucket.

oci os bucket create --endpoint http:{ZFSSA name or IP address} --namespace-name {share name} --compartment-id {share name} --name {bucket name}

For my example below:

Parameter value
ZFSSA name or IP address zfstest-adm-a.dbsubnet.bgrennvcn.oraclevcn.com
share name objectstorage
bucket name newobjects

The command to create my bucket would is:
oci os bucket create --endpoint http://zfstest-adm-a.dbsubnet.bgrennvcn.oraclevcn.com --namespace-name objectstorage --compartment-id objectstorage --name newobjects


Ensure you have the authentication information for APEX

This step is to make sure you have what you need for APEX in order to configure and upload an object into object storage on ZFSSA.

If you successfully created a bucket in the last step, you should have everything you need in the configuration file that you used.  Looking at the contents of my config file (below) I have almost all the parameters I need for APEX.

From the step above I have the correct  URL to access the object storage and the bucket.

http://{ZFSSA name or IP address}/n/{share name}/b/{bucket name}/o/

which becomes

http://zfstest-adm-a.dbsubnet.bgrennvcn.oraclevcn.com/n/objectstorage/newobjects/o/

The rest of the information except for tenancy is in the configuration file.

Parameter in config file value
user ocid1.user.oc1..{ZFS user} ==> ocid1.user.oc1..oracle 
fingerprint {my fingerprint} ==> 88:bf:b8:95:c0:0a:8c:a7:ed:55:dd:14:4f:c4:1b:3e
key_file This file contains the private key, and we will use this in APEX
region This is always us-phoenix-1 and is 
namespace share name ==> objectstorage
compartment
share name ==> objectstorage


NOTE: The tenancy ID for ZFSSA is always  "ocid1.tenancy.oc1..nobody"


In APEX configure web credentials

Now that we have all of the authentication information outlined in the previous step, we need to configure web credentials to access the OCI object storage on ZFSSA as a rest service.

In order to add the web credentials I log into my workspace in APEX. Note I am added the credentials at the workspace level rather than at the application level.
Within your workspace make sure you are within the "App Builder" section and click on "Workspace Utilities". 


Within "Workspace Utilities" click on "web Credentials".


Now click on "Create >" to create new web credential


Enter the information below (also see screen shot)

  • Name of credential
  • Type is OCI
  • user Id from above
  • private key from above
  • Tenancy ID is always ocid1.tenancy.oci1..nobody for ZFSSA
  • Fingerprint that matches the public/private key
  • URL for the ZFS


In apex create the upload region and file selector

I have an existing application, or you can create a new application in apex. I am going to start by creating a blank page in my application.


After clicking on "Next >", I give the new page a name and create the page.


Then on the new page I created a new region by right clicking on "Body"


Once I created the region, I named the region "upload" by changing the identification on the right hand side of Page Designer.


Then on the left hand side of Page Designer, I right clicked on my region "upload" and chose to create a new "Page Item".


After creating the new page item I needed to give the item a better identification name and change the type to "file upload". See the screen shot below.


In apex create the Button to submit the file to be stored in object storage.


Next we need to add a button to upload the file to object storage.  Right click on the "upload" region, and this time choose "create button below".


I gave the button a clearer name to identify what it's there for


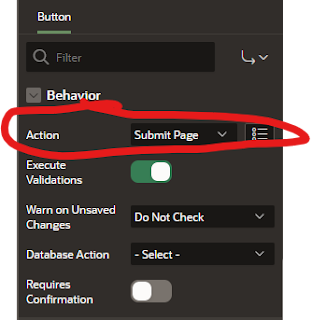
And I scrolled down the attributes of the button on the right hand side, and made sure that the behavior for the button was "Submit Page"


In apex add the upload process itself

Click on the processing section in the top left corner of Page Designing and you will see the sections for page process.  Right click on "Processing" and click on "Create process"


The next step is to give the process a better identifier, and I named my "file_upload", and I also need to include the PL/SQL code to execute as part of this process.

The items we need to customer for the code snippet are.

ITEM VALUE
File Browse Page Item ":" followed by the name of the file selector. Mine is ":FILE_NAME"
Object Storage URL This is the whole URL including namespace and bucket name
Web Credentials This is the name for the Web Credentials created for the workspace


My PL/SQL code is below with the values I've mentioned throughout this blog.


declare
    l_request_url varchar(32000);
    l_content_length number;
    l_response clob;
    upload_failed_exception exception;
    l_request_object blob;
    l_request_filename varchar2(500);
    begin
        select blob_content, filename into l_request_object, l_request_filename from apex_application_temp_files where name = :FILE_NAME;
        l_request_url := 'http://zfstest-adm-a.dbsubnet.bgrennvcn.oraclevcn.com/n/objectstorage/b/newobjects/o/' || apex_util.url_encode(l_request_filename);        
l_response := apex_web_service.make_rest_request(
            p_url => l_request_url,
            p_http_method => 'PUT',
            p_body_blob => l_request_object,
            p_credential_static_id => 'ZFSAPI'
        );end;


In the APEX database ensure you grant access to the URL

The final step before we test this is to add the ACL grant for the URL.
NOTE: This needs to be granted to to the apex application owner, in my case APEX_230200

BEGIN
    DBMS_NETWORK_ACL_ADMIN.APPEND_HOST_ACE(
        host => '*',
        ace => xs$ace_type(privilege_list => xs$name_list('connect', 'resolve'),
            principal_name => 'APEX_230200',
            principal_type => xs_acl.ptype_db
        )
    );
END;
/


Upload the object and verify it was successful

After saving the page in Page Designer run the page to upload an object.
Choose an object from your local file system and click on the "Upload Object" button.

If there were no errors, it was successful and you can verify it was uploaded by listing the objects in the bucket.
Below is my statement to list the objects.

oci os object list --endpoint http://zfstest-adm-a.dbsubnet.bgrennvcn.oraclevcn.com  --namespace-name objectstorage --bucket-name newobjects


 That's all there is to it

Monday, December 4, 2023

File Retention on ZFS now supports expired file deletion/holds and changing permissions

 The latest release of ZFS (8.8.63) contains 2 new features associated with File Retention lock.

  • File retention (deletion or hold) after file expiration
  • Allow permission changes on retained files.


File retention on expiry policy

This new setting for projects/shares defaults to "off" which is the normal behavior of unlocking files, but leaving them on the filesystem.  In order to delete files you need to wait until the retention period expires, and then you can delete the file.

There are 2 new settings you can use to work with locked files to change this behavior.

Delete

When set to "Delete", files will be immediately deleted when their retention lock expires. This can be very useful if you want files to be automatically cleaned up at the end of their retention without having to create a deletion process.

There are a few items to be aware of the automatic deletion process.
  1. DO NOT use this with an RMAN retention window.  Customers typically use a weekly full/daily incremental backup strategy with RMAN. With this strategy, a weeks worth of backups (all dependent on the oldest full backup) are deleted together.  Deleting backups as soon as they expire would delete backups too soon.  Even with archival backups I recommend letting RMAN perform the deletions, otherwise you risk having a file deleted too early.
  2. Be careful changing this setting on an existing share.  This setting takes effect immediately and will affect ALL files that have a retention lock.  Any files that were locked, but their retention lock expired will be deleted when this setting is applied.

Hold

When set to "Hold", any files that have, or have had a retention lock will be affected.  This setting  immediately prevents the deletion of all retention locked files until the hold is removed regardless of when the lock is set to expire.  Keep in mind that while a hold is in place, the files still have a retention lock with an expiration date.

Removing the hold: When you remove the hold, the normal expiration date takes effect.  If you remove the hold by changing the expiry policy to "Delete", ALL files that have an expired retention will be immediately deleted.  If you change the expire policy to "Off", the files remain, and you must manually delete them.


NOTE: Be very careful when changing the Expiry Policy.  The new setting immediately affects existing files, not just new files going forward, unlike the other file retention settings.


Allow permission changes on retained files


What happens normally : When a file has a retention lock set, you are protecting this file from both being deleting AND from being updated. Because you were not allowed to update the file permissions, you were not able to change the settings from the default of -r--r-----+ while the file was locked.

This could be an issue depending on what type of file you are protecting. There are some cases where you want to make this file either
  • An executable file, not just a read only file.
  • readable by any user.
When you attempted to make this change to a locked file the update would fail with a "Operation not permitted".

-r--r-----+ 1 oracle oinstall 792 Dec  4  2023 testfile
[oracle@ssh-server rmanbackups]$ ls -al testfile
-r--r-----+ 1 oracle oinstall 792 Dec  4 20:26 testfile
[oracle@ssh-server rmanbackups]$ chmod 550 testfile
chmod: changing permissions of 'testfile': Operation not permitted
[oracle@ssh-server rmanbackups]$ chmod 444 testfile
chmod: changing permissions of 'testfile': Operation not permitted
[oracle@ssh-server rmanbackups]$


What this setting does: When you check the setting for "Allow permission changes on retained files" you are IMMEDIATELY able to change the permissions on files that are locked.  The files are still protected from making them writable, but you can adjust both the "r" - read and "x" execute settings for all users. 

NOTE: this setting does take affect immediately and will affect all currently locked files regardless of when they were created.

Thursday, September 29, 2022

ZFSSA File Retention and Snapshot Retention provide protection for RMAN incremental merge backups.

File Retention Lock and Snapshot Retention Lock are great new features on ZFSSA that can help protect your backups from deletion and help you meet regulatory requirements. Whether it be an accidental deletion or a bad actor attempting to corrupt your backups they are protected.

In this post I am going to walk through how to implement File Retention and Snapshot Retention together to protect an RMAN incremental merge backup from being deleted . 

 Why do I need both? 

The first question you might have is why do I need both File Retention and Snapshot Retention to protect my backups ? RMAN incremental merge backups consists of 3 types of backup pieces.

 FILE IMAGE COPIES - Each day when the backup job is executed the same image copy of each datafile file is updated by recovering the datafile with an incremental backup. This moves the image copy of each datafile forward one day using the changed blocks from the incremental backup. The backup files containing the image copy of the datafiles needs to be updatable by RMAN.

INCREMENTAL BACKUP - Each day a new incremental backup (differential) is taken. This incremental backup contains the blocks that changed in the database files since the previous incremental backup. Once created this file does not change. 

 ARCHIVE LOG BACKUPS - Multiple times a day, archive log backups (also known as log sweeps) are taken. These backup files contain the change records for the database and do not change once written. 


 How to leverage both retention types 


 SNAPSHOT RETENTION can be used to create a periodic restorable copy of a share/project by saving the unique blocks as of the "snapshot" time a new snapshot is taken. Each of these periodic snapshots can be scheduled on a regular basis. With snapshot retention, the snapshots are locked from being deleted, and the schedule itself is locked to prevent tampering with the snapshots. This is perfect for ensuring we have a restorable copy of the datafile images each time they are updated by RMAN.

FILE RETENTION can be used to lock both the incremental backups and the archive log backups. Both types of backup files do not change once created and should be locked to prevent removal or tampering with for the retention period. 


 How do I implement this ? 

First I am going create a new project for my backups named "DBBACKUPS". Of course you could create 2 different projects. Within this project I am going to create 2 shares with different retention settings. 

 FULLBACKUP - Snapshot retention share 

 My image copy backups are going to a share that is protected with snapshot retention. The documentation on where to start with snapshot retention can be found here. In the example below I am keeping 5 days of snapshots, and I am locking the most recent 3 days of snapshots. This configuration will ensure that I have locked image copies of my database files for the last 3 days. 

 NOTE: Snapshots only contain the unique blocks since the last snapshot, but still provide a FULL copy of each datafile. The storage used to keep each snapshots is similar to the storage needed for each incremental backup. 

ZFSSA snapshot retention settings for /fullbackup


 DAILYBACKUPS - File Retention share 

My incremental backups and archivelog backups are going to a share with File Retention. The files (backup pieces) stored on this share will be locked from being modified or deleted. The documentation on where to start with File Retention can be found here

 NOTE: I chose the "Privileged override" file retention policy. I could have chosen "Mandatory" file retention policy if I wanted to lock down the backup pieces even further. 

 In the example below I am retaining all files for 6 days. 

ZFSSA file retention settings for /dailybackups


DAILY BACKUP SCRIPT 


Below is the daily backup script I am using to perform the incremental backup, and the recovery of the image copy datafiles with the changed blocks. You can see that I am allocating channels to "/fullbackup" which is the share configured with Snapshot Retention, and the image copy backups are going to this share. The incremental backups are going to "/dailybackups" which is protected with File Retention. 

run {
  ALLOCATE CHANNEL Z1 TYPE DISK  format '/fullbackup/radb/DATA_%N_%f.dbf';
  ALLOCATE CHANNEL Z2 TYPE DISK  format '/fullbackup/radb/DATA_%N_%f.dbf';
  ALLOCATE CHANNEL Z3 TYPE DISK  format '/fullbackup/radb/DATA_%N_%f.dbf';
  ALLOCATE CHANNEL Z4 TYPE DISK  format '/fullbackup/radb/DATA_%N_%f.dbf';
  ALLOCATE CHANNEL Z5 TYPE DISK  format '/fullbackup/radb/DATA_%N_%f.dbf';
  ALLOCATE CHANNEL Z6 TYPE DISK  format '/fullbackup/radb/DATA_%N_%f.dbf';
  
  backup
    section size 32G
    incremental level 1
    for recover of copy with tag 'DEMODBTEST' database FORMAT='/dailybackups/radb/FRA_%d_%T_%U.bkp';
  recover copy of database with tag 'DEMODBTEST' ;
  RELEASE CHANNEL Z1;
  RELEASE CHANNEL Z2;
  RELEASE CHANNEL Z3;
  RELEASE CHANNEL Z4;
  RELEASE CHANNEL Z5;
  RELEASE CHANNEL Z6;
}


 ARCHIVELOG BACKUP SCRIPT 

Below is the log sweep script that will perform the periodic backup of archive logs and send them to the "/dailybackups" share which has File Retention configured. 

run {
  ALLOCATE CHANNEL Z1 TYPE DISK  format '/dailybackups/radb/ARCH_%U.bkup';
  ALLOCATE CHANNEL Z2 TYPE DISK  format '/dailybackups/radb/ARCH_%U.bkup';
  ALLOCATE CHANNEL Z3 TYPE DISK  format '/dailybackups/radb/ARCH_%U.bkup';
  ALLOCATE CHANNEL Z4 TYPE DISK  format '/dailybackups/radb/ARCH_%U.bkup';
  ALLOCATE CHANNEL Z5 TYPE DISK  format '/dailybackups/radb/ARCH_%U.bkup';
  ALLOCATE CHANNEL Z6 TYPE DISK  format '/dailybackups/radb/ARCH_%U.bkup';

  
  backup
    section size 32G
    filesperset 32
    archivelog all;
  RELEASE CHANNEL Z1;
  RELEASE CHANNEL Z2;
  RELEASE CHANNEL Z3;
  RELEASE CHANNEL Z4;
  RELEASE CHANNEL Z5;
  RELEASE CHANNEL Z6;
}


 RESULT: 

This strategy will ensure that I have 5 days of untouched full backups available for recovery. It also ensures that I have 6 days of untouched archive logs, and incremental backups that can be applied if necessary. This will protect my RMAN incremental merge backups using a combination of Snapshot Retention for backup pieces that need to be updated, and File Retention for backup pieces that will not change.

Thursday, May 26, 2022

ZFSSA offers versatile data protection

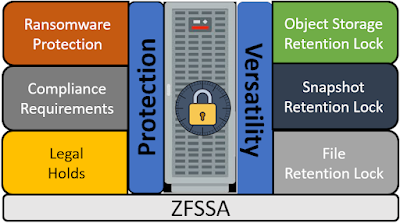
 The latest release of ZFSSA software OS8.8.45 includes file retention locking, joining object retention lock and snapshot retention lock providing both versatility and protection of your data.

Retention Lock on ZFSSA


3 types of retention lock


Legal Hold


You might need to preserve certain business data in response to potential or on-going lawsuits. A legal hold does not have a defined retention period and remains in effect until removed.  Once the legal hold is removed, all protected data is immediately eligible for deletion unless other retention rules still apply.


NOTE: Both Data Governance and Regulatory Compliance can be use to protect from any kind of cyber/ransomware attack.  


Data Governance


Data Governance locks data sets (snapshot, object or file) for a period of time protecting the data from deletion.  You might need to protect certain data sets as a part of internal business process requirements or protect data sets as part of your cyber protection strategy. Data Governance allows for adjustments in the retention strategy from privileged users.


Regulatory Compliance


Your industry might require you to retain a certain class of data for a defined length of time. Your data retention regulations might also require that you lock the retention settings. Regulatory compliance only allows you to increase the retention time if at all.  Regulatory Compliance is the most restrictive locking strategy and often does not allow anyone, even an administrator, to make changes affecting retention.


3 implementations of retention lock


Object storage

Object storage retention is managed through the OCI client tool and Object retention is enforced through the API. Current retention settings are applied to all objects when they are accessed.  Adding a rule immediately takes affect for all objects.  

Administration of retention rules can be managed through the use of RSA certificates.  It is recommended to create a separation of duties between a security administrator, and the object owner.

Retention on object storage is implemented in the following way based on the retention lock type.


Legal hold


Legal holds are implemented by placing an indefinite retention rule on a bucket.  Creating this rule ensures that all objects within the bucket can not be deleted, and cannot be changed. Only new objects can be stored.


Data Governance


Data Governance is implemented by placing a time bound retention rule on a bucket.  The rule sets a lock on all objects for a set length of time.  The rule can be later deleted. For cyber protection it is recommended to implement this with a separation of duties.


Regulatory Compliance


Regulatory Compliance is implemented by placing a locked time bound retention rule on a bucket with a grace period.  When a locked time bound retention rule is created it immediately takes effect, but there is a grace period of at least 14 days before the rule becomes permanent which allows you to test the rule. Once the grace period expires (defined by a specific date and time) the rule cannot be deleted even by an administrator.


Snapshots


Snapshot locking is managed the BUI, or CLI.  Individual snapshots can be locked, and scheduled snapshots can be created and automatically locked.  Permission for controlling snapshot locking can be assigned to ZFSSA users allowing you to create a separation of duties. Shares or projects cannot be removed if they contained locked snapshots.

Retention on snapshots is implemented in the following way based on the retention lock type.


Legal hold


Because snapshots only affect data that is on the project/share when the snapshot is taken, it is not possible to lock all new data as it is written.  Manual snapshots can be used to provide a mechanism to capture the content of a share as of the current time.  This could suffice for a Legal Hold.  A manual snapshot can be created with a "retention lock" of UNLOCKED creating a snapshot that cannot be removed. The only way to remove the snapshot is by changing the "retention lock" to OFF, unlocking it for deletion. This creates a hold on the current data for an indefinite period of time.  Permissions for releasing the hold on a the snapshot can be assigned to specific individual account allowing for a separation of duties.


Data Governance


Data governance of snapshots is handled through the use of scheduled locked snapshots and enabling the retention policy for scheduled snapshots.  A LOCKED schedule is created with both a retention, and "keep at most" setting. This allows you to manage snapshots for a locked number of snapshots, while automatically cleaning up snapshots that are past the retention number.  The snapshots within the retention number can not be unlocked, and the schedule can not be removed as long as there is data contained in the snapshot. 


Regulatory Compliance


Regulatory compliance of snapshots is handled through the same method as Data Governance.  Snapshots cannot be be removed when they are locked, and the schedule remains locked.


File Retention


File retention is set at the share or project level and controls updating and deletion of all data contained on the share/project.  A default file retention length is set and all new files will inherit the default setting in effect when the file is created. It is also possible to manually set the retention on a file increasing the default setting inherited by the file.


Legal Hold


Legal Holds on files is implemented by manually increasing the retention on individual files.  Because a Legal Hold may be required for an indefinitely period of time, it is recommended to periodically extend the retention on files needed within the legal hold. This allows the files retention to expire once the need the for the Legal Hold has passed.


Data Governance

Data governance is implemented by creating a NEW project and share with a file retention policy of privileged.  Privileged mode allows you to create a default retention setting for all new files, and change that setting (longer or shorter) going forward.  Files created inherit the retention setting in effect when they are created.  Retention can also be adjusted manually to be longer by changing the unlock timestamp.  Projects/shares cannot be deleted as long as they have locked files remaining on them.


Regulatory Compliance

Regulatory compliance  is implemented by creating a NEW project and share with a file retention policy of mandatory (no override).  Mandatory mode does not allow you to decrease the default file retention. Retention can also be adjusted manually to be longer by changing the unlock timestamp. Regulatory Compliance uses the same mechanisms as Data Governance but is much more restrictive.  The project/share cannot be removed when locked files exist, and the storage pool cannot be removed when locked files exist within the pool. This mode also requires an NTP server be utilized, and root is locked out of any remote access.


The best way to explore these new features is by using the ZFSSA image in OCI to test different scenarios.

Wednesday, May 18, 2022

File Retention Lock now available in ZFSSA OS8.8.45

 File Retention Lock is introduced today in the much-awaited release of ZFSSA AK Software OS8.8.45 (aka 2013.1 Update 8.45) 

ZFSSA retention lock


OS8.8.45 introduces File Retention to ZFSSA.

 File retention is controlled by a new system attribute timestamp for files that, once set, makes the file read-only and unable to be deleted. Once the date/time specified by that timestamp has passed and the retention has expired, the file may be deleted. No other modification is allowed, even after expiration.

In a filesystem with retention enabled, rename of directories is blocked unless the directory is empty. This is done to preserve the name of a file, including its path, so that its location cannot be hidden or any meaning conveyed by a changed path.

File retention enforces one of two policies, set at filesystem creation:

  • Privileged mode: Allows a process with the FILE_RETENTION_OVERRIDE privilege to override retention and delete files. This privilege does not allow files to be modified once retained.           

Mandatory mode: No privilege or authorization allows deletion of a retained file until the retention timestamp has been surpassed. Mandatory mode's protection extends to the filesystem and pool in that they may not be destroyed until all retention on all files therein has expired. A mandatory-mode-protected filesystem also protects its ancestors and clone descendants from destruction.


NOTE: File retention must be enabled in the filesystem during creation before files can be retained because in most settings, taking away the ability to modify or delete a file would be undesirable behavior.