Thursday, July 18, 2024

DBMS_CLOUD Debugging with ZFS Object Storage

 In the course of testing the DBMS_CLOUD functionality against OCI object storage on ZFS, I have wanted to perform debugging by looking at the packets sent to the Web Listener on my ZFS.

Unfortunately for debugging purposes, DBMS_CLOUD requires all calls to object storage to be HTTPS calls which are encrypted.

In this blog post, I will go through the architecture below to show you how I was able to use a Load Balancer in OCI on port 443 (HTTPS traffic) to send the requests to my ZFS using Port 80 (HTTP traffic).

By doing this I was able to see all the packets going to ZFS.

You can use this same process to debug network traffic, while leaving the application interface encrypted.


Below are the steps in the OCI console, but I am not going to include the policies that need to be configured.

1) Create a vault

You can find create Vault under "Identity & Security" --> "Key Management & Secret Management".

Click on "Create Vault" and all you need to do is to give the vault a name, and choose the compartment to store the vault.

Once you fill them in click on "Create Vault" to have the vault created.

2) Create a Master Encryption Key

Once the Vault is created, click on the vault name, and this will bring up the window where you can enter a Master Encryption Key to be created within the vault.

Click on "Create Key" and enter the information to create a new Key in this vault.  Note that 

  • The key MUST be an HSM key, you cannot use a software key
  • The key must be asymmentric. The default is symmetric and must be changed.

3) Create a Certificate Authority

Under "Identity & Security" --> "Certificates" you will see "Certificate Authorities". We need to create a new one.

Click on "Create Certificate Authority", and in this case we are creating a Root Certificate Authority. You need to give it a "Name" and "Description" and click on the 'Next" button in the lower left corner.

Then on the next window give it a "Common Name" and click on Next.


On the next window, you must choose a "not valid before". In my case, I chose today.

Then you must enter the Vault and the Encryption key that you had created previously.

Then click on 'Next"


Then set the expiry rule and click on "next".  I left the defaults.


On the next window I changed "Revocation Configuration"  to "skip" and I clicked on "Next"


Then on the "Summary" window I clicked on "Create Certificate Authority" to create the Certificate Authority.


4) Create a Load Balancer

This can be found under "Networking" --> "Load balancers". Click on Load Balancer.

Once here, click on the "Create Load balancer" button.
Give the load balancer a name (if you want) to make it easier to find.
You then need to scroll down to the bottom of the screen to choose your network and subnet for the Load balancer.
Once you fill these in Click on "NEXT".


After clicking on Next, I left everything defaulted. This will do a health check on the ZFS using port 80.  Then I clicked on "Next" again.


In this window, I changed from HTTPS to HTTP. This allows me to create the Load Balancer without having a Certificate yet.  


I left the logging off, and clicked on "Submit" to create the Load Balancer.


5) Determine the Public IP for the Load Balancer

Once the load balancer is created, I go to the list of of load balancers under Networking--> Load balancers --> Load Balancer and it shows me the public IP for the Load Balancer that was created.  The overall Health is showing "incomplete" since I haven't added any backend hosts yet.


6) Create the certificate


Now that I know the Public IP address (129.146.220.252) I can create a certificate for it in my Certificate Authority.
I go back to "Identity & Security" --> Certificates and click on "certificates"

I click on "Create Certificate" and I enter the name and description and Click on "next"


I give the "Common Name" my IP address so that the Certificate Name matches the URL I am going to use to connect.  Then I click on "Next".


In the next window I fill in the "not valid before" and click on "next".


I leave the rules default for the certificate and click on "next"


Then when I get to the "Summary" window I click on "Create Certificate".

7) Create a Backend set for the load balancer

I now go back to Networking --> Load Balancers --> Load Balancer and choose the Load Balancer I had previously created.

On the left hand side of the window I click on "Backend Sets" to list the existing Backend sets.  By default a backend set was created for me, but it has no members.
I click on the default Backend set to bring up the window to add members.
This will bring up a window showing that the backend set is "incomplete"
From here I click on "Backends(0)" on left hand side of the window.


This brings up a window with an "Add backends" button. Click on this button to bring up the window to enter backends.


On the window above I entered the IP address of the HTTP interface I am using ZFS, leaving the port as 80 so that the traffic will be unencrypted, and click on "ADD" to add it to the backend list.

8) Change the Health Check to TCP

On the Backends window I changed the "Update Health Check" to use TCP protocol from HTTP protocol and clicked on "Save Changes".


9) Change the Load Balancer to HTTPS

I now go back to Networking --> Load Balancers --> Load Balancer and choose the Load Balancer I had previously created.

From the left had side, I click on "Listeners" and then I click on "Create Listener".


In the window that comes up, I want to make this a HTTPS listener, I change the protocol to HTTPS, and I choose the certificate I created in the previous step. This allows the load balancer to encrypted receive traffic with a registered certificate.
In this step, I also need to ensure it is using the Backend set I just updated. Once complete choose "Create Listener".


That's all there is to it.

Now I can access the Object storage on ZFS using the "Public IP" using DBMS_CLOUD (which is encrypted) and it will be passed on to the ZFS as HTTP traffic.


Wednesday, July 10, 2024

Creating Archival Backups from ZDLRA using EM Cloud Control


The ability for the ZDLRA to create archive backups was added with release 21.1 and I wrote a blog post (here) on how to do this.  I recently noticed that the latest plugin for ZDLRA (13.5.1.0.0) allows you to dynamically schedule your archival jobs from EM Cloud Control.

Create Archival Backup


In this blog post I will go through how to use this new feature.

First the release that I am using for this is

  •  EM Cloud Control 13.5.0.19
  • Zero Data Loss Recovery Appliance Plugin Release 13.5.1.0.0

Where to find the feature:

If you have the correct plugin, you will notice that there is a new choice in the "Recovery Appliance"  pull down menu provided by the plugin.


There is an entry for "Archival Backups" that appears just below "replication".  When you chose this option it will bring up a new window that you can use to prepare to create an archival backup.


Notice that there is nothing listed here.  I did create an archival backup earlier, but it isn't listed.

In order to create an archival backup, Click on the "Create Archival Backup" button and continue to one of the next sections.  You can either create a "one-time" archival backup, or schedule a recurring backup.  The default is to create a recurring scheduled backup

Create a recurring scheduled Backup:

Protected Databases

I am going to create a recurring scheduled backup for my database "testdb".   I can choose only one database.

Recovery Point Time

  • This should be for every month.  I chose every month individually, and I ensure that I chose all 12 months.
  • This should occur on the "last" day of the month
  • The recovery point should be 11:00 PM based on the browser time (I can also chose the DB time, or UTC).
  • I want to set the restore point prefix to be "MONTHLY_KEEP_BACKUP_". The job will affix the timestamp to the end of the the prefix

Retention Time

  • Keep this backup for 3 years (I can also choose a time period based on months or weeks).

Properties

  • Use the attribute set "TESTDB" that I created earlier.
  • Leave the default format of the backup pieces, but I can change the format if I'd like to.
  • I am setting not setting encryption algorithm on (I would need to for a copy-to-cloud job).
  • I am not setting a compression algorithm on.
My screen for creating the recurring backup looks like the image below.


Once I complete everything I can click on OK, and it will submit my schedule to run.


Viewing recurring scheduled Backup  Procedures:

The recurring backups are not scheduled as jobs, they are scheduled as Procedures because they have a few steps to execute.
You can find these scheduled backups in EM Cloud Control under Enterprise --> Provisioning and Patching --> Procedure Activity.
At this point, I scheduled 2 jobs (actually procedures) , prior and you can see them in this section.


In order to see more detail on these 2 procedures I can select one of them and click on the "Reschedule" button at the top of the list of procedures.
I know the first procedure is for executing scheduled archival backups for TESTDB because the name of the procedure contains TESTDB followed by the timestamp.

Below is what it shows it when I choose to reschedule it.


You can see that during this test, I created a monthly schedule that creates a new backup at 7:00 AM PT on the 10th of the months listed.  During my test I did not include all months, and those that I included, I did not choose them in order.  
When I go back to the list of procedures, and drill into the procedure, I can see there there are just a couple of steps, and I can't see any detail as to what the steps do.


Viewing executed scheduled Backup Procedures:

In order to view any executed scheduled backup you would look in the same place as you do for schedule procedures.  Along with the 2 scheduled procedures I had above, I also had one of the actually execute and I see it in the list.


You can see that the first scheduled job had successfully executed, now let's take a look at the executed step and output.
If you click on the highlighted "Run" name, you can drill into the procedure and steps. Below is what I see for the step detail for this execution.


Below is what the output of the last step looks like.

You can see all of the attributes that were set when I created this procedure, and you can see the actual command that executed to create the archival backup.


Create a One-time only archival Backup:

Similar to creating an recurring backup, you go the "Create Archival Backup" section within the ZDRLA plugin.

Protected Databases

I am going to create a One-time archival backup for my database "testdb".   I can choose only one database.

Create Archival Backup For


Within this section there are 3 choices

Point-in-Time : Using a date picker choose the point in time you want to create the archival backup as of. 


SCN : Enter the SCN you want to use. The text tells the range of SCN numbers you can use.


Restore Point : Enter the restore point from the drop down menu.


Retention Time (same as recurring backups)

  • Keep this backup for 3 years (I can also choose a time period based on months or weeks).

Properties (same as recurring backups)

  • Use the attribute set "TESTDB" that I created earlier.
  • Leave the default format of the backup pieces, but I can change the format if I'd like to.
  • I am setting not setting encryption algorithm on (I would need to for a copy-to-cloud job).
  • I am not setting a compression algorithm on.
Click "OK" after filling in all of the detail, and submit the job.


Viewing archival Backups:


In the window that you choose the "Create Archival Bucket" you can view existing backups.  In order to view the backups, you must first choose the "Protected Database" you want to view the backups for. Below is what you would see once a backup is initiated.


Summary:

You still might find it easier to create the archive log yourself using the PL/SQL package. This can be done either manually or through scripting.  The GUI gives you nice way to schedule individual database jobs, but for 100's, or 1000's of databases with varying requirements, scripting can be more flexible.


Wednesday, June 26, 2024

Using APEX to upload objects to ZFSSA

 When working on my latest project, I wanted to be able to provide an easy web interface that can be used to upload images into OCI object storage on ZFSSA by choosing the file on my local file system.

In this blog post, I will go through the series of steps I used to create a page in my APEX application that allows a user to choose a local file on their PC, and upload that file (image in my case) to OCI object storage on ZFSSA.


Below are the series of steps I followed.


Configure ZFSSA as OCI object storage

First you need to configure your ZFSSA as OCI object storage.  Below are a couple of links to get you started.

During this step you will

  • Create a user on ZFSSA that will be be the owner of the object storage
  • Add a share that is owned by the object storage user
  • Enable OCI API mode "Read/Write" as the protocol for this share
  • Under the HTTP service enable the service and enable OCI.
  • Set the default path as the share.
  • Add a public key for the object storage user under "Keys" within the OCI configuration.

NOTE: You can find an example of how to create public/private key pair here.

Create a bucket in the OCI object storage on ZFSSA

In order to create a bucket in the OCI object storage you need to use the "OCI cli" interface.
If you have not installed it already, you can use this link for instructions on how to install it.

Once installed, you need to configure the ~/.oci/config file and I explain the contents in my "OCI access to ZFS" section of this blog post.

Now you should have the oci cli installed, and the configuration file created, and we are ready for the command to create the bucket.

oci os bucket create --endpoint http:{ZFSSA name or IP address} --namespace-name {share name} --compartment-id {share name} --name {bucket name}

For my example below:

Parameter value
ZFSSA name or IP address zfstest-adm-a.dbsubnet.bgrennvcn.oraclevcn.com
share name objectstorage
bucket name newobjects

The command to create my bucket would is:
oci os bucket create --endpoint http://zfstest-adm-a.dbsubnet.bgrennvcn.oraclevcn.com --namespace-name objectstorage --compartment-id objectstorage --name newobjects


Ensure you have the authentication information for APEX

This step is to make sure you have what you need for APEX in order to configure and upload an object into object storage on ZFSSA.

If you successfully created a bucket in the last step, you should have everything you need in the configuration file that you used.  Looking at the contents of my config file (below) I have almost all the parameters I need for APEX.

From the step above I have the correct  URL to access the object storage and the bucket.

http://{ZFSSA name or IP address}/n/{share name}/b/{bucket name}/o/

which becomes

http://zfstest-adm-a.dbsubnet.bgrennvcn.oraclevcn.com/n/objectstorage/newobjects/o/

The rest of the information except for tenancy is in the configuration file.

Parameter in config file value
user ocid1.user.oc1..{ZFS user} ==> ocid1.user.oc1..oracle 
fingerprint {my fingerprint} ==> 88:bf:b8:95:c0:0a:8c:a7:ed:55:dd:14:4f:c4:1b:3e
key_file This file contains the private key, and we will use this in APEX
region This is always us-phoenix-1 and is 
namespace share name ==> objectstorage
compartment
share name ==> objectstorage


NOTE: The tenancy ID for ZFSSA is always  "ocid1.tenancy.oc1..nobody"


In APEX configure web credentials

Now that we have all of the authentication information outlined in the previous step, we need to configure web credentials to access the OCI object storage on ZFSSA as a rest service.

In order to add the web credentials I log into my workspace in APEX. Note I am added the credentials at the workspace level rather than at the application level.
Within your workspace make sure you are within the "App Builder" section and click on "Workspace Utilities". 


Within "Workspace Utilities" click on "web Credentials".


Now click on "Create >" to create new web credential


Enter the information below (also see screen shot)

  • Name of credential
  • Type is OCI
  • user Id from above
  • private key from above
  • Tenancy ID is always ocid1.tenancy.oci1..nobody for ZFSSA
  • Fingerprint that matches the public/private key
  • URL for the ZFS


In apex create the upload region and file selector

I have an existing application, or you can create a new application in apex. I am going to start by creating a blank page in my application.


After clicking on "Next >", I give the new page a name and create the page.


Then on the new page I created a new region by right clicking on "Body"


Once I created the region, I named the region "upload" by changing the identification on the right hand side of Page Designer.


Then on the left hand side of Page Designer, I right clicked on my region "upload" and chose to create a new "Page Item".


After creating the new page item I needed to give the item a better identification name and change the type to "file upload". See the screen shot below.


In apex create the Button to submit the file to be stored in object storage.


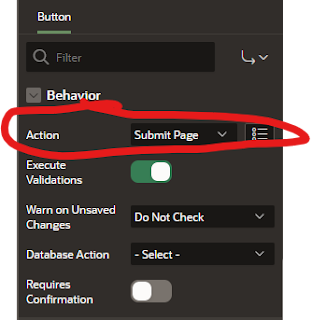
Next we need to add a button to upload the file to object storage.  Right click on the "upload" region, and this time choose "create button below".


I gave the button a clearer name to identify what it's there for


And I scrolled down the attributes of the button on the right hand side, and made sure that the behavior for the button was "Submit Page"


In apex add the upload process itself

Click on the processing section in the top left corner of Page Designing and you will see the sections for page process.  Right click on "Processing" and click on "Create process"


The next step is to give the process a better identifier, and I named my "file_upload", and I also need to include the PL/SQL code to execute as part of this process.

The items we need to customer for the code snippet are.

ITEM VALUE
File Browse Page Item ":" followed by the name of the file selector. Mine is ":FILE_NAME"
Object Storage URL This is the whole URL including namespace and bucket name
Web Credentials This is the name for the Web Credentials created for the workspace


My PL/SQL code is below with the values I've mentioned throughout this blog.


declare
    l_request_url varchar(32000);
    l_content_length number;
    l_response clob;
    upload_failed_exception exception;
    l_request_object blob;
    l_request_filename varchar2(500);
    begin
        select blob_content, filename into l_request_object, l_request_filename from apex_application_temp_files where name = :FILE_NAME;
        l_request_url := 'http://zfstest-adm-a.dbsubnet.bgrennvcn.oraclevcn.com/n/objectstorage/b/newobjects/o/' || apex_util.url_encode(l_request_filename);        
l_response := apex_web_service.make_rest_request(
            p_url => l_request_url,
            p_http_method => 'PUT',
            p_body_blob => l_request_object,
            p_credential_static_id => 'ZFSAPI'
        );end;


In the APEX database ensure you grant access to the URL

The final step before we test this is to add the ACL grant for the URL.
NOTE: This needs to be granted to to the apex application owner, in my case APEX_230200

BEGIN
    DBMS_NETWORK_ACL_ADMIN.APPEND_HOST_ACE(
        host => '*',
        ace => xs$ace_type(privilege_list => xs$name_list('connect', 'resolve'),
            principal_name => 'APEX_230200',
            principal_type => xs_acl.ptype_db
        )
    );
END;
/


Upload the object and verify it was successful

After saving the page in Page Designer run the page to upload an object.
Choose an object from your local file system and click on the "Upload Object" button.

If there were no errors, it was successful and you can verify it was uploaded by listing the objects in the bucket.
Below is my statement to list the objects.

oci os object list --endpoint http://zfstest-adm-a.dbsubnet.bgrennvcn.oraclevcn.com  --namespace-name objectstorage --bucket-name newobjects


 That's all there is to it