Showing posts with label ZFS. Show all posts

Wednesday, June 26, 2024

Using APEX to upload objects to ZFSSA

 When working on my latest project, I wanted to be able to provide an easy web interface that can be used to upload images into OCI object storage on ZFSSA by choosing the file on my local file system.

In this blog post, I will go through the series of steps I used to create a page in my APEX application that allows a user to choose a local file on their PC, and upload that file (image in my case) to OCI object storage on ZFSSA.


Below are the series of steps I followed.


Configure ZFSSA as OCI object storage

First you need to configure your ZFSSA as OCI object storage.  Below are a couple of links to get you started.

During this step you will

  • Create a user on ZFSSA that will be be the owner of the object storage
  • Add a share that is owned by the object storage user
  • Enable OCI API mode "Read/Write" as the protocol for this share
  • Under the HTTP service enable the service and enable OCI.
  • Set the default path as the share.
  • Add a public key for the object storage user under "Keys" within the OCI configuration.

NOTE: You can find an example of how to create public/private key pair here.

Create a bucket in the OCI object storage on ZFSSA

In order to create a bucket in the OCI object storage you need to use the "OCI cli" interface.
If you have not installed it already, you can use this link for instructions on how to install it.

Once installed, you need to configure the ~/.oci/config file and I explain the contents in my "OCI access to ZFS" section of this blog post.

Now you should have the oci cli installed, and the configuration file created, and we are ready for the command to create the bucket.

oci os bucket create --endpoint http:{ZFSSA name or IP address} --namespace-name {share name} --compartment-id {share name} --name {bucket name}

For my example below:

Parameter value
ZFSSA name or IP address zfstest-adm-a.dbsubnet.bgrennvcn.oraclevcn.com
share name objectstorage
bucket name newobjects

The command to create my bucket would is:
oci os bucket create --endpoint http://zfstest-adm-a.dbsubnet.bgrennvcn.oraclevcn.com --namespace-name objectstorage --compartment-id objectstorage --name newobjects


Ensure you have the authentication information for APEX

This step is to make sure you have what you need for APEX in order to configure and upload an object into object storage on ZFSSA.

If you successfully created a bucket in the last step, you should have everything you need in the configuration file that you used.  Looking at the contents of my config file (below) I have almost all the parameters I need for APEX.

From the step above I have the correct  URL to access the object storage and the bucket.

http://{ZFSSA name or IP address}/n/{share name}/b/{bucket name}/o/

which becomes

http://zfstest-adm-a.dbsubnet.bgrennvcn.oraclevcn.com/n/objectstorage/newobjects/o/

The rest of the information except for tenancy is in the configuration file.

Parameter in config file value
user ocid1.user.oc1..{ZFS user} ==> ocid1.user.oc1..oracle 
fingerprint {my fingerprint} ==> 88:bf:b8:95:c0:0a:8c:a7:ed:55:dd:14:4f:c4:1b:3e
key_file This file contains the private key, and we will use this in APEX
region This is always us-phoenix-1 and is 
namespace share name ==> objectstorage
compartment
share name ==> objectstorage


NOTE: The tenancy ID for ZFSSA is always  "ocid1.tenancy.oc1..nobody"


In APEX configure web credentials

Now that we have all of the authentication information outlined in the previous step, we need to configure web credentials to access the OCI object storage on ZFSSA as a rest service.

In order to add the web credentials I log into my workspace in APEX. Note I am added the credentials at the workspace level rather than at the application level.
Within your workspace make sure you are within the "App Builder" section and click on "Workspace Utilities". 


Within "Workspace Utilities" click on "web Credentials".


Now click on "Create >" to create new web credential


Enter the information below (also see screen shot)

  • Name of credential
  • Type is OCI
  • user Id from above
  • private key from above
  • Tenancy ID is always ocid1.tenancy.oci1..nobody for ZFSSA
  • Fingerprint that matches the public/private key
  • URL for the ZFS


In apex create the upload region and file selector

I have an existing application, or you can create a new application in apex. I am going to start by creating a blank page in my application.


After clicking on "Next >", I give the new page a name and create the page.


Then on the new page I created a new region by right clicking on "Body"


Once I created the region, I named the region "upload" by changing the identification on the right hand side of Page Designer.


Then on the left hand side of Page Designer, I right clicked on my region "upload" and chose to create a new "Page Item".


After creating the new page item I needed to give the item a better identification name and change the type to "file upload". See the screen shot below.


In apex create the Button to submit the file to be stored in object storage.


Next we need to add a button to upload the file to object storage.  Right click on the "upload" region, and this time choose "create button below".


I gave the button a clearer name to identify what it's there for


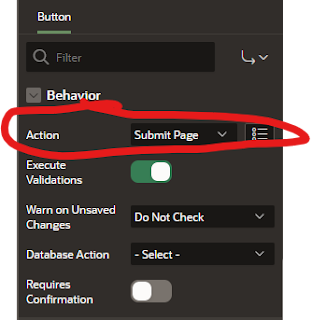
And I scrolled down the attributes of the button on the right hand side, and made sure that the behavior for the button was "Submit Page"


In apex add the upload process itself

Click on the processing section in the top left corner of Page Designing and you will see the sections for page process.  Right click on "Processing" and click on "Create process"


The next step is to give the process a better identifier, and I named my "file_upload", and I also need to include the PL/SQL code to execute as part of this process.

The items we need to customer for the code snippet are.

ITEM VALUE
File Browse Page Item ":" followed by the name of the file selector. Mine is ":FILE_NAME"
Object Storage URL This is the whole URL including namespace and bucket name
Web Credentials This is the name for the Web Credentials created for the workspace


My PL/SQL code is below with the values I've mentioned throughout this blog.


declare
    l_request_url varchar(32000);
    l_content_length number;
    l_response clob;
    upload_failed_exception exception;
    l_request_object blob;
    l_request_filename varchar2(500);
    begin
        select blob_content, filename into l_request_object, l_request_filename from apex_application_temp_files where name = :FILE_NAME;
        l_request_url := 'http://zfstest-adm-a.dbsubnet.bgrennvcn.oraclevcn.com/n/objectstorage/b/newobjects/o/' || apex_util.url_encode(l_request_filename);        
l_response := apex_web_service.make_rest_request(
            p_url => l_request_url,
            p_http_method => 'PUT',
            p_body_blob => l_request_object,
            p_credential_static_id => 'ZFSAPI'
        );end;


In the APEX database ensure you grant access to the URL

The final step before we test this is to add the ACL grant for the URL.
NOTE: This needs to be granted to to the apex application owner, in my case APEX_230200

BEGIN
    DBMS_NETWORK_ACL_ADMIN.APPEND_HOST_ACE(
        host => '*',
        ace => xs$ace_type(privilege_list => xs$name_list('connect', 'resolve'),
            principal_name => 'APEX_230200',
            principal_type => xs_acl.ptype_db
        )
    );
END;
/


Upload the object and verify it was successful

After saving the page in Page Designer run the page to upload an object.
Choose an object from your local file system and click on the "Upload Object" button.

If there were no errors, it was successful and you can verify it was uploaded by listing the objects in the bucket.
Below is my statement to list the objects.

oci os object list --endpoint http://zfstest-adm-a.dbsubnet.bgrennvcn.oraclevcn.com  --namespace-name objectstorage --bucket-name newobjects


 That's all there is to it

Tuesday, December 19, 2023

ZFSSA can be used to share data from your Oracle Database

 Data Sharing has become a big topic recently, and Oracle Cloud has added some new services to allow you to share data from an Autonomous Database.  But how do you do this with your on-premises database ? In this post I show you how to use ZFS as your data sharing platform.


Data Sharing

Being able to securely share data between applications is a critical feature in todays world.  The Oracle Database is often used to consolidate and summarize collected data, but is not always the platform for doing analysis.  The Oracle Database does have the capability to analyze data, but tools such as Jupyter Notebooks, Tableu, Power Bi, etc are typically the favorites of Data Scientists and data analysts.

The challenge is how to give access to specific pieces of data in the database without providing access to the database itself.  The most common solution is to use object storage and pre-authenticated URLs.  Data is extracted from the database based on the user and stored in object storage in a sharable format (JSON for example).  With this paradigm, and pictured above, you can create multiple datasets that contain a subset of the data specific to the users needs and authorization.  The second part is the use of a pre-authenticated URL.  This is a dynamically created URL that allows access to the object without authentication. Because it contains a long string of random characters, and is only valid for a specified amount of time, it can be securely shared with the user.

My Environment

For this post, I started with an environment I had previously configured to use DBMS_CLOUD.  My database is a 19.20 database.  In that database I used the steps specified in the MOS note and my blog (information can be found here) to use DBMS_CLOUD.

My ZFSSA environment is using 8.8.63, and I did all of my testing in OCI using compute instances.

For preparation to test I had

  • Installed DBMS_CLOUD packages into my database using MOS note #2748362.1
  • Downloaded the certificate for my ZFS appliance using my blog post and added them to wallet.
  • Added the DNS/IP addresses to the DBMS_CLOUD_STORE table in the CDB.
  • Created a user in my PDB with authority to use DBMS_CLOUD
  • Created a user on ZFS to use for my object storage authentication (Oracle).
  • Configured the HTTP service for OCI
  • Added my public RSA key from my key par to the OCI service for authentication.
  • Created a bucket
NOTE:  In order to complete the full test, there were 2 other items I needed to do.

1) Update the ACL to also access port 80.  The DBMS_CLOUD configuration sets ACLs to access websites using port 443.  During my testing I used port 80 (http vs https).
2) I granted execute on DBMS_CRYPTO to my database user for the testing.

Step #1 Create Object

The first step was to create an object from a query in the database.  This simulated pulling a subset of data (based on the user) and writing it to a object so that it could be shared.  To create the object I used the DBMS_CLOUD.EXPORT_DATA package.  Below is the statement I executed.

BEGIN
 DBMS_CLOUD.EXPORT_DATA(
       credential_name => 'ZFS_OCI2',  
    file_uri_list =>'https://zfs-s3.zfsadmin.vcn.oraclevcn.com/n/zfs_oci/b/db_back/o/shareddata/customer_sales.json',
    format => '{"type" : "JSON" }',
   query => 'SELECT OBJECT_NAME,OBJECT_TYPE,STATUS FROM user_objects');
END;
/

In this example:
  • CREDENTIAL_NAME - Refers to my authentication credentials I had previously created in my database.
  • FILE_URI_LIST - The name and location of the object I want to create on the ZFS object storage.
  • FORMAT - The output is written in JSON format
  • QUERY - This is the query you want to execute and store the results in the object storage.  
As you can see, it would be easy to create multiple objects that contain specific data by customizing the query, and naming the object appropriately.

In order to get the  proper name of the object I then selected the list of objects from object storage.

set pagesize 0
SET UNDERLINE =
col object_name format  a25
col created format  a20
select object_name,to_char(created,'MM/DD/YY hh24:mi:ss') created,bytes/1024  bytes_KB 
       from dbms_cloud.list_objects('ZFS_OCI2', 'https://zfs-s3.zfsadmin.vcn.oraclevcn.com/n/zfs_oci/b/db_back/o/shareddata/');


 customer_sales.json_1_1_1.json 12/19/23 01:19:51    3.17382813


From the output, I can see that my JSON file was named 'customer_sales.json_1_1_1.json'.


Step #2 Create Pre-authenticated URL

The Package I ran to do this is below. I am going to break down the pieces into multiple sections. Below is the full code.


Step #2a Declare variables

The first part of the pl/sql package declares the variables that will be used in the package. Most of the variables are normal VARCHAR variables, but there a re a few other variable types that are specific to the packages used to encrypt and send the URL request.

  • sType,kType - These are constants used to sign the URL request with  RSA 256 encryption
  • utl_http.req,utl_http.resp - These are request and response types used when accessing the object storage
  • json_obj - This type is used to extract the url from the resulting JSON code returned from the object storage call. 

Step #2b Set variables

In this section of code I set the authentication information along with the host, and the private key part of my RSA public/private key pair. 
I also set a variable with the current date time, in the correct GMT format.

NOTE: This date time stamp is compared with the date time on the ZFSSA. It must be within 5 minutes of the ZFSSA date/time or the request will be rejected.

Step #2c Set JSON body

In this section of code, I build the actual request for the pre-authenticated URL.  The parameters for this are...
  • accessType - I set this to "ObjectRead" which allows me to create a URL that points to a specific object.  Other options are Write, and ReadWrite.
  • bucketListingAction - I set this to "Deny",  This disallows the listing of objects.
  • bucketName - Name of the bucket
  • name - A name you give the request so that it can be identified later
  • namespace/namepaceName - This is the ZFS share
  • objectName - This is the object name on the share that I want the request to refer to. 
  • timeExpires - This is when the request expires.
NOTE: I did not spend the time to do a lot of customization to this section.  You could easily make the object name a parameter that is passed to the package along with the bucketname etc. You could also dynamically set the expiration time based on sysdate.  For example you could have the request only be valid for 24 hours by dynamically setting the timeExpires.

The last step in this section of code is to create a sha256 digest of the JSON "body" that I am sending with the request.  I created it using the dbms_crypto.hash.

Step #2d Create the signing string

This section builds the signing string that is encrypted.  This string is set in a very specific format.  The string that is build contains.

(request-target): post /oci/n/{share name}/b/{bucket name}/p?compartment={compartment} 
date: {date in GMT}
host: {ZFS host}
x-content-sha256: {sha256 digest of the JSON body parameters}
content-type: application/json
content-length: {length of the JSON body parameters}

NOTE: This signing string has to be created with the line feeds.

The final step in this section is sign the signing string with the private key.
In order to sign the string the DBMS_CRYPTO.SIGN package is used.


Step #2e Build the signature from the signing string


This section takes the signed string that was built in the prior step and encodes the string in Base 64.  This section uses the utl_encode.base64_encode package to sign the raw string and it is then converted to a varchar.

Note: The resulting base64 encoded string is broken into 64 character sections.  After creating the encoded string, I loop through the string, and combine the 64 character sections into a single string.
This took the most time to figure out.

Step #2f Create the authorization header

This section dynamically builds the authorization header that is sent with the call.  This section includes the authentication parameters (tenancy OCID, User OCID, fingerprint), the headers (these must be in the order they are sent), and the signature that was created in the last 2 steps.

Step #2g Send a post request and header information


The next section sends the post call to the ZFS object storage followed by each piece of header information.  After header parameters are sent, then the JSON body is sent using the utl_http.write_text call.  

Step #2h Loop through the response

This section gets the response from the POST call, and loops through the response.  I am using the json_object_t.parse call to create a JSON type, and then use the json_obj.get to retrieve the unique request URI that is created.
Finally I display the resulting URI that can be used to retrieve the object itself.


Documentation

There were a few documents that I found very useful to give me the correct calls in order to build this package.

Signing request documentation : This document gave detail on the parameters needed to send get or post requests to object storage.  This document was very helpful to ensure that I had created the signature properly.

Http message signature format : This document gives detail on the signature itself and the format.

OCI rest call walk through : This post was the most helpful as it gave an example of a GET call and a PUT call. I was first able to create a GET call using this post, and then I built on it to create a GET call. 


Monday, December 4, 2023

File Retention on ZFS now supports expired file deletion/holds and changing permissions

 The latest release of ZFS (8.8.63) contains 2 new features associated with File Retention lock.

  • File retention (deletion or hold) after file expiration
  • Allow permission changes on retained files.


File retention on expiry policy

This new setting for projects/shares defaults to "off" which is the normal behavior of unlocking files, but leaving them on the filesystem.  In order to delete files you need to wait until the retention period expires, and then you can delete the file.

There are 2 new settings you can use to work with locked files to change this behavior.

Delete

When set to "Delete", files will be immediately deleted when their retention lock expires. This can be very useful if you want files to be automatically cleaned up at the end of their retention without having to create a deletion process.

There are a few items to be aware of the automatic deletion process.
  1. DO NOT use this with an RMAN retention window.  Customers typically use a weekly full/daily incremental backup strategy with RMAN. With this strategy, a weeks worth of backups (all dependent on the oldest full backup) are deleted together.  Deleting backups as soon as they expire would delete backups too soon.  Even with archival backups I recommend letting RMAN perform the deletions, otherwise you risk having a file deleted too early.
  2. Be careful changing this setting on an existing share.  This setting takes effect immediately and will affect ALL files that have a retention lock.  Any files that were locked, but their retention lock expired will be deleted when this setting is applied.

Hold

When set to "Hold", any files that have, or have had a retention lock will be affected.  This setting  immediately prevents the deletion of all retention locked files until the hold is removed regardless of when the lock is set to expire.  Keep in mind that while a hold is in place, the files still have a retention lock with an expiration date.

Removing the hold: When you remove the hold, the normal expiration date takes effect.  If you remove the hold by changing the expiry policy to "Delete", ALL files that have an expired retention will be immediately deleted.  If you change the expire policy to "Off", the files remain, and you must manually delete them.


NOTE: Be very careful when changing the Expiry Policy.  The new setting immediately affects existing files, not just new files going forward, unlike the other file retention settings.


Allow permission changes on retained files


What happens normally : When a file has a retention lock set, you are protecting this file from both being deleting AND from being updated. Because you were not allowed to update the file permissions, you were not able to change the settings from the default of -r--r-----+ while the file was locked.

This could be an issue depending on what type of file you are protecting. There are some cases where you want to make this file either
  • An executable file, not just a read only file.
  • readable by any user.
When you attempted to make this change to a locked file the update would fail with a "Operation not permitted".

-r--r-----+ 1 oracle oinstall 792 Dec  4  2023 testfile
[oracle@ssh-server rmanbackups]$ ls -al testfile
-r--r-----+ 1 oracle oinstall 792 Dec  4 20:26 testfile
[oracle@ssh-server rmanbackups]$ chmod 550 testfile
chmod: changing permissions of 'testfile': Operation not permitted
[oracle@ssh-server rmanbackups]$ chmod 444 testfile
chmod: changing permissions of 'testfile': Operation not permitted
[oracle@ssh-server rmanbackups]$


What this setting does: When you check the setting for "Allow permission changes on retained files" you are IMMEDIATELY able to change the permissions on files that are locked.  The files are still protected from making them writable, but you can adjust both the "r" - read and "x" execute settings for all users. 

NOTE: this setting does take affect immediately and will affect all currently locked files regardless of when they were created.

Thursday, September 21, 2023

ZFS storing encryption keys in Oracle Key Vault (OKV)

 ZFS can be configured to use Oracle Key Vault (OKV)  as a KMIPs cluster to store it's encryption keys. In this blog post I will go through how to configure my ZFS replication pair to utilize my OKV cluster and take advantage of the Raw Crypto Replication mode introduced in 8.8.57.


OKV Cluster Environment:

First I am going to describe the environment I am using for my OKV cluster.

I have 2 OKV servers, OKVEAST1 ( IP:10.0.4.230)  and OKVEAST2 (IP: 10.0.4.254). These OKV servers are both running 21.6 (the current release as of writing this post).


ZFS replication Pair:

For my ZFS pair, I am using a pair of ZFS hosts that I have been running for awhile.  My first ZFS host is "testcost-a" (IP: 10.0.4.45)  and my second ZFS host is "zfs_s3"( IP: 10.0.4.206).  Both of these servers are running the 8.8.60 release.

For my replication, I already have "testcost-a" configured as my upstream, and "zfs_s3" configured as the downstream.

Steps to configure encryption using OKV

Documentation:

The documentation I am using to configure ZFS can be found in the 8.8.x Storage Administrators guide.  I did look through the documentation for OKV, and I didn't find anything specific that needs to be done when using OKV as a KMIP server.

Step #1 - Configure endpoints/wallets in OKV

The first step is to create 2 endpoints in OKV and assign a shared wallet between these 2 endpoints. 

 I am starting by creating a single wallet that I am going to use share the encryption keys between my 2 ZFS replication pairs.  I


The next step after creating the wallet is to create the 2 endpoints. Each ZFS host is an endpoint. Below is the screenshot for adding the first node.


After creating both endpoints I see them in the OKV console.


Then I click on each endpoint and ensure that 

  • The default wallet for each endpoint is the "ZFS_ENCRYPTION_KEYS" wallet
  • The endpoint has the ability to manage this wallet.


Then I go back to endpoint list in the console and save the "enrollment token" for each node and logout.

Server                    Enrollment Token

ZFS_S3        FdqkaimSpCUBfVqV

TESTCOST-A         uy59ercFNjBisU12

I then go to the main screen for OKV and click on the enrollment token download


Enter the Enrollment Token and click on "Submit Token"


You see that the token is validated. Then click on Enroll and it will download the token "okvclient.jar" which I am renaming to okvclient_{zfs server}.zip.  This will allow me to extract the certificates.

When completed, I have enrolled the endpoints and I am ready to add them to the ZFS.


Step #2 - Add the Certificates 

When I look at the .jar files that were created for the endpoints I can see all the files that are included in the endpoint enrollment. I need to add the certificates to the ZFS servers.  I can find those in the "ssl" directory contained in .jar file.


I start by uploading the "key.pem" for my first ZFS "testcost-a" in the Configuration=>SETTINGS=>Certificates=>System section of the BUI.


After uploading it I then add the "cert.pem" certificate in system also.


After uploading, I clicked in the pencil to see the details for the certificate.  

NOTE: The IP Address is the primary node in my OKV cluster.

Under Certificates=>Trusted I uploaded the CA.pem certificate.


After uploading this certificate, I click on the pencil and select "kmip" identifying this certificate to be used for the KMIP service.


The certificate should now appear as a trusted KMIP services certificate.


I can now upload the certificates for my other ZFS server (zfs_s3) the same way.


Step #3 - Add the OKV/KMIP service

I now navigate to the Shares=>ENCRYPTION=>KMIP section of the BUI to add the KMIP servers to my first ZFS host.  Because I have 2 possible KMIP servers (I am using an OKV cluster), I am going to uncheck the "Match Hostname against certificate subject" button.  I left the default to destroy the key when removing it from the ZFS.

I added the 2 OKV servers (if I had a more than 2 nodes in my cluster I would add those nodes also).  I added the port used for KMIP services on OKV (5696), and I chose the "Client TLS Authentication Certificate" I uploaded in the previous step (FLxULFbeMO).


I perform the same process on my second ZFS so that the paired ZFS servers are all configured to communicate with my OKV cluster to provide KMIP services.

NOTE: If you want to get the list of OKV hosts in the cluster you can look in the .jar file within the conf=>install.cfg file to see the OKV servers details. Below is the contents of my file.


Once I add the KMIP configuration to both of my ZFS servers I can look at my endpoints in OKV and see that they are both ENROLLED, and that OKV knows the IP address of my ZFS servers.


Step #4 - Add one or more keys.

On my upstream ZFS, I click on the "+" to add a new key and save it.


After adding it, the key appears in this section.


Step #5 - Add the keys to the shared wallet

I noticed that even though the wallet is the default wallet for the endpoints, the key did not get added to the wallet. I can see that both nodes have access to manage the wallet.


I clicked on the wallet, and then the "Add Contents", from there I am adding my new key to the wallet.


And now I login into the second ZFS (zfs_s3) and add the same key.  Make sure you add the same named key on the second ZFS so that they can match.

Step #6 - Create a new encrypted project/share

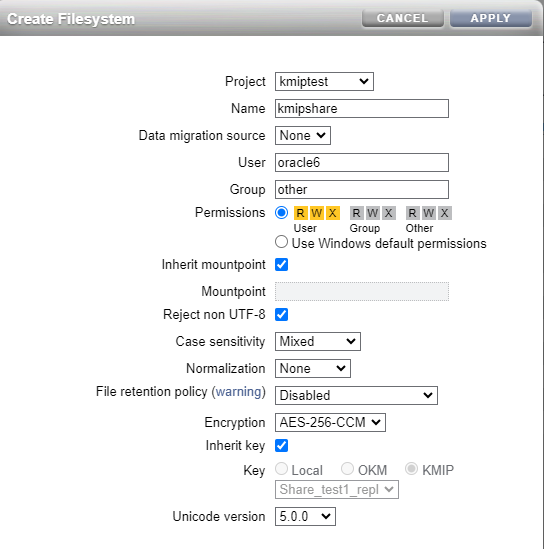
On my first ZFS (upstream - testcost-a) I am creating a new project and share that is encrypted using the key from the KMIP service.


Then within the share, I configure replication to my paired ZFS.
And now I am creating a share within this project.


Step #7 - Configure replication

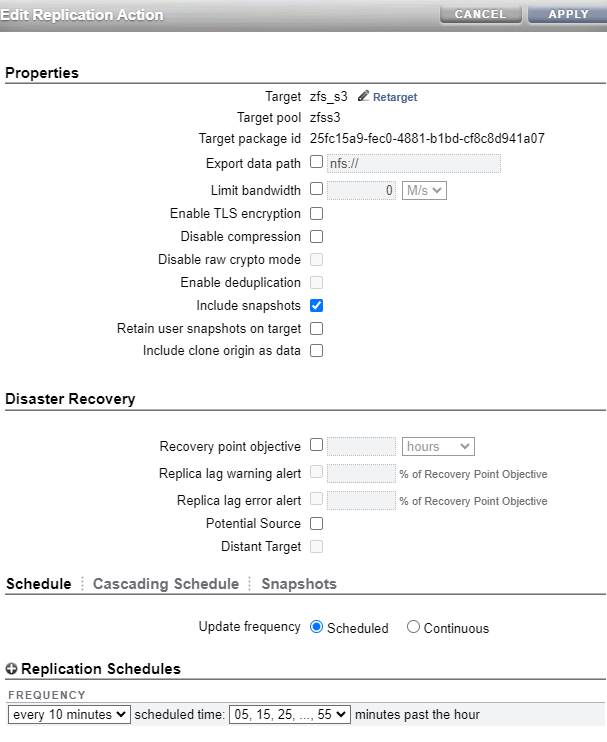
Finally I configured replication from my project in my upstream (testcost-a) to my downstream (zfs_s3).  Below are the settings for my replication processing to send a snapshot every 10 minutes.  Notice that I made sure that I did NOT disable raw Crypto Mode (which is what I am using for this replication).  You can follow this link to learn more about Raw Crypto Replication.


Result:


I now have replication on my encrypted share working between my upstream and downstream.  With this new feature, the blocks are sent in their original encrypted format, and are stored on the downstream encrypted.  Since both ZFS servers can access the encryption key, both servers are able to decrypt the blocks.

I did test shutting down one of my OKV hosts, and found that the ZFS severs were able to successfully connect to the surviving node.

I even mounted the share, stored some files, replicated it, mounted a snapshot copy, and ensured that both ZFS servers presented the shares readable.

Wednesday, August 2, 2023

ZDLRA - Copy-to-cloud steps by step explained

 One of the best features of the ZDLRA is the ability to dynamically create a full Keep backup and send it to Cloud (ZFSSA or OCI) for archival storage.

Here is a great article by Oracle Product Manager Marco Calmasini that explains how to use this feature.


In this blog post, I will go through the RACLI steps that you execute, and explain what is happening with each step

The documentation I am started with is the 21.1 administrators Guide which can be here.  If you are on a more current release, then you can find the steps in chapter named "Archiving Backups to Cloud".


Deploying the OKV Client Software

To ensure that all the backup pieces are encrypted, you must use OKV (Oracle Key Vault) to manage the encryption keys that are being used by the ZDLRA.  Even if you are using TDE for the datafiles, the copy-to-cloud process encrypts ALL backup pieces including the backup of the controlfile, and spfile which aren't already encrypted.

I am not going to go through the detailed steps that are in the documentation to configure OKV, but I will just go through the high level processes.

The most important items to note on this sections are

  • Both nodes of the ZDLRA are added as endpoints, and they should have a descriptive name that identifies them, and ties them together.
  • A new endpoint group should be created with a descriptive name, and both nodes should be added to the new endpoint group.
  • A new virtual wallet is created with a descriptive name, and this needs to both associated with the 2 endpoints, and be the default wallet for the endpoints.
  • Both endpoints of the ZDLRA are enrolled through OKV and during the enrollment process a unique enrollment token file is created for each node. It is best to immediately rename the files to identify the endpoint it is associated with using the format <myhost>-okvclient.jar.
  • Copy the enrollment token files to the /radump directory on the appropriate host.
NOTE: It is critical that you follow these directions exactly, and that each node has the appropriate enrollment token with the appropriate name before continuing.

#1 Add credential_wallet

racli add credential_wallet


Fri Jan 1 08:56:27 2018: Start: Add Credential Wallet
Enter New Keystore Password: <OKV_endpoint_password>
Confirm New Keystore Password:
Enter New Wallet Password: <ZDLRA_credential_wallet_password> 
Confirm New Wallet Password:
Re-Enter New Wallet Password:
Fri Jan 1 08:56:40 2018: End: Add Credential Wallet

The first step to configure the ZDLRA to talk to OKV is to have the ZDLRA create a password protected SEPS wallet file that contains the OKV password.
This step asks for 2 new passwords when executing
  1. New Keystore Password - This password is the OKV endpoint password.  This password is used to communicate with OKV by the database, and can be used with okvutil to interact with OKV directly
  2. New Wallet Password - This password is used to protect the wallet file itself that will contain the OKV keystore password.
This password file is shared across both nodes.

Update contents      -  "racli add credential"
Change password    - "racli alter credential_wallet"

#2 Add keystore

racli add keystore --type hsm --restart_db

RecoveryAppliance/log/racli.log
Fri Jan 1 08:57:03 2018: Start: Configure Wallets
Fri Jan 1 08:57:04 2018: End: Configure Wallets
Fri Jan 1 08:57:04 2018: Start: Stop Listeners, and Database
Fri Jan 1 08:59:26 2018: End: Stop Listeners, and Database
Fri Jan 1 08:59:26 2018: Start: Start Listeners, and Database
Fri Jan 1 09:02:16 2018: End: Start Listeners, and Database

The second step to configure the ZDLRA to talk to OKV is to have the ZDLRA database be configured to communicate with OKV. The Database on the ZDLRA will be configured to use the OKV wallet for encryption keys which requires a bounce of the database.  


Backout         - "racli remove keystore" 
Status            - "racli status keystore"
Update          - "racli alter keystore"
Disable          - "racli disable keystore"
Enable            - "racli enable keystore"

#3 Install okv_endpoint (OKV client software)

racli install okv_endpoint

23 20:14:40 2018: Start: Install OKV End Point [node01]
Wed August 23 20:14:43 2018: End: Install OKV End Point [node01]
Wed August 23 20:14:43 2018: Start: Install OKV End Point [node02]
Wed August 23 20:14:45 2018: End: Install OKV End Point [node02]

The third step to configure the ZDLRA to talk to OKV is to have the ZDLRA nodes (OKV endpoints) enrolled in OKV.  This step will install the OKV software on both nodes of the ZDLRA, and complete the enrollment of the 2 ZDLRA nodes with OKV.  The password that entered in step #1 for OKV is used during the enrollment process.

Status            - "racli status okv_endpoint"

NOTE: At the end of this step, the status command should return a status of online from both nodes.

Node: node02
Endpoint: Online
Node: node01
Endpoint: Online

#4 Open the Keystore

racli enable keystore

The fourth step to configure the ZDLRA to talk to OKV is to have the ZDLRA nodes open the encryption wallet in the database. This step will use the saved passwords from step #1 and open up the encryption wallet.

NOTE: This will need to be executed after any restarts of the database on the ZDLRA.

#5 Create a TDE master key for the ZDLRA in the Keystore

racli alter keystore --initialize_key

The final step to configure the ZDLRA to talk to OKV is to have the ZDLRA create the master encryption for the ZDLRA in the wallet.

Creating Cloud Objects for Copy-to-Cloud

These steps create the cloud objects necessary to send backups to a cloud location.

NOTE: If you are configuring multiple cloud locations, you may go through these steps for each location.

Configure public/private key credentials

Authentication with the object storage is done using an X.509 certificate.  The ZDLRA steps outlined in the documentation will generate a new pair of API signing keys and register the new set of keys.
You can also use any set of API keys that you previously generated by putting your private key in the shared location on the ZDLRA nodes..
In OCI each user can only have 3 sets of API keys, but the ZFSSA has no restrictions on the number of API signing keys that can be created.
Each "cloud_key" represents an API signing key pair, and each cloud_key contains 
  1. pvt_key_path - Shared location on the ZDLRA where the private key is located
  2. fingerprint      - fingerprint associated with the private key to identify which key to use.
You can use the same "cloud_key" to authenticate to multiple buckets, and even different cloud locations.

Documentation steps to create new key pair

#1 Add Cloud_key


racli add cloud_key --key_name=sample_key

Tue Jun 18 13:22:07 2019: Using log file /opt/oracle.RecoveryAppliance/log/racli.log
Tue Jun 18 13:22:07 2019: Start: Add Cloud Key sample_key
Tue Jun 18 13:22:08 2019: Start: Creating New Keys
Tue Jun 18 13:22:08 2019: Oracle Database Cloud Backup Module Install Tool, build 19.3.0.0.0DBBKPCSBP_2019-06-13
Tue Jun 18 13:22:08 2019: OCI API signing keys are created:
Tue Jun 18 13:22:08 2019:   PRIVATE KEY --> /raacfs/raadmin/cloud/key/sample_key/oci_pvt
Tue Jun 18 13:22:08 2019:   PUBLIC  KEY --> /raacfs/raadmin/cloud/key/sample_key/oci_pub
Tue Jun 18 13:22:08 2019: Please upload the public key in the OCI console.
Tue Jun 18 13:22:08 2019: End: Creating New Keys
Tue Jun 18 13:22:09 2019: End: Add Cloud Key sample_key

This step is used to generate a new set of API signing keys,
The output of this step is a shared set of files on the ZLDRA which are stored in:
/raacfs/raadmin/cloud/key/{key_name)/

In order to complete the cloud_key information, you need to add the public key to OCI, or to the ZFS and save the fingerprint that is associated with the public key. The fingerprint is used in the next step.

#2 racli alter cloud_key


racli alter cloud_key --key_name=sample_key --fingerprint=12:34:56:78:90:ab:cd:ef:12:34:56:78:90:ab:cd:ef

The fingerprint that is associated with the public key (from the previous step) is added to the ZDLRA cloud_key information so that it can be used for authentication.  
Both the private key, and the fingerprint are need to use the API signing key for credentials.

Using your own API signing key pair

#1 Add cloud_key

racli add cloud_key --key_name=KEY_NAME [--fingerprint=PUBFINGERPRINT --pvt_key_path=PVTKEYFILE]

You can add your own API signing keys to the ZDLRA by  using the "add cloud_key" command identifying both the private key file location (it is best to follow the format and location in the automated steps) and the fingerprint associated with the API signing keys.
It is assumed that the public key has already been added to OCI, or to the ZFSSA.

Status        - racli list cloud_key
Delete        - racli remove cloud_key
Update       - racli alter cloud_key

Documentation steps to create a new cloud_user 

This step is used to create the wallet entry on the ZDLRA that is used for authenticating to the object store.
This step combines the "cloud_key", which contains the API signing keys, the user login information and the compartment (on ZFSSA the compartment is the share ).
The cloud_user can be used for authentication with multiple buckets/locations that are identified as cloud_locations as long as they are within the same compartment (share on ZFSSA).

The format of the command to create a new cloud_user is below

racli add cloud_user 
--user_name=sample_user
--key_name=sample_key
--user_ocid=ocid1.user.oc1..abcedfghijklmnopqrstuvwxyz0124567901
--tenancy_ocid=ocid1.tenancy.oc1..abcedfghijklmnopqrstuvwxyz0124567902
--compartment_ocid=ocid1.compartment.oc1..abcedfghijklmnopqrstuvwxyz0124567903

The parameters for this command are

  • user_name        - This is the username that is associated with the cloud_user to unique identify it.
  • key_name         - This is name of the "cloud_key" identifying the API signing keys to be used.
  • user_ocid          - This is the Username for authentication. In OCI this is the users OCID, in ZFS, this combines the ocid format with the username on the ZFSSA that owns the share.
  • tenancy_ocid    - this is the tenancy OCID in OCI, on ZFSSA it is ignored
  • compartment_ocid - this is the OCID, on ZFSSA it is the share
For more information on configuring the ZFSSA see
How to configure Zero Data Loss Recovery Appliance to use ZFS OCI Object Storage as a cloud repository (Doc ID 2761114.1)


List                - racli list  cloud_user
Delete            - racli remove  cloud_user
Update           - racli alter cloud_user

Documentation steps to create a new cloud_location 

This step is used to associate the cloud_user (used for authentication) with both the location and the bucket that is going to be used for backups.

racli add cloud_location
--cloud_user=<CLOUD_USER_NAME>
--host=https://<OPC_STORAGE_LOCATION>
--bucket=<OCI_BUCKET_NAME>
--proxy_port=<HOST_PORT>
--proxy_host=<PROXY_URL>
--proxy_id=<PROXY_ID>
--proxy_pass=<PROXY_PASS>
--streams=<NUM_STREAMS>
[--enable_archive=TRUE]
--archive_after_backup=<number>:[YEARS | DAYS]
[--retain_after_restore=<number_hours>:HOURS]
--import_all_trustcert=<X509_CERT_PATH>
--immutable
--temp_metadata_bucket=<metadata_bucket>  


I am going to go through the key items that need to be entered here.  I am going to skip over the PROXY information and certificate.

  • cloud_user - This is the object store authentication information that was created in the previous steps.
  • host - This the URL for the object storage location. On ZFS the namespace in the URL is the "share"
  • bucket - This is the bucket where the backups will be sent. The bucket will be created if it doesn't exists. 
  • streams - The maximum number of channels to use when sending backups to the cloud
  • enable_archive - Not used with ZFS. With OCI the default TRUE allows you to set an archival strategy, FALSE will automatically put backups in archival storage.
  • archive_after_restore - Not used with ZFS. Automatically configures an archival strategy in OCI
  • retain_after_restore - Not used with ZFS. Sets the period of time that backups will remain in standard storage before returning to archival storage.
  • immutable - This allows you to set retention rules on the bucket by using the <metadata_bucket> for temporary files that need to be deleted after the backup. When using immutable you must also have a temp_metadata_bucket
  • temp_metadata_bucket - This is used with immutable to configure backups to go to 2 buckets, and this bucket will only contain a temporary object that gets deleted after the backup completes.
This command will create multiple attribute sets (between 1 and the number of streams) for the cloud_location that can be used for sending archival backups to the cloud with different numbers of channels.
The format of <copy_cloud_name> is a combination of  <bucket name> and <cloud_user>.
The format of the attributes used for the copy jobs is <Cloud_location_name>_<stream number>


Update          - racli alter cloud_location
Disable          - racli disable cloud_location  - This will pause all backups going to this location
Enable           - racli enable cloud_location  - This unpauses all backups going to this location
List                - racli list  cloud_location
Delete            - racli remove cloud_location

NOTE: There are quite a few items to note in this section.
  • When configuring backups to go to ZFSSA use the documentation previously mentioned to ensure the parameters are correct.
  • When executing this step with ZFSSA, make sure that the default OCI location on the ZFSSA is set to the share that you are currently configuring. If you are using multiple shares for buckets, then you will have to change the ZFSSA settings as you add cloud locations.
  • When using OCI for archival ensure that you configure the archival rules using this command. This ensures that the metadata objects, which can't be archived are excluded as part of the lifecycle management rules created during this step.


Create the job template using the documentation.