Showing posts with label cloud. Show all posts

Saturday, February 13, 2021

Oracle Database 19c now supports DBMS_CLOUD.

 If you have been wondering why I've spent so much time blogging about how to configure ZFS as an object store, today is the day you get the answer.


Today MOS note 2748362.1 - How To Setup And Use DBMS_CLOUD Package was published.


You are probably saying, "so what?, 21c supports DBMS_CLOUD, and that's a long way off for me"..

This note goes through the steps to configure DBMS_CLOUD for 19c. Yes. it's backported !

NOTE: it is only supported for multitenant

If you were very astute, you might have noticed that the 19.9 release of the software contained scripts in the $ORACLE_HOME/rdbms/admin directory with names like dbms_cloud.sql.

Well today, this published notes explains how to install DBMS_CLOUD packages so that you can use it with your 19.9 + database.

I'm going to take this a step further, and show you how to use these scripts and connect the ZFS appliance.  Keep in mind, there is a ZFS simulator you can use, and do the same steps.

Here is some information on how to do this if you don't know where to start

Configuring ZFS as an object store

Step 1. Install DBMS_CLOUD in the CDB

I am going through the MOS, and I am following the same series of steps.  Creating a script in my /home/oracle/dbc directory, so that I can run this again for all my databases.

Just as in the note, I ran a perl script, and looked at the logs. Everything was successful.

I then ran the 2 queries. First against the CDB, then against the PDB.


So far so good.


Step 2 Create SSL Wallet with Certificates.

The next step is to create a wallet, and download the certificates using the link.  The certificates come in a zip file containing all 3 certificates.

VeriSign.cer
BaltimoreCyberTrust.cer
DigiCert.cer

These are the Certificate Authorities that will be used to authenticate the SSL certificates.  DBMS_CLOUD uses HTTPS, and requires that a valid certificate is used.


ZFS NOTE BEGIN : *************************************

At this point there is an additional step for using ZFS (or your own object store). You need to add the certificate to the wallet if it is a self-signed certificate (which is what ZFS will use normally).

In order to get the certificate you need to display it with the following command (filling in your IP address).

openssl s_client -showcerts -connect 10.136.64.85:443

From the output I want to grab the certificate which is between the BEGIN and END


-----BEGIN CERTIFICATE-----
MIIEWTCCA0GgAwIBAgIIXJAYBgAAAAIwDQYJKoZIhvcNAQELBQAwcDEtMCsGA1UE
AwwkenM3LTJjYXAtMjAwZi12bTAyLnVzLm9zYy5vcmFjbGUuY29tMT8wPQYDVQQN
DDZodHRwczovL3pzNy0yY2FwLTIwMGYtdm0wMi51cy5vc2Mub3JhY2xlLmNvbToy

..

oH4pa4Hv4/s0GKJcjQDTlhyyAQXHD+EDfa0KSqP6+Rcwv9+pzXhTJu6IYJLanKo

uM6RxG2XAIH82blU+A==
-----END CERTIFICATE-----

Once I put it in a file, I perform the same command to load these certificates from my file.

ZFS NOTE END : *****************************************

Once added I display what is in the wallet.

orapki wallet display -wallet .
Oracle PKI Tool Release 21.0.0.0.0 - Production
Version 21.0.0.0.0
Copyright (c) 2004, 2020, Oracle and/or its affiliates. All rights reserved.

Requested Certificates:
User Certificates:
Trusted Certificates:

Subject:        2.5.4.13=https://zs7-2cap-200f-vm02.bgrenn.com:215/\#cert,CN=zs7-2cap-200f-vm02.bgrenn.com
Subject:        2.5.4.13=https://zs7-2cap-200f-vm01.bgrenn.com:215/\#cert,CN=zs7-2cap-200f-vm01.bgrenn.com
Subject:        CN=DigiCert Global Root CA,OU=www.digicert.com,O=DigiCert Inc,C=US
Subject:        CN=Baltimore CyberTrust Root,OU=CyberTrust,O=Baltimore,C=IE
Subject:        CN=VeriSign Class 3 Public Primary Certification Authority - G5,OU=(c) 2006 VeriSign\, Inc. - For authorized use only,OU=VeriSign Trust Network,O=VeriSign\, Inc.,C=US


You can see that it captured the server names of the ZFS ports I am using.


Step 3 Configure the Oracle environment for the Wallet.


I followed the next set of instructions to update the sqlnet.ora file with the location of wallet.

A few items to note on this step
  • I am in a RAC environment so I need to make the change to ALL nodes in my RAC cluster, and I also need to copy the wallet to the nodes in the same location on all hosts.
  • The WALLET_LOCATION is also used by ZDLRA. if you are using a ZDLRA for backups, you need add the certificates to wallet that is used by the ZDLRA.
  • If you using Single Sign On which may use the WALLET_LOCATION, be especially careful since they often default to $ORACLE_BASE, but will get over ridden when this is set.
I completed these steps, and I now have the same sqlnet.ora file on all nodes, and my wallet is on all nodes in the same location under $ORACLE_BASE.

Step 4 Configure the Database with ACEs for DBMS_CLOUD.


The next step is to create Access Control Entries (ACEs) to allow communication. This only needs to be in CDB$ROOT.

I stored the script in a file and changed the script in 2 ways

  • define sslwalletdir= {my wallet locatioin}  --> I set this.
  • I removed all lines around proxy. I didn't need a proxy since I am only using a ZFS internal to my datacenter.
I verified with the query and it returned the location of SSL_WALLET.

Step 5 Verify the configuration of the DBMS_CLOUD

I put the script in a file and made a few changes.

  • wallet_path => {my wallet path}
  • wallet_password => {my wallet password}
  • get_page('https://zs7-2cap-200f-vm02.bgrenn.com') --> I put in the URL for my first ZFS network name (from the certificate) followed by the second name from the certificate.
I got a "valid response" backup.. 
I can also check the ACLs with the script below
SELECT host, lower_port, upper_port, acl
FROM   dba_network_acls;

Step 6 Configure users or roles to use  DBMS_CLOUD

I changed the script to use my username which I created in my PDB to create tables etc. and utilize DBMS_CLOUD, and ran it in my pdb.

I took the second script, removed the proxy information , entered the wallet path and executed in my  PDB.

Step 6 Configure users or roles to use DBMS_CLOUD


I changed the script and added my username in my PDB.


Step 7 Configure ACEs for a user role to use DBMS_CLOUD


Again I removed the proxy information since there was no proxy. I also entered the SSL_wallet directory.

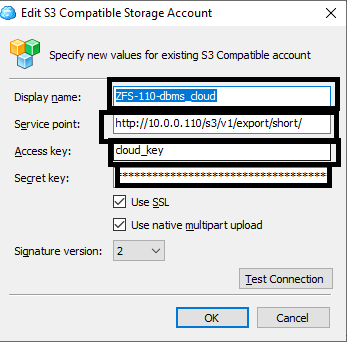
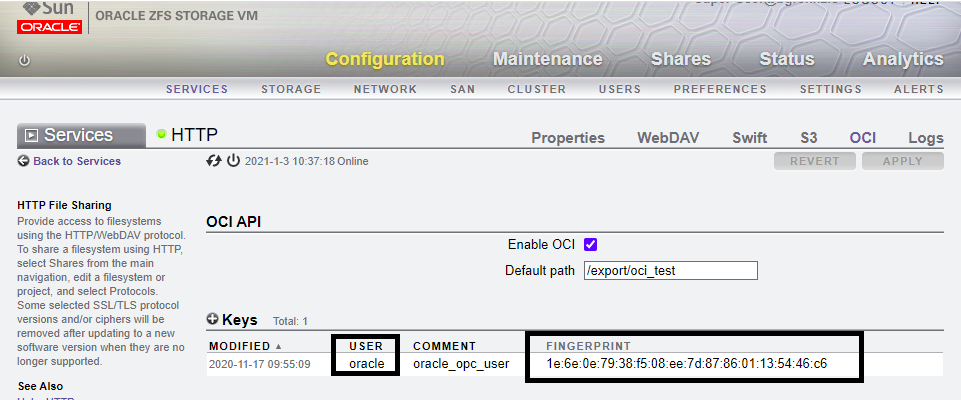
Step 8  Configure the credential for OCI (or S3 if you prefer).


Using the create credential and the parameters I have pointed out in previous posts.

 I create a credential to point to my OCI bucket on ZFS.


exec DBMS_CLOUD.CREATE_CREDENTIAL ( -
    CREDENTIAL_NAME => 'ZFS', -
    USER_OCID => 'ocid1.user.oc1..oracle', -
    TENANCY_OCID => 'ocid1.tenancy.oc1..nobody', -
    PRIVATE_KEY => 'MIIEogIBAAKCAQEAnLe/u2YjNVac5z1j/Ce7YRSd6wpwaK8elS+TxucaLz32jUaDCUfMbzfSBP0WK00uxbdnRdUAss1F1sRUm+GqyEEvT2c1LRJ0FnfSFEXrJnDZfEVe/dFi90fctbx4BUSqRroh0RQbQyk24710zO2C3tev66eHEvfxxXGUqI+jrDKOJ7sFdGE42R9uRhhWxaWS4e43OEZk41gq2ykdVFlNp...mXU6w6blGpxWkzfPMJKuOhXYoEXM41uxykDX3nq/wPWxKJ7TnShGLyiFMWiuuQF+s29AbwtlAkQRcHnnkvDFHwE=', -
    FINGERPRINT => '1e:6e:0e:79:38:f5:08:ee:7d:87:86:01:13:54:46:c6');

Note the parameters for ZFS

  • CREDENTIAL_NAME - Name of the credential
  • USER_OCID - 'ocid1.user.oci..' || {ZFS user id}
  • TENANCY_ID - 'ocid1.tenancy.oci1..nobody' - hardocded in
  • PRIVATE_KEY - Private key matching the public key on the ZFS
  • FINGERPRINT - fingerprint for the public key on the ZFS.

Step 9  Load raw data to the object store.


First I am going to open a file, and put some data into it.. Upload the file to my OCI bucket and then create an external table on it.

Below is the input file.

 16TS$                           TABLE                    1904172019041720190417VALID
        20ICOL$                         TABLE                    1904172019041720190417VALID
         8C_FILE#_BLOCK#                CLUSTER                  1904172019041720190417VALID
        37I_OBJ2                        INDEX                    1904172019041720190417VALID
        22USER$                         TABLE                    1904172019041720190417VALID
        33I_TAB1                        INDEX                    1904172019041720190417VALID
        40I_OBJ5                        INDEX                    1904172019041720190417VALID
        31CDEF$                         TABLE                    1904172019041720190417VALID
        41I_IND1                        INDEX                    1904172019041720190417VALID
         3I_OBJ#                        INDEX                    1904172019041720190417VALID
         6C_TS#                         CLUSTER                  1904172019041720190417VALID
        51I_CON1                        INDEX                    1904172019041720190417VALID
        34I_UNDO1                       INDEX                    1904172019041720190417VALID
        11I_USER#                       INDEX                    1904172019041720190417VALID
        29C_COBJ#                       CLUSTER                  1904172019041720190417VALID
        49I_COL2                        INDEX                    1904172019041720190417VALID
        32CCOL$                         TABLE                    1904172019041720190417VALID
        14SEG$                          TABLE                    1904172019041720190417VALID
        23PROXY_DATA$                   TABLE                    1904172019041720190417VALID
        44I_FILE2                       INDEX                    1904172019041720190417VALID
        46I_USER1                       INDEX                    1904172019041720190417VALID
        56I_CDEF4                       INDEX                    1904172019041720190417VALID
        21COL$                          TABLE                    1904172019041720190417VALID
        47I_USER2                       INDEX                    1904172019041720190417VALID
        26I_PROXY_ROLE_DATA$_1          INDEX                    1904172019041720190417VALID
        18OBJ$                          TABLE                    1904172019041720190417VALID
        42I_ICOL1                       INDEX                    1904172019041720190417VALID
        19IND$                          TABLE                    1904172019041720190417VALID
        39I_OBJ4                        INDEX                    1904172019041720190417VALID
        59BOOTSTRAP$                    TABLE                    1904172019041720190417VALID
        36I_OBJ1                        INDEX                    1904172019041720190417VALID
        15UNDO$                         TABLE                    1904172019041720190417VALID
        10C_USER#                       CLUSTER                  1904172019041720190417VALID
         4TAB$                          TABLE                    1904172019041720190417VALID
         2C_OBJ#                        CLUSTER                  1904172019041720190417VALID
        28CON$                          TABLE                    1904172019041720190417VALID
         5CLU$                          TABLE                    1904172019041720190417VALID
        27I_PROXY_ROLE_DATA$_2          INDEX                    1904172019041720190417VALID
        24I_PROXY_DATA$                 INDEX                    1904172019041720190417VALID
        45I_TS1                         INDEX                    1904172019041720190417VALID
        13UET$                          TABLE                    1904172019041720190417VALID
        12FET$                          TABLE                    1904172019041720190417VALID
        17FILE$                         TABLE                    1904172019041720190417VALID

I created a file locally (/tmp/objects.csv), created a bucket (using the OCI CLI tool) and uploaded the file.

Create the bucket on zfs

oci os bucket create --endpoint http://zs7-2cap-200f-vm02.bgrenn.com/oci --namespace-name export/objectstoreoci --compartment-id export/objectstoreoci --name bucketoci  


And copy my file to my bucket.

oci os object put --endpoint http://zs7-2cap-200f-vm02.bgrenn.com/oci ---namespace-name export/objectstoreoci --bucket-name bucketoci  - --file /tmp/objects.csv  --name objects.csv


Step 10  Create an external table on the object.


Now we have the file in the bucket we are ready to create the external table.

ZFS NOTE BEGIN : ***************************************

There is an additional step to access the ZFS. There is a table owned by C##CLOUD$SERVICE which contains the objects store that can be accessed, and how to authenticated. By looking at the current entries you can see the types for OCI and S3.

until I do this you will an error like this..


ERROR at line 1:
ORA-20006: Unsupported object store URI -
https://zs7-2cap-200f-vm01.bgrenn.oracle.com/export/objectstoreoci/bucketoci
/objects.csv
ORA-06512: at "C##CLOUD$SERVICE.DBMS_CLOUD", line 917
ORA-06512: at "C##CLOUD$SERVICE.DBMS_CLOUD", line 2411
ORA-06512: at line 1

Here is the table that we need to change. You can see that it contains 
  • CLOUD_TYPE - authentication to use
  • BASE_URI_PATTERN - URI pattern to identify and allow
  • VERSION - This is used if different authentication versions exist for an object store
  • STATUS - Not sure, but they are all '1'


 desc C##CLOUD$SERVICE.dbms_cloud_store;
 Name                       Null?    Type
 ----------------------------------------- -------- ----------------------------
 CLOUD_TYPE                        VARCHAR2(128)
 BASE_URI_PATTERN                    VARCHAR2(4000)
 VERSION                        VARCHAR2(128)
 STATUS                         NUMBER

I add a row to this table for my object store.  ORACLE_BMC is the OCI authentication

SQL> insert into C##CLOUD$SERVICE.dbms_cloud_store values ('ORACLE_BMC','%.bgrenn.com',null,1);

1 row created.

SQL> commit;

Commit complete.


ZFS NOTE END : *****************************************


We are ready, now let's create the table and give it a go !!

Create the external table on the object
exec DBMS_CLOUD.CREATE_EXTERNAL_TABLE( -
    table_name      =>'CHANNELS_EXT_ZFS', -
    credential_name =>'ZFS', -
    file_uri_list   =>'https://zs7-2cap-200f-vm01.bgrenn.com/oci/n/export/objectstoreoci/b/bucketoci/o/objects.csv', -
    format          => json_object('trimspaces' value 'rtrim', 'skipheaders' value '1', 'dateformat' value 'YYYYMMDD'), -
    field_list      => 'object_id      (1:10)   char' || -
                      ', object_name    (11:40)  char' || -
                      ', object_type    (41:65)  char' || -
                      ', created_date1  (66:71)  date mask "YYMMDD"' || -
                      ', created_date2  (72:79)  date' || -
                      ', last_ddl_time  (80:87)  date' || -
                      ', status         (88:97)', -
   column_list     => 'object_id      number' || -
                      ', object_name    varchar2(30)' || -
                      ', object_type    varchar2(25)' || -
                      ', status         varchar2(10)' || -
                      ', created_date1  date' || -
                      ', created_date2  date' || -
                      ', last_ddl_time  date');

Select from the table.

OBJECT_ID OBJECT_NAME              OBJECT_TYPE            STATUS
---------- ------------------------------ ------------------------- ----------
CREATED_D CREATED_D LAST_DDL_
--------- --------- ---------
    20 ICOL$              TABLE             VALID
17-APR-19 17-APR-19 17-APR-19

     8 C_FILE#_BLOCK#          CLUSTER            VALID
17-APR-19 17-APR-19 17-APR-19

    37 I_OBJ2              INDEX             VALID
17-APR-19 17-APR-19 17-APR-19


That's all there is to it.

Enjoy !

Wednesday, February 10, 2021

Oracle Cloud object Store access with rlone.

 If you are using the Oracle Object Store as part of the Oracle Public Cloud, "rclone" is an open source tool you can use to make things easier.


One of the things I really like about RCLONE is that it provides a command line like interface that is easy to use.  If you have looked at the OCI cli tool, it requires a myriad of parameters.  Below is the command I was using with OCI to view my list of buckets (I obfuscated some of the values).

oci os bucket list --endpoint https://objectstorage.us-ashburn-1.oraclecloud.com  --namespace-name id20xxxxxofo --compartment-id ocid1.compartment.oc1..aaaaaaxxxxxxxxxxxxxxxxxcpqyvzzb4ykd3tyq --config-file ~/.oci/natdconfig 

In order to use the OCI tool, I had to constantly keep a text file open to copy and paste commands.

In comparison, this is the command to list the buckets in my object store using rlcone.

rclone ls oci_bucket:


1) Configure compatibility for an S3 interface in the Public cloud.

In your public cloud council, in the top right hand corner, click on the "silhouette" that controls you settings. in the pull down menu click on "user settings" to bring up the window to configure you resources.  Once there, click on "Customer Secret keys" and then "Generate Secret Key" bring up the window to add a secret key.


On this window give your secret key a name (like S3Key" in my case).  When you click the "Generate Secret key" button, it will give you secret associated with key. SAVE THIS.

Once complete, you will have 2 items associated with your account

NAME:            S3Key                                                        or whatever you named your key.
Access Key:    ddddddddddddeeeeeeeeeffffffffggggg      A uniquely identified key ID
Secret Key :   dd32234sdwercfwe                                     A system generated "secret"

2) Download rclone.

     This can easily be done from the  RCLONE.ORG site.

    Note: You chose the platform you want to execute rclone on, then download the .zip file.
              The .zip file contains the execute, and documentation.
              Copy the "rclone" executable to the location of your choice and make it executable.


2) Configure Rclone.

    You start by executing "rclone config". This will create a configuration file in ~/.config/rclone/rclone called rclone.conf.  This is an interactive interface that will set the correct configuration parameters to be used.

This is an example of what I entered to connect to my Object Store using the S3 interface.

--> rclone config

Give this entry a unique name to identify the S3 object store.
 
Name> oci_s3    <-- my entry name in the config file 


Type of storage to configure.
Enter a string value. Press Enter for the default ("").
Choose a number from below, or type in your own value
..
 4 / Amazon S3 Compliant Storage Provider (AWS, Alibaba, Ceph, Digital Ocean, Dreamhost, IBM COS, Minio, Tencent COS, etc)
..
Storage> 4      <-- 4 identifies this as an S3 compatible object store


Choose your S3 provider.
Enter a string value. Press Enter for the default ("").
Choose a number from below, or type in your own value
..
13 / Any other S3 compatible provider
..
provider> 13      <-- 13 identifies this as "other" S3 compatible object store


Get AWS credentials from runtime (environment variables or EC2/ECS meta data if no env vars).
Only applies if access_key_id and secret_access_key is blank.
Enter a boolean value (true or false). Press Enter for the default ("false").
Choose a number from below, or type in your own value
 1 / Enter AWS credentials in the next step
   \ "false"

 env_auth> 1     <-- 1 to identify that we are using  "AWS compatible Key" for authentication


AWS Access Key ID.
Leave blank for anonymous access or runtime credentials.
Enter a string value. Press Enter for the default ("").

access_key_id>  ddddddddddddeeeeeeeeeffffffffggggg   <-- This is the Access key ID that was generated from my name in the public cloud


AWS Secret Access Key (password)
Leave blank for anonymous access or runtime credentials.
Enter a string value. Press Enter for the default ("").

secret_access_key> dd32234sdwercfwe  --> The system generated key associated with my access key


Region to connect to.
Leave blank if you are using an S3 clone and you don't have a region.
Enter a string value. Press Enter for the default ("").
Choose a number from below, or type in your own value
 1 / Use this if unsure. Will use v4 signatures and an empty region.
   \ ""

region>        --> Leave blank


Endpoint for S3 API.
Required when using an S3 clone.
Enter a string value. Press Enter for the default ("").
Choose a number from below, or type in your own value

endpoint> {namespace}.compat.objectstorage.{region}.oraclecloud.com   --> Note that you will need to fill in your namespace from your account, and ensure the region is correct for the URL.


Location constraint - must be set to match the Region.
Leave blank if not sure. Used when creating buckets only.
Enter a string value. Press Enter for the default ("").

location_constraint>        --> Leave blank


Canned ACL used when creating buckets and storing or copying objects.

This ACL is used for creating objects and if bucket_acl isn't set, for creating buckets too.

For more info visit https://docs.aws.amazon.com/AmazonS3/latest/dev/acl-overview.html#canned-acl

Note that this ACL is applied when server side copying objects as S3
doesn't copy the ACL from the source but rather writes a fresh one.
Enter a string value. Press Enter for the default ("").
Choose a number from below, or type in your own value
 1 / Owner gets FULL_CONTROL. No one else has access rights (default).
   \ "private"

acl>          --> Leave blank


Edit advanced config? (y/n)
y) Yes
n) No (default)

 y/n>           --> Leave blank


Remote config
--------------------
[oci_s3]
type = s3
provider = Other
env_auth = false
access_key_id = S3_Key
secret_access_key = ddddddd...
endpoint = xxxxxxx.compat.objectstorage.us-ashburn-1.oraclecloud.com
--------------------
y) Yes this is OK (default)
e) Edit this remote
d) Delete this remote

y/e/d> y           --> y to save this entry


3) Validate rclone.


Now let's verify what got create.

> cat ~/.config/rclone/rclone.conf

[oci_s3]
type = s3
provider = other
env_auth = false
access_key_id =dd32234sdwercfwe
secret_access_key = dddddxxxxxx
endpoint = xxxxxxx.compat.objectstorage.us-ashburn-1.oraclecloud.com
acl = authenticated-read

That's It.  In my case 
  • the entry is "oci_s3"
  • The access key for S3 is dd32234sdwercfwe"
  • The secret associated with my S3 key is "dddddxxxxxx"
  • The end point I am connecting to is "xxxxxxx.compat.objectstorage.us-ashburn-1.oraclecloud.com"
    • "xxxxxxx" is my namespace
    • "us-ashburn-1" is my region


4) Using rclone.


Now with rclone I can execute commands against my object store that are more linux like.

rclone mkdir oci_s3:mybucket  --> will create a bucket named "mybucket"
rclone ls oci_s3:  --> will list all my buckets
rclone ls oci_s3:mybucket --> will list all the objects in my bucket.

I can also use it to copy to and from my bucket.

rlcone copy /home/oracle/myfile.txt oci_s3:mybucket   --> copies the file to the bucket.

Finally, a great command is sync to synchronize the contents of my on-prem to the cloud

 rlcone sync /home/oracle/mydir/ oci_s3:mybucket  --> this will sync the two locations

Now how fun with it !!


Tuesday, January 5, 2021

Managing an Object Store on ZFS

 This blog post will cover how to access the object store on ZFS to create buckets and upload files. For S3, I am using Cloudberry, which I downloaded here. For OCI, I am using the OCI cli tool.


S3 access to ZFS

This is the easiest, since the S3 object store on ZFS is an S3 compatible interface.

In cloudberry add a new account and use the following for input.


Note that you need to enter the 4 fields above.

  • Display Name -- What you want to call the new account entry
  • Service Point  -- This is the ZFS interface for S3 in the form of 
HTTP://{the IP of the ZFS}/s3/v1/{share name}
  • Access Key  -- This is the name you gave the S3 access key, when you added it to the ZFS
  • Secret Key   -- This is the long string of characters that was returned by ZFS when you created the key.
That's it ! You can now use cloudberry to create buckets, upload files, sync object stores etc.


OCI access to ZFS

Install the CLI

Like the Oracle cloud, there is currently (as of me writing the blog post), no GUI tool like cloudberry that will connect to an OCI object store.  When connecting to the Oracle cloud, you can access the OCI object store through the S3 interface, but this is not possible on ZFS. Both the OCI and S3 object store are independent and cannot access buckets etc. in the other object store.

In order to access ZFS through OCI we start with downloading the OCI cli tool. Documentation on how do this can be found here.

In my install, I took the easy route  (and since I had a Ubuntu client with root access to play with). I installed it directly using "sudo pip install oci-cli"

Create a config file.


Once you have the OCI cli installed we need to set up a configuration file to be used.
The default file is ~/.oci/config, but this location can be changed when using the command if you access multiple OCI installations.

This is the contents of my file.


1
2
3
4
5
6
7
[DEFAULT]
user=ocid1.user.oc1..oracle
fingerprint=1e:6e:0e:79:38:f5:08:ee:7d:87:86:01:13:54:46:c6
key_file=/home/oracle/opc/oracle_private.pem
tenancy=ocid1.tenancy.oc1..nobody
region=us-phoenix-1
pass_phrase = oracle

Now to walk through each line.

1. This identified the entry. Since the config file can contain entries for multiple OCI locations, this entry is identified as the default entry to use (If I don't specify one).
2. This is the user ID.  Since I am using ZFS, the format is "ocid1.user.oc1..{zfs user}"
3. This is the fingerprint. I mentioned in the last blog post that this will be needed. This fingerprint identifies the API public_key entry on ZFS to use when matching the private API key being sent
4. This is the private key file. This contains the private API key that matches the public key that was added to the ZFS.
5. This is unimportant to ZFS, but is required to be set. Use the entry above.
6. Like #5. this is not used by ZFS but is needed by the OCI client.
7. This is optional. If the API private key was created with a pass_phrase, this the pass_phrase that matches the private key.


Create a bucket on OCI.

Almost there now ! We have everything in place for authentication, and we are ready to create an OCI bucket on ZFS for storing data.

The command is 

oci os bucket create --endpoint {OCI object store location} --namespace-name {location on the object store} --compartment-id {compartment in OCI} --name {new bucket name}


Now let's walk through what the parameters will be for ZFS

--endpoint               -> For my ZFS appliance, it is the url + oci
--namespace-name  -> This is the share on the ZFS.  "/export/short" in my config.
--compartment-id    -> This is also the share on the ZFS.  "/export/short" in my config.
--name                     -> the name of the bucket I want to create.

For my configuration below is the command and the output.. I now have a bucket created, and I am able upload data !


oci os bucket create --endpoint http://10.0.0.110/oci --namespace-name export/short --compartment-id export/short --name mynewbucket 

{
  "data": {
    "approximate-count": null,
    "approximate-size": null,
    "compartment-id": "export/short",
    "created-by": "oracle",
    "defined-tags": null,
    "etag": "a51c8ecbf1429f95b446c4413df9f494",
    "freeform-tags": null,
    "id": null,
    "is-read-only": null,
    "kms-key-id": null,
    "metadata": null,
    "name": "mynewbucket",
    "namespace": "export/short",
    "object-events-enabled": null,
    "object-lifecycle-policy-etag": null,
    "public-access-type": "NoPublicAccess",
    "replication-enabled": null,
    "storage-tier": "Standard",
    "time-created": "2021-01-05T16:15:05+00:00",
    "versioning": null
  },
  "etag": "a51c8ecbf1429f95b446c4413df9f494"
}


ADVANCED TOPIC -- SSL with OCI CLI


Now let's say I want to encrypt my connections to OCI and use the HTTPS server available on ZFS.
First I need to create a file containing the certificate. I can get the certificate by executing.

openssl s_client -showcerts -connect 10.0.0.110:443

This returns a lot of information, but within the output I can see the certificate, and I can copy and paste into a file.

Certificate chain
 0 s:CN = 10.0.0.110, description = https://10.0.0.110:215/#cert
   i:CN = 10.0.0.110, description = https://10.0.0.110:215/#cert
-----BEGIN CERTIFICATE-----
MIIDXDCCAkSgAwIBAgIIW+387wAAAAIwDQYJKoZIhvcNAQELBQAwPDETMBEGA1UE
AwwKMTAuMC4wLjExMDElMCMGA1UEDQwcaHR0cHM6Ly8xMC4wLjAuMTEwOjIxNS8j
Y2VydDAeFw0wNjAyMTUxODAwMDBaFw0zODAxMTkwMzE0MDdaMDwxEzARBgNVBAMM
CjEwLjAuMC4xMTAxJTAjBgNVBA0MHGh0dHBzOi8vMTAuMC4wLjExMDoyMTUvI2Nl
cnQwggEiMA0GCSqGSIb3DQEBAQUAA4IBDwAwggEKAoIBAQCyfgnTMtxgPEtrmCpB
J4gHngdqpRQWnUXA/OtWGymXME/+gAd5Q/8LZ74VpkHIwk3T7z/+tJVgL1HFmmbi
ZRSsXfSUgOBHm0doPn3VGbykz5MHWm3HHwjpPwvVhyeuVEkUfs/yiZ9B1WZrkr6U
ePNKlkbdL1VN5q2zuLdJ7+jn3HIiSS9j10i7HQVFEuzUAGdt3q0rp2MwaxSP6+cZ
hzMaI5IGBHuVkw2fGX1RdDB6uZpFEEhRSHURr5/3d+UgOprkMKp8Wph3kH0E2Nha
tGpSn2/6NM/Up/nDjfu2Dxm9A2aCwC56ShTckTTxE2HrgfSE9r/vEnkJEdSemH+X
9BuRAgMBAAGjYjBgMCYGCWCGSAGG+EIBDQQZFhdBdXRvbWF0aWNhbGx5IGdlbmVy
YXRlZDA2BgNVHREBAf8ELDAqggoxMC4wLjAuMTEwhwQKAABuhhZodHRwczovLzEw
LjAuMC4xMTA6MjE1MA0GCSqGSIb3DQEBCwUAA4IBAQAqxZk2knSBinWvTADkrvuS
C3vkeLyOLCRwABnGzZV80AAZ3tSVZt2JPXtg8uAVEj29J4VFw/I7HuneGL/faW9q
Qr9h+2WjvoT+m6lIfwELeaomZhkrLmJomGqSP1wfw5jaw3cpt0yOeS4RWUYb9eEe
bTH6laFBtSdbaI/uHslxpJwNRDwn8zBpAWmZk83UQ5CytH37yrFPRoHQWp+OqF+V
GYTPA4drxQ00nuelNfpHWMCjjMr0WxFz5rNJPMOAe2W1Xcr/MM1h04kGVwRtYsC0
4izqKtfiOHt0wMkSbYuSj1tIzdEzjVmxNSS7nv/znrMt+6SsdYQHMmaJ4+wHlJo4
-----END CERTIFICATE-----
---
Server certificate
subject=CN = 10.0.0.110, description = https://10.0.0.110:215/#cert

I want to copy the certificate including the "BEGIN CERTIFICATE" and "END CERTIFICATE" lines into a file. 

I now need to set my environment to see the certificate file and use it. In my case "/home/oracle/opc/wallet_cloud/zfs.cer"

export REQUESTS_CA_BUNDLE=/home/oracle/opc/wallet_cloud/zfs.cer

I can now view the buckets in my object store, and upload files encrypted.

oci os bucket list --endpoint https://10.0.0.110/oci --namespace-name export/short --compartment-id export/short 
{
  "data": [
    {
      "compartment-id": "export/short",
      "created-by": "oracle",
      "defined-tags": null,
      "etag": "a51c8ecbf1429f95b446c4413df9f494",
      "freeform-tags": null,
      "name": "mynewbucket",
      "namespace": "export/short",
      "time-created": "2021-01-05T16:15:05+00:00"
    }
  ]
}


The OCI documentation should give you everything you need to upload/download objects within a bucket.

Managing authentication for a ZFS Object Store

 As promised, I am continuing my blog series on how to work with ZFS as a cloud store.


My first blog post went through the steps of how to configure ZFS as an object store.

This post will go through how to create the authentication keys/secrets to access  Object Store.

OCI/S3 user management

The first thing to do is to create a user on the ZFS that will be used as the owner of the object store.

In my case I am going to use the "oracle" account, and ensure that the GUID is the same as the GUID I use on all my DB servers.


NOTE: Most of the information I used to go through the process was from this document.

Create the user

Start by logging into the web interface for the ZFS appliance and navigate to Configuration -> users .

Once on this page, click on the + sign next to users to create a new user. In the example, I had already created the Oracle user.


Now on the create user page, ensure the user is a "local" user, and the "User ID" is the same as the GUID I normally use for Oracle. After entering the information, click on "ADD" in the upper right hand corner to add the user.


Change share ownership

Now that I have the "oracle" user created, I am going to change ownership on my share that will be my object store.

In order to do this, I am going navigate to Shares -> SHARES . I see my object store share and highlight it and click on the pencil icon to edit the share.


I am now on the detail screen for my share, and I navigate to the Shares -> SHARES -> Access page.
On this page, I change the user to be Oracle, and ensure the permissions are open enough. Once this change is made click on the apply button in the top right hand corner.


OCI Authentication.

Create the API keys

Now we need to add to add the API key to authenticate the user to the Object store.
In the case of an OCI bucket, authentication is performed by using an X.509 certificate.
This is the same authentication used for an OCI bucket in the Oracle Cloud.

Instructions on how to create an API signing key can be found here.

In my case I used the linux command instructions, and the openssl command to create both a private and public key.  When completed, I had 2 files.

/home/oracle/opc/oracle_public.pem  
        -----BEGIN PUBLIC KEY-----
        sdfa23
        ....
        -----END PUBLIC KEY-----

/home/oracle/opc/oracle_private.pem  
       -----BEGIN RSA PRIVATE KEY----
        5dfgsret345
        ....
        -----END RSA PRIVATE KEY-----

Add the API key

Now that we generated the Keys, lets add them to the share so we can access the OCI object store.

We start by going to Configuration-> Services -> HTTP. Click on HTTP to bring up the next page.


On this page, we want to go to the OCI tab and add a new key.


On the "New Key" window that popped up, add the Oracle user, and paste in the public key. Once everything is entered click on add to create the key.


Once added make note of the Fingerprint.


S3 Authentication.

Create the Secret.

Unlike OCI, S3 authentication is done through a "secret".  The use of a "secret" is similar to the idea of a Key and a Passcode. You create a new access  key for the user, and you then you are provided a long string that is the "passcode" for this key.

Like creating API key for OCI, we start by going to the HTTP service.


This time we go the S3 tab under HTTP and click on the + sign to add a key.


Enter the oracle user, and give your key a name. Once complete, click on ADD to create the key.


Now you will see a window with the Secret Key.
SAVE THIS KEY. you will not be given this key again. You can copy and paste it, but better yet, save it in a file.


Authentication for S3 and OCI.


When you completed both of these actions you will have 2 authentication pieces that we will use to create buckets and access the object store in future blog posts.

S3 - You have an "ACCESSS_KEY" and a "SECRET_KEY" that will be used.

OCI - You have a file containing the private_key, public_key, and the fingerprint associated with the public_key to identify it.


Friday, November 6, 2020

Cloud restores to a RAC cluster with RMAN.

 This post is about an RMAN command you probably never thought much about,"Autolocate". I know I never did until I started testing restores from a cloud store.


Now let's see what it is, what it does.

First let's see what the documentation says it does.

"RMAN automatically performs autolocation of all files that it must back up or restore. If you use the noncluster file system local archiving scheme, then a node can only read the archived redo logs that were generated by an instance on that node. RMAN never attempts to back up archived redo logs on a channel it cannot read.

During a restore operation, RMAN automatically performs the autolocation of backups. A channel connected to a specific node only attempts to restore files that were backed up to the node. For example, assume that log sequence 1001 is backed up to the drive attached to node1, while log 1002 is backed up to the drive attached to node2. If you then allocate channels that connect to each node, then the channel connected to node1 can restore log 1001 (but not 1002), and the channel connected to node2 can restore log 1002 (but not 1001)."

After reading this, you are probably wondering why this matters when restoring from a cloud store.

To show you, I will walk through what happens during the "autolocate" process.

First, as you would guess, the "autolocation" occurs before any restore operations can start.

Also, this only comes into play when restoring to multiple nodes in the RAC cluster using channels allocated to the different nodes..

To show why it's important to understand it, I will walk through the test case that I had.

EXAMPLE environment:

MYDB - I have a very large Database, 100 TB composed of 8,000 individual datafiles.

DB Host - I have 8 nodes in my RAC cluster

BACKUP - I backed up to a cloud store with a filesperset 1, section size 32G. since my datafiles where all 32G, they would be individual pieces even with a different filesperset.  My backup is composed of ~8,000 individual backup pieces.

RESTORE - In order to improve my restore performance I configured my restore across all 8 nodes.


What happens:

What the "autolocate" does, by default, is it validates that each backup piece is available from each node.  This is a serial process for each backup, AND for each node.

This turned out ot be a slow process due to the # of validations that needed to be performed. For my example it validated 8,000 X 8 = 64,000 validations.  

Also, I found that this serial process took a lot of time.  Even though each validation takes a fraction of a second, the total time for the validation becomes significant.  In my test case, 8 pieces/second were being validated.

This added up because below is what was happening.

START RESTORE :  00:00

    Node 1 - validate 500 pieces : 01:02

    ......

    Node 1 - validate 5000 pieces : 10:25

    ....

    Node 1 - validate 8000 pieces : 16:40

    Node 2 - start validation : 16:40

    ....

    ....

     Node 8 - validate 8000 pieces    2 : 13:20

BEGIN Restoring files.


So how to get around this issue? If you are sure that all backupieces you are restoring are available from every node in your cluster, you can set it off at the beginning of your restore operation.

RMAN> set autolocate off;

During my testing, it bypassed the validation step, and started restoring the database within a few seconds.

This is something to keep in mind, if you see a gap in time between starting a restore on a RAC cluster, and when it starts assigning datafiles to channels.

Tuesday, October 13, 2020

ZFS Appliance - Your on-premise cloud store

 This is the first in a series of posts about using ZFS as a cloud store for your S3 bucket, or your OCI (Oracle Cloud Infrastructure) bucket in your datacenter.


I am going to walk through in the next few posts how to utilize a ZFS appliance as a cloud store.

There maybe a number of reasons why you might want to do this. Maybe you want to learn more about using cloud buckets for storage, or maybe you are already familiar with the the concept, and you want to jump right in.

As my starting point for this I am going to go through how I configured this in my home office lab so you can too.. That is provided that you have enough hardware sitting around to set it up.


Step 1 : Download an Virtual box. 

If you haven't worked with virtualbox yet, now is a good time to get started.  In order to go through and emulate what I am explaining, you are going to need at least 1 virtualbox environment for the ZFS emulator, and a second environment (virtual or bare metal) for a DB server.  Virtual box will allow you to download an image (which includes the software install) and start it up immediately.  This saves a lot of time and trouble in downloading and configuring an environment (patches, libraries, settings) etc.

Step 2 : Download Database image, and ZFS image


At a bare minimum to go through my demo, you will need 2 environments, The ZFS environment must be a virtual image, but the DB environment is up to you. Below are the 2 Virtual Box images to get you started

VB 1 : Database Virtual Box Appliance / Virtual Machine. DB Version 19.3 (as of writing)
VB 2 : Oracle ZFS Storage Simulator. Version 8.8 (as of writing)

Step 3: Patch ZFS image to latest release.


This can be done by downloading the latest patch from My Oracle support, and applying it to the running ZFS image.  This is critical for the ZFS image, as there have been recent patches to to make these features work seamlessly.

At the end of completing these 3 steps, you will have a ZFS Simulator running on at least release 8.26 (the current release as of writing) , and a database running release 19.3 (mine is running 19.6)

FULL DISCLOSURE : Since I use my DB host for a lot of other testing, I am actually executing my demos on a bare metal environment using OEL (Oracle Enterprise Linux) and  DB version 19.6.

In this first post I am going to go through the steps to configure my ZFS simulator to present itself with both an S3 bucket and an OCI bucket.

From there I will write 2 more posts on setting up security, connecting to the buckets, and backing up my database.

For documentation, these are few of the places I found start with.

To make it easy, I created one big storage pool "mypool" Double Parity. I used 10 disks, and the pool is around 35 GB. Enough to perform some simple tests with. I also created a single share "myshare" using all the default values.

Step 5: Enable S3 and OCI services.

I logged onto the ZFS storage console through my web browser as root, using the IP address I assigned during the first startup, and the password I entered during the first startup of the VB image .

Start by going to the services page for the appliance with "Configuration --> Services"
On this page you will notice that the "HTTP" service (under Data services) is greyed out and disabled.
Click on the "power button" to enable the service.


Once the service starts, it will appear green like other online Data Services.
Now click on the "HTTP" itself bringing up the configuration screen.

First let's enable S3 for the appliance.  

Note: under HTTP, I clicked on the S3 tab bringing up the screen below.   
Click on "Enable S3" and press the "APPLY" button in the top right under "Logs".


Next let's enable OCI for the appliance.

Note: under HTTP, I clicked on the S3 tab bringing up the screen below.   
Click on "Enable OCI" and press the "APPLY" button in the top right under "Logs".


Now that I enabled the S3, and OCI bucket at the appliance I need to enable it for my share. This can be done at different levels, at the Project, or at the Share.  To make things easy (since I only have 1 project and 1 share), I enabled it at the project level.
You can see below that I changed both the "S3 API Mode" and the "OCI API Mode" from "None" to "Read/Write" and applied the changes.


You can also see the URL from the project level

S3    : http://10.0.0.115/s3/v1/export/
OCI : http://10.0.0.115/oci/n/export/

When I look at the share and the protocol setting, I can see the HTTP settings are inherited from the project, and my S3 and OCI bucket URLs are shown on the page.


You can also see the URL from the share level (inherited from the project)

S3    : http://10.0.0.115/s3/v1/export/myshare
OCI : http://10.0.0.115/oci/n/export/myshare

That's all there is to configuring my ZFS appliance to act as a cloud store for both S3 buckets and OCI buckets.

My next 2 posts (I am reserving the spots here to add the links later) will cover.