Monday, April 5, 2021

Oracle TDE encryption - Encrypting my pluggable database

 This is post #1 in a series of posts explaining how to implement TDE (Transparent Data Encryption). In this first post I will take my Multitenant 19c database (remember Multitenant is mandatory with 21c) and configure TDE in my 3 (no extra license needed) pluggable databases.


The database I created for this example contains 3 PDBs as this will give me the flexibility to unplug and move PDBs around.

The names I used are

  • TDETEST - This is my CDB, and I will only be encrypting users tablespace and the catalog.
  • TDEPDB1,TDEPDB2, TDEPDB3 - My 3 PDBs. I will be encrypted all user tablespaces that make up these 3 PDBS .

Since I have only a single instance, the location I chose to put the local wallet file is under  $ORACLE_BASE/admin/$ORACLE_SID/wallet (/home/oracle/app/oracle/admin/tdetest/admin).

In a RAC environment you have a few choices of where to put the wallet file. The most important thing though, is to ensure each node has an identical copy in a RAC environment.

In a RAC environment you can put the wallet file:

  • On the local file system on each node, but be sure they are all identical. It is best to put them within the $ORACLE_BASE to make it easier in an out-of-place upgrade.
  • On a shared filesystem. This can be ACFS, DBFS, or just NFS.
  • With ASM. It is possible to set the location to be an ASM file for example "+DATA/TDETEST/wallet"
NOTE:  When deciding where to store your TDE wallet there are 2 items to keep in mind.
 1) You need to backup your wallet. Without the wallet file you can't access your database. Once encryption is implemented, the wallet needs to be available.
2) The wallet needs to be backed up separate from the database. If the wallet and the Database backup are stored together, anyone can read the backup.


 In my further blogs I will be converting from using a local wallet file to store my encryption keys, to using OKV along with a local wallet that caches the autologin information.

To migrate to TDE, I chose to perform the quickest method "Restore tablespace as encrypted".  With my test database, I did not have a standby database. 

NOTE: With a standby database the fastest way to convert to TDE would be with a "standby first" strategy. This is explained in this MAA document which includes an automated procedure. With this strategy you would convert your standby database to utilize TDE with a restore as encrypted, while the primary database stays untouched. Once the standby is converted, you would perform a switchover (to the standby) and encrypt the "current standby", which was the primary. Once both are encrypted, you would switch back and the process is completed.


Step 1 - Perform a full backup of the database immediately prior to starting the process.  Since I am using "restore tablespace as encrypted" this will allow me to open the database with minimal recovery.  Once backed up, you also should create a restore point to quickly identify the point after the full backup prior to the encryption.

create restore point pretde;

Step 2 - Set the location of the wallet_root, and the tde configuration.  I chose to use the WALLET_ROOT parameter (new with 19 I believe) because it gives the most flexibility.  Keep in mind in order to go through step 2 completely the database will need to be bounced.


alter system set WALLET_ROOT='/home/oracle/app/oracle/admin/tdetest/wallet/' scope=spfile;

startup force;

alter system set tde_configuration='KEYSTORE_CONFIGURATION=FILE' scope=both;


Step 3 - We are going to take a look at the database and the parameters that are set for the encryption wallet. Below is the formatted query I am going to be using throughout this post.


Below is the output of the query and the current settings as of this point. You can see that there are rows for all my PDBs, and that the status is "NOT_AVAILABLE" since I have not created a wallet or any  master keys yet. You can also see that the keystore is UNITED, meaning that all the keys (both for the CDB and all the PDBs) are assumed to be contained in the same Wallet file.

Also note that the WRL_PARAMETER is set based on the WALLET_ROOT setting. The TDE wallet file is defaulted to be the WALLET_ROOT/tde directory for the CDB.

PDB Name   Type       WRL_PARAMETER                                      Status                         WALLET_TYPE          KEYSTORE Backed Up
---------- ---------- -------------------------------------------------- ------------------------------ -------------------- -------- ----------
CDB$ROOT   FILE       /home/oracle/app/oracle/admin/tdetest/wallet//tde/ NOT_AVAILABLE                  UNKNOWN              NONE     UNDEFINED
PDB$SEED   FILE                                                          NOT_AVAILABLE                  UNKNOWN              UNITED   UNDEFINED
TDEPDB1    FILE                                                          NOT_AVAILABLE                  UNKNOWN              UNITED   UNDEFINED
TDEPDB2    FILE                                                          NOT_AVAILABLE                  UNKNOWN              UNITED   UNDEFINED
TDEPDB3    FILE                                                          NOT_AVAILABLE                  UNKNOWN              UNITED   UNDEFINED


Step 4. Now I need to create the keystore and open it for the CDB, and all my individual PDBs. Note that each PDB shares the keystore with the CDB. In isolated mode, I would create an individual keystore for each PDB and they would be in subdirectories under the WALLET_ROOT location.  

But first I need to create the directory to hold the keystore wallet.

mkdir /home/oracle/app/oracle/admin/tdetest/wallet/tde
ADMINISTER KEY MANAGEMENT CREATE KEYSTORE '/home/oracle/app/oracle/admin/tdetest/wallet/tde' IDENTIFIED BY "F1LE2021!";

ADMINISTER KEY MANAGEMENT SET KEYSTORE OPEN IDENTIFIED BY "F1LE2021!";
alter session set container=tdepdb1; ADMINISTER KEY MANAGEMENT SET KEYSTORE OPEN IDENTIFIED BY "F1LE2021!" CONTAINER = CURRENT;
alter session set container=tdepdb2; ADMINISTER KEY MANAGEMENT SET KEYSTORE OPEN IDENTIFIED BY "F1LE2021!" CONTAINER = CURRENT;
alter session set container=tdepdb3; ADMINISTER KEY MANAGEMENT SET KEYSTORE OPEN IDENTIFIED BY "F1LE2021!" CONTAINER = CURRENT;

Now let's look at the encryption settings in v$encryption_wallet. Below you can see that there is a single wallet setting (UNITED keystore), and the status is "OPEN_NO_MASTER_KEY". The master key has not been set for CDB, or the PDBs.

PDB Name   Type       WRL_PARAMETER                                      Status                         WALLET_TYPE          KEYSTORE Backed Up
---------- ---------- -------------------------------------------------- ------------------------------ -------------------- -------- ----------
CDB$ROOT   FILE       /home/oracle/app/oracle/admin/tdetest/wallet//tde/ OPEN_NO_MASTER_KEY             PASSWORD             NONE     UNDEFINED
PDB$SEED   FILE                                                          CLOSED                         UNKNOWN              UNITED   UNDEFINED
TDEPDB1    FILE                                                          OPEN_NO_MASTER_KEY             PASSWORD             UNITED   UNDEFINED
TDEPDB2    FILE                                                          OPEN_NO_MASTER_KEY             PASSWORD             UNITED   UNDEFINED
TDEPDB3    FILE                                                          OPEN_NO_MASTER_KEY             PASSWORD             UNITED   UNDEFINED

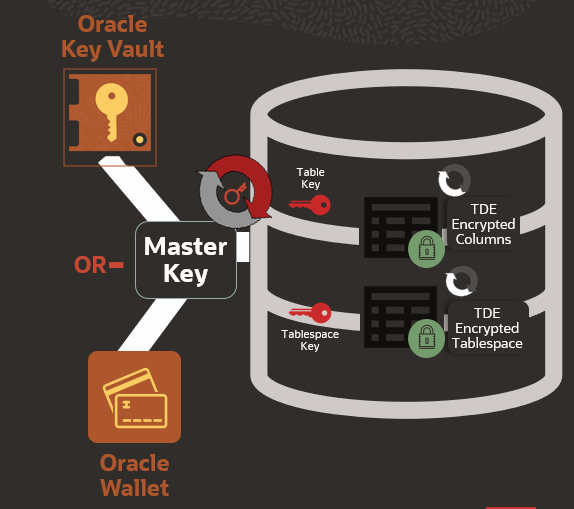
Step 5. Now we create the master keys for the CDB and each PDB.  A master key is needed to encrypt the tablespace encryption keys stored in the datafiles. 

NOTE: I added a tag that identifies the key with the CDB or PDB it is created for. I highly recommend using tags to identify the keys within the wallet. Identifying the master encryption key for an individual PDB will be important when moving PDBs between CDBs.


ADMINISTER KEY MANAGEMENT SET encryption KEY using tag 'TDETEST MASTERKEY_APRIL19' IDENTIFIED BY "F1LE2021!" WITH BACKUP USING 'TDETEST_TDEKEY_APR1_backup';
alter session set container=tdepdb1;
ADMINISTER KEY MANAGEMENT SET encryption KEY using tag 'TDEPDB1 MASTERKEY_APRIL19' IDENTIFIED BY "F1LE2021!" WITH BACKUP USING 'TDEPDB1_TDEKEY_APR1_backup'  container=current;
alter session set container=tdepdb2; ADMINISTER KEY MANAGEMENT SET encryption KEY using tag 'TDEPDB2 MASTERKEY_APRIL19' IDENTIFIED BY "F1LE2021!" WITH BACKUP USING 'TDEPDB2_TDEKEY_APR1_backup' container=current;
alter session set container=tdepdb3; ADMINISTER KEY MANAGEMENT SET encryption KEY using tag 'TDEPDB3 MASTERKEY_APRIL19' IDENTIFIED BY "F1LE2021!" WITH BACKUP USING 'TDEPDB3_TDEKEY_APR1_backup' container=current;

And once again let's look at the settings in v$encryption_wallet.  This time you will see that the wallet is open for all CDBs/PDBs except for the PDB$SEED. The wallet type is "PASSWORD" which means that the wallet needs to be manually opened with a password.

PDB Name   Type       WRL_PARAMETER                                      Status                         WALLET_TYPE          KEYSTORE Backed Up
---------- ---------- -------------------------------------------------- ------------------------------ -------------------- -------- ----------
CDB$ROOT   FILE       /home/oracle/app/oracle/admin/tdetest/wallet//tde/ OPEN                           PASSWORD             NONE     NO
PDB$SEED   FILE                                                          CLOSED                         UNKNOWN              UNITED   UNDEFINED
TDEPDB1    FILE                                                          OPEN                           PASSWORD             UNITED   NO
TDEPDB2    FILE                                                          OPEN                           PASSWORD             UNITED   NO
TDEPDB3    FILE                                                          OPEN                           PASSWORD             UNITED   NO


Step 6 - We have the master keys set and the wallets are open.  We now need to implement TDE by encrypted the tablespaces in my PDBs. As I said before, in my example, I used "restore tablespace as encrypted". 

Another option is to encrypt online (as of 12c). In this process the database will encrypt each datafile sequentially while the database is online and active.

NOTE : If using online encryption be aware that

  • It takes much longer than performing a restore, as datafiles are encrypted sequentially. Using "restore tablespace as encrypted" You can parallelize the restore across multiple channels.
  • The process needs enough space for 2 copies of the largest datafile. If using bigfiles, this can be quite a bit of storage. 
  • You need to monitor the process to ensure it completes successfully.

Next step is I am going to startup mount and open the wallets, restore my 3 PDBs users tablespaces, along with the users tablespace in my CDB, and then recover and open the database.


sqlplus> shutdown immediate;
sqlplus> startup mount;
sqlplus> ADMINISTER KEY MANAGEMENT SET KEYSTORE OPEN IDENTIFIED BY "F1LE2021!";
sqlplus> alter session set container=tdepdb1;
sqlplus> ADMINISTER KEY MANAGEMENT SET KEYSTORE OPEN IDENTIFIED BY "F1LE2021!" CONTAINER = CURRENT;
sqlplus> alter session set container=tdepdb2;
sqlplus> ADMINISTER KEY MANAGEMENT SET KEYSTORE OPEN IDENTIFIED BY "F1LE2021!"  CONTAINER = CURRENT;
sqlplus> alter session set container=tdepdb3;
sqlplus> SDMINISTER KEY MANAGEMENT SET KEYSTORE OPEN IDENTIFIED BY "F1LE2021!"  CONTAINER = CURRENT;

rman target / catalog rmancat/oracle@rmancat

rman> restore tablespace users as encrypted;

rman> restore tablespace tdepdb1:users  as encrypted;
rman> restore tablespace tdepdb2:users  as encrypted;
rman> restore tablespace tdepdb3:users as encrypted;
rman> recover database; rman> alter database open;

Step 7 - Make sure all new tablespaces are encrypted by default

 In order to ensure all new tablespaces are encrypted I am going to set the database parameter.

sql> alter system set encrypt_new_tablespaces = ALWAYS scope = both sid = '*';

Step 8 - Encrypt all credentials that contained in the root container

In order to encrypt all credentials (like scheduler credentials, and DB Link credentials) that are stored in the system catalogs, you need to login as a user granted "SYSKM" role and execute

sql> alter database dictionary encrypt credentials container = current;

Step 9 - I am going to verify that the pluggable databases are encrypted, along with the catalog. 

First let's look at the existing keys using the query below


I can see the keys that are created in each container, including the ROOT

PDB Name        Activation Time            Key ID                                                  Tag
--------------- -------------------------- ------------------------------------------------------- ----------------------------------------
CDB$ROOT        19-Apr-2021 05:12:41pm     AbwcWGicr0+rvyhrSB+rKQAAAAAAAAAAAAAAAAAAAAAAAAAAAAAA    TDETEST MASTERKEY_APRIL19

TDEPDB1         19-Apr-2021 05:19:11pm     AX9pkB+zQE/Wv6Qek13TeLkAAAAAAAAAAAAAAAAAAAAAAAAAAAAA    TDEPDB1 MASTERKEY_APRIL19

TDEPDB2         19-Apr-2021 05:19:11pm     AUKkROD1TE8wv0jfJhN63JYAAAAAAAAAAAAAAAAAAAAAAAAAAAAA    TDEPDB2 MASTERKEY_APRIL19

TDEPDB3         19-Apr-2021 05:19:13pm     AZUWZDWpxk9sv0GrljDFr7sAAAAAAAAAAAAAAAAAAAAAAAAAAAAA    TDEPDB3 MASTERKEY_APRIL19


I am going to use the query below to look at the encryption setting on each datafile.


Below is the output. I see that all the datafiles were properly encrypted and are available.

PDB Name        Tablespace Name                Encrypted  Master Key ID
--------------- ------------------------------ ---------- ------------------------------------------------------------
CDB$ROOT        SYSAUX                         NO         AbwcWGicr0+rvyhrSB+rKQA=
                SYSTEM                         NO         AbwcWGicr0+rvyhrSB+rKQA=
                TEMP                           NO         AbwcWGicr0+rvyhrSB+rKQA=
                UNDOTBS1                       NO         AbwcWGicr0+rvyhrSB+rKQA=
                USERS                          YES        AbwcWGicr0+rvyhrSB+rKQA=

TDEPDB1         SYSAUX                         NO         AX9pkB+zQE/Wv6Qek13TeLk=
                SYSTEM                         NO         AX9pkB+zQE/Wv6Qek13TeLk=
                TEMP                           NO         AX9pkB+zQE/Wv6Qek13TeLk=
                UNDOTBS1                       YES        AX9pkB+zQE/Wv6Qek13TeLk=
                USERS                          YES        AX9pkB+zQE/Wv6Qek13TeLk=

TDEPDB2         SYSAUX                         NO         AUKkROD1TE8wv0jfJhN63JY=
                SYSTEM                         NO         AUKkROD1TE8wv0jfJhN63JY=
                TEMP                           NO         AUKkROD1TE8wv0jfJhN63JY=
                UNDOTBS1                       YES        AUKkROD1TE8wv0jfJhN63JY=
                USERS                          YES        AUKkROD1TE8wv0jfJhN63JY=

TDEPDB3         SYSAUX                         NO         AZUWZDWpxk9sv0GrljDFr7s=
                SYSTEM                         NO         AZUWZDWpxk9sv0GrljDFr7s=
                TEMP                           NO         AZUWZDWpxk9sv0GrljDFr7s=
                UNDOTBS1                       YES        AZUWZDWpxk9sv0GrljDFr7s=
                USERS                          YES        AZUWZDWpxk9sv0GrljDFr7s=


And I am going to look at the catalog to be sure

select enforcement from DICTIONARY_CREDENTIALS_ENCRYPT;

ENFORCEM
--------
ENABLED


Step 10 - I am adding the ability to access the keystore without having to enter the password. This can make it much easier to open the keystore if you don't chose to make the Keystore Wallet AUTO_LOGON.

I am putting my keystore password in an AUTO_LOGIN wallet as a secret.  This wallet needs to be created in a directory called TDE_SEPS. In my case since, I am using WALLET_ROOT, the directory containing the secret must be WALLET_ROOT/tde_seps.

The password portion of "ADMINISTER KEY" becomes IDENTIFIED by EXTERNAL STORE;

NOTE: I am using the phrase "FOR CLIENT 'TDE_WALLET'"
              'TDE_WALLET' is necessary to


ADMINISTER KEY MANAGEMENT
     ADD SECRET 'F1LE2021!' FOR CLIENT 'TDE_WALLET'
     USING TAG 'TDE file keystore password' 
     TO LOCAL AUTO_LOGIN KEYSTORE '/home/oracle/app/oracle/admin/tdetest/wallet/tde_seps';

Now to verify it I am going to restart my database and open the wallet using the external store (rather than hardcoding in the password).

ADMINISTER KEY MANAGEMENT SET KEYSTORE OPEN IDENTIFIED BY EXTERNAL STORE;

alter session set container=tdepdb1;
ADMINISTER KEY MANAGEMENT SET KEYSTORE OPEN IDENTIFIED BY EXTERNAL STORE CONTAINER = CURRENT;
alter pluggable database  open;

alter session set container=tdepdb2;
ADMINISTER KEY MANAGEMENT SET KEYSTORE OPEN IDENTIFIED BY EXTERNAL STORE  CONTAINER = CURRENT;
alter pluggable database  open;

alter session set container=tdepdb3;
ADMINISTER KEY MANAGEMENT SET KEYSTORE OPEN IDENTIFIED BY EXTERNAL STORE CONTAINER = CURRENT;
alter pluggable database  open;

And finally verify that that the Keystores are open (using the external store) for my CDB and PDBs.
PDB Name   Type       WRL_PARAMETER                                      Status                         WALLET_TYPE          KEYSTORE Backed Up
---------- ---------- -------------------------------------------------- ------------------------------ -------------------- -------- ----------
CDB$ROOT   FILE       /home/oracle/app/oracle/admin/tdetest/wallet//tde/ OPEN                           PASSWORD             NONE     NO
PDB$SEED   FILE                                                          CLOSED                         UNKNOWN              UNITED   UNDEFINED
TDEPDB1    FILE                                                          OPEN                           PASSWORD             UNITED   NO
TDEPDB2    FILE                                                          OPEN                           PASSWORD             UNITED   NO
TDEPDB3    FILE                                                          OPEN                           PASSWORD             UNITED   NO


Step 11 - I am going to change the wallets to be AUTO_LOGIN, bounce the database and verify that the encryption settings are all correct.

sqlplus / as sysdba

sql> ADMINISTER KEY MANAGEMENT SET KEYSTORE CLOSE IDENTIFIED BY EXTERNAL STORE;
sql> ADMINISTER KEY MANAGEMENT CREATE AUTO_LOGIN KEYSTORE FROM KEYSTORE '/home/oracle/app/oracle/admin/tdetest/wallet/tde/' IDENTIFIED BY "
F1LE2021!";

sql> shutdown immediate
sql> startup

And v$encryption_wallet shows me that my wallets are all open, and that they are AUTOLOGIN.

PDB Name   Type       WRL_PARAMETER                                      Status                         WALLET_TYPE          KEYSTORE Backed Up
---------- ---------- -------------------------------------------------- ------------------------------ -------------------- -------- ----------
CDB$ROOT   FILE       /home/oracle/app/oracle/admin/tdetest/wallet//tde/ OPEN                           AUTOLOGIN            NONE     NO
PDB$SEED   FILE                                                          OPEN                           AUTOLOGIN            UNITED   NO
TDEPDB1    FILE                                                          OPEN                           AUTOLOGIN            UNITED   NO
TDEPDB2    FILE                                                          OPEN                           AUTOLOGIN            UNITED   NO
TDEPDB3    FILE                                                          OPEN                           AUTOLOGIN            UNITED   NO

Now I am ready to perform a new FULL backup of the pluggable databases, and they are ready for use.

That's all there is to implementing TDE with a wallet file. Next post, I am going to convert my wallet to OKV managed wallets.


Monday, March 29, 2021

ZDRLA adds smart incremental to be even smarter.

 Recently version 19.1.1.2 of ZDLRA software was released, and one the features is something called "Smart Incremental".  I will walk through how this feature works, and help you understand why features like this are "ZDLRA Only".


I am going to start by walking through how incremental backups become "virtual full backups", and that will give you a better picture of how "smart incremental" is possible.

The most important thing to understand about these features is that the RMAN catalog itself is within the ZDLRA  AND the ZDLRA has the ability to update the RMAN catalog.

How does a normal backup strategy work ? 

That is probably the best place to start.  What DBAs typically do is perform a WFDI (Weekly Full Daily Incremental) backup.  To keep my example simple, I will use the following assumptions.
  • My database contains 3 datafile database. SYSTEM, SYSAUX, USERS, but I will only use the example of backing up datafile users.
  • Each of these 3 datafiles are 50 GB in size
  • I am only performing a differential backup which creates a backup containing the changes since the last backup (full OR incremental).
  • My database is in archivelog  *
* NOTE: With ZDLRA you can back up a nologging database, and still take advantage of virtual fulls. The database needs to be in a MOUNTED state when performing the incremental backup.

If placed in a table the backups for datafile USERS would look this. Checkpoint SCN is the current SCN number of the database at the start of the backup.


If I were to look at what is contained in the RMAN catalog (RC_BACKUP_DATAFILE), I would see the same backup information but I would see the SCN information 2 columns.
  • Incremental change # is the oldest SCN contained in the backupset. This is the starting SCN number of the previous backup, this backup is based on.
  • Checkpoint Change # is  starting SCN number of the backup.  Everything newer than this SCN (including this SCN) needs to be defuzzied.


Normal backup progression (differential)


When performing an incremental RMAN backup of a datafile, the first thing that RMAN does is decide which blocks needs to be backed up. Because you are performing an incremental backup,  you may be backing up all of the blocks, only some of the blocks, or even none of the blocks if the file has not changed.
This is a decision RMAN makes by querying the RMAN catalog entries (or the controlfile entries if you not using an RMAN catalog).

Now let's walk through this decision process.  Each RMAN incremental differential's starting SCN is based on the beginning SCN of the previous backup (except for the full).


By looking at the RMAN catalog (or controlfile), RMAN determines  which blocks need to be contained in each incremental backup.


Normal backup progression (cumulative differential)


Up to release 19.1.1.2, the recommendation was to perform a Cumulative Differential backup. The cumulative differential backup compares the starting SCN number of the last full backup to determine the starting point of the incremental backup (rather than the last incremental backup) .
The advantage of the cumulative over differential, is that a cumulative backups can be applied to the last full and take the place of applying multiple differential backups.  However, cumulative backups are bigger  every day that passes between full backups because they contain all blocks since the last full.

Below is what a cumulative schedule would look like and you can compare this to the differential above.
You can see that each cumulative backups starts with the Checkpoint SCN of the last full to ensure that all blocks changed since the full backup started are captured.


The RMAN catalog entries would look like this.


If you were astute, you would notice a few things happened with the cumulative differential vs the differential.
  • The backup size got bigger every day
  • The time it took to perform the incremental backup got longer
  • The range of SCNs contained in the incremental is larger for a cumulative backup.

ZDLRA backup progression (cumulative differential)

As  you most likely know, one the most important features of the ZDLRA is the ability to create a "virtual full" from an incremental backup.,

If we look at what happens with a cumulative differential (from above), I will fill in the virtual full RMAN catalog entries by shading them light green.

The process of performing backups on the ZDLRA is exactly the same as it is for the above cumulative, but the RMAN catalog looks like this.


What you will noticed by looking at this compared to the normal cumulative process that
  • For every cumulative incremental backup there is a matching virtual full backup  The Virtual full backup appears (from the newly inserted catalog entry) to have beeen taken at the same time, and the same starting SCN number as the cumulative incremental. Virtual full backups, and incremental backups match time, and SCN as catalog entries.
  • The size of the virtual full is 0 since it is virtual and does not take up any space.
  • The completion time for the cumulative incremental backup is the same as the differential backups.  Because the RMAN logic can see the virtual full entry in the catalog, it executes the cumulative incremental EXACTLY as if it is the first differential incremental following a full backup.
Smart Incremental backups -

Now all of this led us to smart incremental backups. Sometimes the cumulative backup process doesn't work quite right.  A few of the reasons this can happen are.

  • You perform a full backup to a backup location other than the ZDLRA. This could be because you are backing up to the ZDLRA for the first time replacing a current backup strategy, or maybe you created a special backup to disk to seed a test environment (Using a keep backup for this will alleviate this issue).  The cumulative incremental backup will compare against the last full regardless of where it was taken (there is exceptions if you always use tags to compare).
  • You implement TDE or rekey the database.  Implementing TDE (Transparent Data Encryption) changes the blocks, but does not change the SCN numbers of the blocks. A new full backup is required.
Previously, you would have to perform a special full backup to correct these issues. In the example below you can see what happens (without smart incremental) to the RMAN catalog if you perform a backup on Thursday at 12:00 to disk to refresh a development environment.


Since the cumulative backups are based on the last full backup, the Thursday - Saturday backups contain all the blocks that have changed since the disk backup started on Thursday at 12:00.
And, since it is cumulative, each days backup is larger, and takes longer.

This is when you would typically have to force a new level 0 backup of the datafile.


What the smart incremental does

Since the RMAN catalog is controlled by the ZDLRA it can correct the problem for you. You no longer need to perform cumulative backups as the ZDLRA can fill in any issues that occur.

In the case of the Full backup to disk, it can "hide" that entry, and continue to correctly perform differential backups. It would "hide" the disk backup that occured, and inform the RMAN client that the last full backup as of Thursday night is NOT the disk backup, but it is the previous virtual full backup.
\


 In the case of the TDE, it can "hide" all of the Level 0 virtual full backups, and the L1 differential backups (which will force a new level 0).


All of this is done without updating the DB client version. All the magic is done within the RMAN catalog on the ZDLRA.

Now isn't that smart ?


Friday, March 26, 2021

ZDLRA leverages the ZFS object store in the newest release

Yes, Using ZFSSA as an on-prem object store with ZDLRA is here, and How to configure Zero Data Loss Recovery Appliance to use ZFS OCI Object Storage as a cloud repository (Doc ID 2761114.1) shows you how.


Above is the diagram from Tim Chien's "Ask Tom" session on the new feature with ZDRA release 19.1.1.2.

 For those how have been reading my blog posts, and wondering why the sudden interest in ZFS as an object store, here is another reason.

The idea behind this is pretty simple,  many customers are looking for an additional tier of storage behind the ZDLRA for 2 reasons
  • They want to extend the the recovery window onto a lower tier of storage. This may include going from a full "any point in time" recovery to a set of "recovery points"
  • They want an archival backup for a long period of time that is a set backup point.  Keep backups are the perfect example of this. With Keep backups you get a self-contained restore point of your choosing.
Now for the magic of how all this works.

1. The first step is to configure your ZFSSA as an OCI object store. As long you are on the latest patched release of OS 8.8, this functionality is available to you.  If you are unfamiliar with how to do this, in previous posts, I have walked through the steps of configuring this. Below are some places to start.


Also, here is the documentation from ZFS.

2. The second step is to configure Key Vault (OKV), which is a licensed product. Key vault is a centralized Encryption Key management system that is used to store the master encryption key for the backups.  OKV is released as a virtual image, that can be installed on physical hardware, or in a virtual environment. the installation is self-contained and walks through a series of questions to finish the configuration.  Easy.
  WHY do I need TDE ?  I'm sure you are asking this question.  The "Copy-to-cloud" functionality of the ZDLRA is being utilized to present ZFS as an "OCI cloud store".  It acts just like an object store in the Oracle Public Cloud.  The only difference is that there is no "ARCHIVE" tier on ZFS.  Since ZFS is considered a "Cloud destination", it follows the Larry rule that "All data in the Cloud is encrypted.". Because of that, the backups going to ZFS will be RMAN encrypted (no license needed for this part).  The ZDLRA uses OKV to store the master keys used to encrypt the RMAN backupsets.

3. The third step is to configure the ZDLRA to utilize OKV as a client, and to point the ZDLRA to your ZFS.
  One of the great things of using this solution is that the process is exactly the same as configuring the ZDLRA to send backups to the Oracle public cloud. This link points to the documentation that makes it clear how to configure this process.

That's all there is to it. The most complicated task is configuring the authentication for the OCI object store on ZFS, as it requires setting up a public and private key.

Now to walk through the workflow.

Backups -- Below is the backup workflow from the presentation.  The ZDLRA creates an RMAN backupset from the backup pieces on the ZDLRA. This backupset is an RMAN encrypted backupset.


One item is NOT mentioned on this slide is compression.  If your Database is using TDE, then the backup cannot be compressed when sent to the ZFS because the ZDLRA does not have the encryption master key for the database.  BUT, if your database is NOT TDE enabled, then you should be using compression when sending the backups to the ZFS. As I've said earlier, the backset is an RMAN encrypted backupset. Because it is already encrypted when sent to ZFS, the ZFS will be unable to compress the backups.  You can find instructions to add compression in the documentation for creating a job template.  There is a setting for the template called

Compression_algorithm=> 
By implementing compression on the ZDLRA you are:
  • Decreasing the size of the backups on the ZFS..
  • Decreasing the networkwork traffic between the ZDLRA and ZFS as the data is compressed before it is sent to ZFS. This can double the throughput for backups and restores.
Keep in mind, that if you restore directly to your database host from the ZFS Object store, the database host will be performing the uncompression.

Restores - Below is the restore workflow. Typically you would utilize the catalog on the ZDLRA and let the ZDLRA be the conduit for uncompressing (if it was compressed when sent to ZFS), and unencrypting it, as the ZDLRA encrypted it.  The ZDLRA already has the credentials for the object store, and it has the Encryption master key available to it from OKV.


Alternately you can restore the backups directly from the ZFS object store.
This would be a 3 step process..

1) You would download the Oracle Database Cloud Backup Module . Once downloaded you would configure the database to utilize the OCI object store. The link above also contains links to documentation for the module, and to a MOS note containing the FAQ.  Keep in mind that in this case you are configuring the Module for the on-premise ZFS (rather than the Oracle public cloud), and the instructions may have to be modified. The table below gives you an idea of the differences.


2) You would catalog the backup pieces. If the RMAN catalog is not available (for some reason) the MOS note mentioned below contains detail on how to list what is in the object store, and how to clean it out.

How to report or delete backup pieces stored in Cloud Object Storage by Database Backup Cloud Service without using RMAN (Doc ID 2360800.1)

The script contained in the MOS note ( odbsrmt.py) should work with a few minor changes to the instructions (since we are talking about an on-prem ZFS).  I will continue to work through the changes and post the results in a future blog post.


3) You would register the restore location as an OKV endpoint (if it isn't already registered), OR you can alternately export the encryption key and create a wallet file.


Conclusion - This is a very exciting addition to the many features that the ZDLRA already provides.

Friday, March 12, 2021

ZFS Object Store - Why are there 3 APIs?

 In talking to others that are new to object stores, there is always a complicated conversation on why there are different API interfaces. I will try to go through the history of object stores and talk about the reason why.


First, I want to say up front I am not going to talk about WebDav.  From what I can find, Web Dav is more of a web page authoring platform.

Next I am going to define a few terms.

OPC - Oracle Public Cloud. This is the Oracle Public Cloud Offering, though there are flavors of the OPC that use the same GUI and interfaces (Cloud@Customer for example). When I refer to OPC, I am talking about anything that uses the standard Oracle Public Cloud BUI interfaces.

OCI - Oracle Cloud Interface.   This is one of the most confusing terms used when talking about the ZFS object store.  For most people, when referring to OCI, they are talking about the interface to the Oracle Public Cloud (OPC) offerings in general. On ZFS, this refers to a specific API for the OPC object store.  When I talk about OCI, I am talking about the object store interface.

OCI Gen 1/OCI Gen 2.  In the history of the Oracle Public Cloud OCI, Generation 1 was Version one of the Oracle Public Cloud.  The object store in the first version utilized the Swift interface (which I will get into later).  Of course, following Generation 1 (Gen 1), there was Generation 2 (Gen 2) which uses a different API.  When I refer to these terms, I am referring to the Object store APIs available in the OPC.

S3 or S3 API. When you think of S3, you are probably thinking AWS. The reality is, AWS built the standard for the cloud object store, but many other vendors offer an object store, on-prem or publicly, that follow the AWS standard.  This is the most commonly used Object Store API standard.

Large objects. This is a special term when talking about an object store. Object stores typically have a limit of 5GB on the size of objects. This made sense in the beginning as object stores where not as widely used for all kinds of objects as they are today.  As data grew the need for Object Stores to handle "Large Objects" becomes clear. When I go through the history, along with features of  object stores, "Large Objects" will refer to any object greater than 5 GB.

Bucket : There may be other terms used to describe a "bucket" or container, but a bucket is the high level identifier where objects are stores.  You can think of it as file drawer, or anything thing else that reminds you that it is a level of separation. This is what I mean  when I refer to a Bucket.

Tenancy : In todays cloud, resources are shared, and each user is a "Tenant" in the Multi-tenant cloud paradigm.  This allows for the sharing of resources while still providing isolation.

Now some history

When the object store world began, there was Swift.  Swift was a simple object store, with a simple interface. OCI Gen 1 uses swift, and ZFS offers Swift as an API interface. Swift was designed more for command line interaction than GUI.  If you look for tools to access a Swift object store you find that "curl", and the "swift" CLI (built in python) are the most common.

Swift  : Below are the highlights of Swift.

  • Swift V1 requires a 2 step authentication, though V2 removed this restriction. A username and password are passed to swift and an authentication token is returned. The token is then used to all subsequent calls.
  • Swift multi-tenancy. Because Swift uses a simple Username/Password authentication (though the idea of tenancy was added later), it does not work well as a shared cloud resource. V1 of swift had no concept of multi-tenancy so every bucket name had to be unique. There was no easy way to tie storage utilization to a specific "tenant", especially when multiple users shared a tenancy.
  • Support of large objects was originally an issue for Swift, and there multiple ways of dealing with the support.  Swift eventually added Dynamic Large Object (DLO) support which allowed for the storage of large objects.  Some vendors/applications using Swift took advantage of DLO, some wrote their own.  The swift CLI for example, uses it's own method of storing large objects by created a "shadow" bucket containing individual pieces (5GB per piece) and then storing a manifest file that tells swift where the objects are. Many other vendors (including Oracle) wrote their own large object support that can only be read by them.
Issues - As you can see there were many issues with Swift and this explains why most vendors have moved away from swift. OCI Gen 1 was a swift V2 interface and it is still available to access object stores. ZFS uses the swift V1 interface.
  • Authentication was difficult
  • no multi-tenancy support for users
  • inability to create cost models based on tenancy
  • no true standard for large objects.
S3 - Along came S3 to provide solutions to these issues.

To solve these issues, AWS came up with a standard that solved these issues and below are the highlights.

  • Authentication is based on Key/passcode. The Key/passcode is uniquely generated for each user of a tenancy.  When accessing the object store, the Key/passcode allows the object store to identify the tenancy and provide the necessary isolation, and of course billing.
  • Large object support was provided.  S3 added the idea of "multi-part uploads". When the client prepares to upload an object, it tells the S3 object store that this is a multi-part upload, along with how many pieces are being uploaded.  This allows the client to break the upload into multi parts (of 5GB or less) and upload each part individually even in parallel. the object store will then join all the parts into a single large object.  The process is reversed for downloads.
  • Having a standard provides for tools like rsync, and cloudberry to be able to synchronize the object store (regardless of vendor) with a file system, upload files through a windows client, even mount the object store a file system through Fuse.

Issues - As you can see many of the issues with swift were corrected, and this is now the most widely used API for an object store.


OCI Gen 2 - Along with the second version of the Oracle Public Cloud came a new API fo the object store.

There was one remaining issue with the AWS API that was solved by this interface. The idea of compartments within a tenancy.  Within a tenancy, the bucket must be unique, but when a new bucket is created, it is created in a compartment. This gives an additional level of organization for objects.


A few of the highlights of OCI Gen 2 are.

  • Authentication uses the RSA public/private key model which is more secure than AWS authentication.
  • The idea of compartments is supported.

Issues - As you can see many of the issues with swift were corrected, and the concept of compartments was added.

  • The only issue I've encountered is the lack of a GUI interface for uploading objects.


SUMMARY :


In summary, on ZFS, all 3 object store are available as separate object stores. pick your object store.

Also to note, in the OPC, all 3 object stores are compatible and can be used to access the same object. This is not the case with ZFS.


Saturday, February 13, 2021

Oracle Database 19c now supports DBMS_CLOUD.

 If you have been wondering why I've spent so much time blogging about how to configure ZFS as an object store, today is the day you get the answer.


Today MOS note 2748362.1 - How To Setup And Use DBMS_CLOUD Package was published.


You are probably saying, "so what?, 21c supports DBMS_CLOUD, and that's a long way off for me"..

This note goes through the steps to configure DBMS_CLOUD for 19c. Yes. it's backported !

NOTE: it is only supported for multitenant

If you were very astute, you might have noticed that the 19.9 release of the software contained scripts in the $ORACLE_HOME/rdbms/admin directory with names like dbms_cloud.sql.

Well today, this published notes explains how to install DBMS_CLOUD packages so that you can use it with your 19.9 + database.

I'm going to take this a step further, and show you how to use these scripts and connect the ZFS appliance.  Keep in mind, there is a ZFS simulator you can use, and do the same steps.

Here is some information on how to do this if you don't know where to start

Configuring ZFS as an object store

Step 1. Install DBMS_CLOUD in the CDB

I am going through the MOS, and I am following the same series of steps.  Creating a script in my /home/oracle/dbc directory, so that I can run this again for all my databases.

Just as in the note, I ran a perl script, and looked at the logs. Everything was successful.

I then ran the 2 queries. First against the CDB, then against the PDB.


So far so good.


Step 2 Create SSL Wallet with Certificates.

The next step is to create a wallet, and download the certificates using the link.  The certificates come in a zip file containing all 3 certificates.

VeriSign.cer
BaltimoreCyberTrust.cer
DigiCert.cer

These are the Certificate Authorities that will be used to authenticate the SSL certificates.  DBMS_CLOUD uses HTTPS, and requires that a valid certificate is used.


ZFS NOTE BEGIN : *************************************

At this point there is an additional step for using ZFS (or your own object store). You need to add the certificate to the wallet if it is a self-signed certificate (which is what ZFS will use normally).

In order to get the certificate you need to display it with the following command (filling in your IP address).

openssl s_client -showcerts -connect 10.136.64.85:443

From the output I want to grab the certificate which is between the BEGIN and END


-----BEGIN CERTIFICATE-----
MIIEWTCCA0GgAwIBAgIIXJAYBgAAAAIwDQYJKoZIhvcNAQELBQAwcDEtMCsGA1UE
AwwkenM3LTJjYXAtMjAwZi12bTAyLnVzLm9zYy5vcmFjbGUuY29tMT8wPQYDVQQN
DDZodHRwczovL3pzNy0yY2FwLTIwMGYtdm0wMi51cy5vc2Mub3JhY2xlLmNvbToy

..

oH4pa4Hv4/s0GKJcjQDTlhyyAQXHD+EDfa0KSqP6+Rcwv9+pzXhTJu6IYJLanKo

uM6RxG2XAIH82blU+A==
-----END CERTIFICATE-----

Once I put it in a file, I perform the same command to load these certificates from my file.

ZFS NOTE END : *****************************************

Once added I display what is in the wallet.

orapki wallet display -wallet .
Oracle PKI Tool Release 21.0.0.0.0 - Production
Version 21.0.0.0.0
Copyright (c) 2004, 2020, Oracle and/or its affiliates. All rights reserved.

Requested Certificates:
User Certificates:
Trusted Certificates:

Subject:        2.5.4.13=https://zs7-2cap-200f-vm02.bgrenn.com:215/\#cert,CN=zs7-2cap-200f-vm02.bgrenn.com
Subject:        2.5.4.13=https://zs7-2cap-200f-vm01.bgrenn.com:215/\#cert,CN=zs7-2cap-200f-vm01.bgrenn.com
Subject:        CN=DigiCert Global Root CA,OU=www.digicert.com,O=DigiCert Inc,C=US
Subject:        CN=Baltimore CyberTrust Root,OU=CyberTrust,O=Baltimore,C=IE
Subject:        CN=VeriSign Class 3 Public Primary Certification Authority - G5,OU=(c) 2006 VeriSign\, Inc. - For authorized use only,OU=VeriSign Trust Network,O=VeriSign\, Inc.,C=US


You can see that it captured the server names of the ZFS ports I am using.


Step 3 Configure the Oracle environment for the Wallet.


I followed the next set of instructions to update the sqlnet.ora file with the location of wallet.

A few items to note on this step
  • I am in a RAC environment so I need to make the change to ALL nodes in my RAC cluster, and I also need to copy the wallet to the nodes in the same location on all hosts.
  • The WALLET_LOCATION is also used by ZDLRA. if you are using a ZDLRA for backups, you need add the certificates to wallet that is used by the ZDLRA.
  • If you using Single Sign On which may use the WALLET_LOCATION, be especially careful since they often default to $ORACLE_BASE, but will get over ridden when this is set.
I completed these steps, and I now have the same sqlnet.ora file on all nodes, and my wallet is on all nodes in the same location under $ORACLE_BASE.

Step 4 Configure the Database with ACEs for DBMS_CLOUD.


The next step is to create Access Control Entries (ACEs) to allow communication. This only needs to be in CDB$ROOT.

I stored the script in a file and changed the script in 2 ways

  • define sslwalletdir= {my wallet locatioin}  --> I set this.
  • I removed all lines around proxy. I didn't need a proxy since I am only using a ZFS internal to my datacenter.
I verified with the query and it returned the location of SSL_WALLET.

Step 5 Verify the configuration of the DBMS_CLOUD

I put the script in a file and made a few changes.

  • wallet_path => {my wallet path}
  • wallet_password => {my wallet password}
  • get_page('https://zs7-2cap-200f-vm02.bgrenn.com') --> I put in the URL for my first ZFS network name (from the certificate) followed by the second name from the certificate.
I got a "valid response" backup.. 
I can also check the ACLs with the script below
SELECT host, lower_port, upper_port, acl
FROM   dba_network_acls;

Step 6 Configure users or roles to use  DBMS_CLOUD

I changed the script to use my username which I created in my PDB to create tables etc. and utilize DBMS_CLOUD, and ran it in my pdb.

I took the second script, removed the proxy information , entered the wallet path and executed in my  PDB.

Step 6 Configure users or roles to use DBMS_CLOUD


I changed the script and added my username in my PDB.


Step 7 Configure ACEs for a user role to use DBMS_CLOUD


Again I removed the proxy information since there was no proxy. I also entered the SSL_wallet directory.

Step 8  Configure the credential for OCI (or S3 if you prefer).


Using the create credential and the parameters I have pointed out in previous posts.

 I create a credential to point to my OCI bucket on ZFS.


exec DBMS_CLOUD.CREATE_CREDENTIAL ( -
    CREDENTIAL_NAME => 'ZFS', -
    USER_OCID => 'ocid1.user.oc1..oracle', -
    TENANCY_OCID => 'ocid1.tenancy.oc1..nobody', -
    PRIVATE_KEY => 'MIIEogIBAAKCAQEAnLe/u2YjNVac5z1j/Ce7YRSd6wpwaK8elS+TxucaLz32jUaDCUfMbzfSBP0WK00uxbdnRdUAss1F1sRUm+GqyEEvT2c1LRJ0FnfSFEXrJnDZfEVe/dFi90fctbx4BUSqRroh0RQbQyk24710zO2C3tev66eHEvfxxXGUqI+jrDKOJ7sFdGE42R9uRhhWxaWS4e43OEZk41gq2ykdVFlNp...mXU6w6blGpxWkzfPMJKuOhXYoEXM41uxykDX3nq/wPWxKJ7TnShGLyiFMWiuuQF+s29AbwtlAkQRcHnnkvDFHwE=', -
    FINGERPRINT => '1e:6e:0e:79:38:f5:08:ee:7d:87:86:01:13:54:46:c6');

Note the parameters for ZFS

  • CREDENTIAL_NAME - Name of the credential
  • USER_OCID - 'ocid1.user.oci..' || {ZFS user id}
  • TENANCY_ID - 'ocid1.tenancy.oci1..nobody' - hardocded in
  • PRIVATE_KEY - Private key matching the public key on the ZFS
  • FINGERPRINT - fingerprint for the public key on the ZFS.

Step 9  Load raw data to the object store.


First I am going to open a file, and put some data into it.. Upload the file to my OCI bucket and then create an external table on it.

Below is the input file.

 16TS$                           TABLE                    1904172019041720190417VALID
        20ICOL$                         TABLE                    1904172019041720190417VALID
         8C_FILE#_BLOCK#                CLUSTER                  1904172019041720190417VALID
        37I_OBJ2                        INDEX                    1904172019041720190417VALID
        22USER$                         TABLE                    1904172019041720190417VALID
        33I_TAB1                        INDEX                    1904172019041720190417VALID
        40I_OBJ5                        INDEX                    1904172019041720190417VALID
        31CDEF$                         TABLE                    1904172019041720190417VALID
        41I_IND1                        INDEX                    1904172019041720190417VALID
         3I_OBJ#                        INDEX                    1904172019041720190417VALID
         6C_TS#                         CLUSTER                  1904172019041720190417VALID
        51I_CON1                        INDEX                    1904172019041720190417VALID
        34I_UNDO1                       INDEX                    1904172019041720190417VALID
        11I_USER#                       INDEX                    1904172019041720190417VALID
        29C_COBJ#                       CLUSTER                  1904172019041720190417VALID
        49I_COL2                        INDEX                    1904172019041720190417VALID
        32CCOL$                         TABLE                    1904172019041720190417VALID
        14SEG$                          TABLE                    1904172019041720190417VALID
        23PROXY_DATA$                   TABLE                    1904172019041720190417VALID
        44I_FILE2                       INDEX                    1904172019041720190417VALID
        46I_USER1                       INDEX                    1904172019041720190417VALID
        56I_CDEF4                       INDEX                    1904172019041720190417VALID
        21COL$                          TABLE                    1904172019041720190417VALID
        47I_USER2                       INDEX                    1904172019041720190417VALID
        26I_PROXY_ROLE_DATA$_1          INDEX                    1904172019041720190417VALID
        18OBJ$                          TABLE                    1904172019041720190417VALID
        42I_ICOL1                       INDEX                    1904172019041720190417VALID
        19IND$                          TABLE                    1904172019041720190417VALID
        39I_OBJ4                        INDEX                    1904172019041720190417VALID
        59BOOTSTRAP$                    TABLE                    1904172019041720190417VALID
        36I_OBJ1                        INDEX                    1904172019041720190417VALID
        15UNDO$                         TABLE                    1904172019041720190417VALID
        10C_USER#                       CLUSTER                  1904172019041720190417VALID
         4TAB$                          TABLE                    1904172019041720190417VALID
         2C_OBJ#                        CLUSTER                  1904172019041720190417VALID
        28CON$                          TABLE                    1904172019041720190417VALID
         5CLU$                          TABLE                    1904172019041720190417VALID
        27I_PROXY_ROLE_DATA$_2          INDEX                    1904172019041720190417VALID
        24I_PROXY_DATA$                 INDEX                    1904172019041720190417VALID
        45I_TS1                         INDEX                    1904172019041720190417VALID
        13UET$                          TABLE                    1904172019041720190417VALID
        12FET$                          TABLE                    1904172019041720190417VALID
        17FILE$                         TABLE                    1904172019041720190417VALID

I created a file locally (/tmp/objects.csv), created a bucket (using the OCI CLI tool) and uploaded the file.

Create the bucket on zfs

oci os bucket create --endpoint http://zs7-2cap-200f-vm02.bgrenn.com/oci --namespace-name export/objectstoreoci --compartment-id export/objectstoreoci --name bucketoci  


And copy my file to my bucket.

oci os object put --endpoint http://zs7-2cap-200f-vm02.bgrenn.com/oci ---namespace-name export/objectstoreoci --bucket-name bucketoci  - --file /tmp/objects.csv  --name objects.csv


Step 10  Create an external table on the object.


Now we have the file in the bucket we are ready to create the external table.

ZFS NOTE BEGIN : ***************************************

There is an additional step to access the ZFS. There is a table owned by C##CLOUD$SERVICE which contains the objects store that can be accessed, and how to authenticated. By looking at the current entries you can see the types for OCI and S3.

until I do this you will an error like this..


ERROR at line 1:
ORA-20006: Unsupported object store URI -
https://zs7-2cap-200f-vm01.bgrenn.oracle.com/export/objectstoreoci/bucketoci
/objects.csv
ORA-06512: at "C##CLOUD$SERVICE.DBMS_CLOUD", line 917
ORA-06512: at "C##CLOUD$SERVICE.DBMS_CLOUD", line 2411
ORA-06512: at line 1

Here is the table that we need to change. You can see that it contains 
  • CLOUD_TYPE - authentication to use
  • BASE_URI_PATTERN - URI pattern to identify and allow
  • VERSION - This is used if different authentication versions exist for an object store
  • STATUS - Not sure, but they are all '1'


 desc C##CLOUD$SERVICE.dbms_cloud_store;
 Name                       Null?    Type
 ----------------------------------------- -------- ----------------------------
 CLOUD_TYPE                        VARCHAR2(128)
 BASE_URI_PATTERN                    VARCHAR2(4000)
 VERSION                        VARCHAR2(128)
 STATUS                         NUMBER

I add a row to this table for my object store.  ORACLE_BMC is the OCI authentication

SQL> insert into C##CLOUD$SERVICE.dbms_cloud_store values ('ORACLE_BMC','%.bgrenn.com',null,1);

1 row created.

SQL> commit;

Commit complete.


ZFS NOTE END : *****************************************


We are ready, now let's create the table and give it a go !!

Create the external table on the object
exec DBMS_CLOUD.CREATE_EXTERNAL_TABLE( -
    table_name      =>'CHANNELS_EXT_ZFS', -
    credential_name =>'ZFS', -
    file_uri_list   =>'https://zs7-2cap-200f-vm01.bgrenn.com/oci/n/export/objectstoreoci/b/bucketoci/o/objects.csv', -
    format          => json_object('trimspaces' value 'rtrim', 'skipheaders' value '1', 'dateformat' value 'YYYYMMDD'), -
    field_list      => 'object_id      (1:10)   char' || -
                      ', object_name    (11:40)  char' || -
                      ', object_type    (41:65)  char' || -
                      ', created_date1  (66:71)  date mask "YYMMDD"' || -
                      ', created_date2  (72:79)  date' || -
                      ', last_ddl_time  (80:87)  date' || -
                      ', status         (88:97)', -
   column_list     => 'object_id      number' || -
                      ', object_name    varchar2(30)' || -
                      ', object_type    varchar2(25)' || -
                      ', status         varchar2(10)' || -
                      ', created_date1  date' || -
                      ', created_date2  date' || -
                      ', last_ddl_time  date');

Select from the table.

OBJECT_ID OBJECT_NAME              OBJECT_TYPE            STATUS
---------- ------------------------------ ------------------------- ----------
CREATED_D CREATED_D LAST_DDL_
--------- --------- ---------
    20 ICOL$              TABLE             VALID
17-APR-19 17-APR-19 17-APR-19

     8 C_FILE#_BLOCK#          CLUSTER            VALID
17-APR-19 17-APR-19 17-APR-19

    37 I_OBJ2              INDEX             VALID
17-APR-19 17-APR-19 17-APR-19


That's all there is to it.

Enjoy !

Wednesday, February 10, 2021

Oracle Cloud object Store access with rlone.

 If you are using the Oracle Object Store as part of the Oracle Public Cloud, "rclone" is an open source tool you can use to make things easier.


One of the things I really like about RCLONE is that it provides a command line like interface that is easy to use.  If you have looked at the OCI cli tool, it requires a myriad of parameters.  Below is the command I was using with OCI to view my list of buckets (I obfuscated some of the values).

oci os bucket list --endpoint https://objectstorage.us-ashburn-1.oraclecloud.com  --namespace-name id20xxxxxofo --compartment-id ocid1.compartment.oc1..aaaaaaxxxxxxxxxxxxxxxxxcpqyvzzb4ykd3tyq --config-file ~/.oci/natdconfig 

In order to use the OCI tool, I had to constantly keep a text file open to copy and paste commands.

In comparison, this is the command to list the buckets in my object store using rlcone.

rclone ls oci_bucket:


1) Configure compatibility for an S3 interface in the Public cloud.

In your public cloud council, in the top right hand corner, click on the "silhouette" that controls you settings. in the pull down menu click on "user settings" to bring up the window to configure you resources.  Once there, click on "Customer Secret keys" and then "Generate Secret Key" bring up the window to add a secret key.


On this window give your secret key a name (like S3Key" in my case).  When you click the "Generate Secret key" button, it will give you secret associated with key. SAVE THIS.

Once complete, you will have 2 items associated with your account

NAME:            S3Key                                                        or whatever you named your key.
Access Key:    ddddddddddddeeeeeeeeeffffffffggggg      A uniquely identified key ID
Secret Key :   dd32234sdwercfwe                                     A system generated "secret"

2) Download rclone.

     This can easily be done from the  RCLONE.ORG site.

    Note: You chose the platform you want to execute rclone on, then download the .zip file.
              The .zip file contains the execute, and documentation.
              Copy the "rclone" executable to the location of your choice and make it executable.


2) Configure Rclone.

    You start by executing "rclone config". This will create a configuration file in ~/.config/rclone/rclone called rclone.conf.  This is an interactive interface that will set the correct configuration parameters to be used.

This is an example of what I entered to connect to my Object Store using the S3 interface.

--> rclone config

Give this entry a unique name to identify the S3 object store.
 
Name> oci_s3    <-- my entry name in the config file 


Type of storage to configure.
Enter a string value. Press Enter for the default ("").
Choose a number from below, or type in your own value
..
 4 / Amazon S3 Compliant Storage Provider (AWS, Alibaba, Ceph, Digital Ocean, Dreamhost, IBM COS, Minio, Tencent COS, etc)
..
Storage> 4      <-- 4 identifies this as an S3 compatible object store


Choose your S3 provider.
Enter a string value. Press Enter for the default ("").
Choose a number from below, or type in your own value
..
13 / Any other S3 compatible provider
..
provider> 13      <-- 13 identifies this as "other" S3 compatible object store


Get AWS credentials from runtime (environment variables or EC2/ECS meta data if no env vars).
Only applies if access_key_id and secret_access_key is blank.
Enter a boolean value (true or false). Press Enter for the default ("false").
Choose a number from below, or type in your own value
 1 / Enter AWS credentials in the next step
   \ "false"

 env_auth> 1     <-- 1 to identify that we are using  "AWS compatible Key" for authentication


AWS Access Key ID.
Leave blank for anonymous access or runtime credentials.
Enter a string value. Press Enter for the default ("").

access_key_id>  ddddddddddddeeeeeeeeeffffffffggggg   <-- This is the Access key ID that was generated from my name in the public cloud


AWS Secret Access Key (password)
Leave blank for anonymous access or runtime credentials.
Enter a string value. Press Enter for the default ("").

secret_access_key> dd32234sdwercfwe  --> The system generated key associated with my access key


Region to connect to.
Leave blank if you are using an S3 clone and you don't have a region.
Enter a string value. Press Enter for the default ("").
Choose a number from below, or type in your own value
 1 / Use this if unsure. Will use v4 signatures and an empty region.
   \ ""

region>        --> Leave blank


Endpoint for S3 API.
Required when using an S3 clone.
Enter a string value. Press Enter for the default ("").
Choose a number from below, or type in your own value

endpoint> {namespace}.compat.objectstorage.{region}.oraclecloud.com   --> Note that you will need to fill in your namespace from your account, and ensure the region is correct for the URL.


Location constraint - must be set to match the Region.
Leave blank if not sure. Used when creating buckets only.
Enter a string value. Press Enter for the default ("").

location_constraint>        --> Leave blank


Canned ACL used when creating buckets and storing or copying objects.

This ACL is used for creating objects and if bucket_acl isn't set, for creating buckets too.

For more info visit https://docs.aws.amazon.com/AmazonS3/latest/dev/acl-overview.html#canned-acl

Note that this ACL is applied when server side copying objects as S3
doesn't copy the ACL from the source but rather writes a fresh one.
Enter a string value. Press Enter for the default ("").
Choose a number from below, or type in your own value
 1 / Owner gets FULL_CONTROL. No one else has access rights (default).
   \ "private"

acl>          --> Leave blank


Edit advanced config? (y/n)
y) Yes
n) No (default)

 y/n>           --> Leave blank


Remote config
--------------------
[oci_s3]
type = s3
provider = Other
env_auth = false
access_key_id = S3_Key
secret_access_key = ddddddd...
endpoint = xxxxxxx.compat.objectstorage.us-ashburn-1.oraclecloud.com
--------------------
y) Yes this is OK (default)
e) Edit this remote
d) Delete this remote

y/e/d> y           --> y to save this entry


3) Validate rclone.


Now let's verify what got create.

> cat ~/.config/rclone/rclone.conf

[oci_s3]
type = s3
provider = other
env_auth = false
access_key_id =dd32234sdwercfwe
secret_access_key = dddddxxxxxx
endpoint = xxxxxxx.compat.objectstorage.us-ashburn-1.oraclecloud.com
acl = authenticated-read

That's It.  In my case 
  • the entry is "oci_s3"
  • The access key for S3 is dd32234sdwercfwe"
  • The secret associated with my S3 key is "dddddxxxxxx"
  • The end point I am connecting to is "xxxxxxx.compat.objectstorage.us-ashburn-1.oraclecloud.com"
    • "xxxxxxx" is my namespace
    • "us-ashburn-1" is my region


4) Using rclone.


Now with rclone I can execute commands against my object store that are more linux like.

rclone mkdir oci_s3:mybucket  --> will create a bucket named "mybucket"
rclone ls oci_s3:  --> will list all my buckets
rclone ls oci_s3:mybucket --> will list all the objects in my bucket.

I can also use it to copy to and from my bucket.

rlcone copy /home/oracle/myfile.txt oci_s3:mybucket   --> copies the file to the bucket.

Finally, a great command is sync to synchronize the contents of my on-prem to the cloud

 rlcone sync /home/oracle/mydir/ oci_s3:mybucket  --> this will sync the two locations

Now how fun with it !!