The latest release of ZFSSA software OS8.8.45 includes file retention locking, joining object retention lock and snapshot retention lock providing both versatility and protection of your data.
3 types of retention lock
Legal Hold
You might need to preserve certain business data in response to potential or on-going lawsuits. A legal hold does not have a defined retention period and remains in effect until removed. Once the legal hold is removed, all protected data is immediately eligible for deletion unless other retention rules still apply.
NOTE: Both Data Governance and Regulatory Compliance can be use to protect from any kind of cyber/ransomware attack.
Data Governance
Data Governance locks data sets (snapshot, object or file) for a period of time protecting the data from deletion. You might need to protect certain data sets as a part of internal business process requirements or protect data sets as part of your cyber protection strategy. Data Governance allows for adjustments in the retention strategy from privileged users.
Regulatory Compliance
Your industry might require you to retain a certain class of data for a defined length of time. Your data retention regulations might also require that you lock the retention settings. Regulatory compliance only allows you to increase the retention time if at all. Regulatory Compliance is the most restrictive locking strategy and often does not allow anyone, even an administrator, to make changes affecting retention.
3 implementations of retention lock
Object storage
Object storage retention is managed through the OCI client tool and Object retention is enforced through the API. Current retention settings are applied to all objects when they are accessed. Adding a rule immediately takes affect for all objects.
Administration of retention rules can be managed through the use of RSA certificates. It is recommended to create a separation of duties between a security administrator, and the object owner.
Retention on object storage is implemented in the following way based on the retention lock type.
Legal hold
Legal holds are implemented by placing an indefinite retention rule on a bucket. Creating this rule ensures that all objects within the bucket can not be deleted, and cannot be changed. Only new objects can be stored.
Data Governance
Data Governance is implemented by placing a time bound retention rule on a bucket. The rule sets a lock on all objects for a set length of time. The rule can be later deleted. For cyber protection it is recommended to implement this with a separation of duties.
Regulatory Compliance
Regulatory Compliance is implemented by placing a locked time bound retention rule on a bucket with a grace period. When a locked time bound retention rule is created it immediately takes effect, but there is a grace period of at least 14 days before the rule becomes permanent which allows you to test the rule. Once the grace period expires (defined by a specific date and time) the rule cannot be deleted even by an administrator.
Snapshots
Snapshot locking is managed the BUI, or CLI. Individual snapshots can be locked, and scheduled snapshots can be created and automatically locked. Permission for controlling snapshot locking can be assigned to ZFSSA users allowing you to create a separation of duties. Shares or projects cannot be removed if they contained locked snapshots.
Retention on snapshots is implemented in the following way based on the retention lock type.
Legal hold
Because snapshots only affect data that is on the project/share when the snapshot is taken, it is not possible to lock all new data as it is written. Manual snapshots can be used to provide a mechanism to capture the content of a share as of the current time. This could suffice for a Legal Hold. A manual snapshot can be created with a "retention lock" of UNLOCKED creating a snapshot that cannot be removed. The only way to remove the snapshot is by changing the "retention lock" to OFF, unlocking it for deletion. This creates a hold on the current data for an indefinite period of time. Permissions for releasing the hold on a the snapshot can be assigned to specific individual account allowing for a separation of duties.
Data Governance
Data governance of snapshots is handled through the use of scheduled locked snapshots and enabling the retention policy for scheduled snapshots. A LOCKED schedule is created with both a retention, and "keep at most" setting. This allows you to manage snapshots for a locked number of snapshots, while automatically cleaning up snapshots that are past the retention number. The snapshots within the retention number can not be unlocked, and the schedule can not be removed as long as there is data contained in the snapshot.
Regulatory Compliance
Regulatory compliance of snapshots is handled through the same method as Data Governance. Snapshots cannot be be removed when they are locked, and the schedule remains locked.
File Retention
File retention is set at the share or project level and controls updating and deletion of all data contained on the share/project. A default file retention length is set and all new files will inherit the default setting in effect when the file is created. It is also possible to manually set the retention on a file increasing the default setting inherited by the file.
Legal Hold
Legal Holds on files is implemented by manually increasing the retention on individual files. Because a Legal Hold may be required for an indefinitely period of time, it is recommended to periodically extend the retention on files needed within the legal hold. This allows the files retention to expire once the need the for the Legal Hold has passed.
Data Governance
Data governance is implemented by creating a NEW project and share with a file retention policy of privileged. Privileged mode allows you to create a default retention setting for all new files, and change that setting (longer or shorter) going forward. Files created inherit the retention setting in effect when they are created. Retention can also be adjusted manually to be longer by changing the unlock timestamp. Projects/shares cannot be deleted as long as they have locked files remaining on them.
Regulatory Compliance
Regulatory compliance is implemented by creating a NEW project and share with a file retention policy of mandatory (no override). Mandatory mode does not allow you to decrease the default file retention. Retention can also be adjusted manually to be longer by changing the unlock timestamp. Regulatory Compliance uses the same mechanisms as Data Governance but is much more restrictive. The project/share cannot be removed when locked files exist, and the storage pool cannot be removed when locked files exist within the pool. This mode also requires an NTP server be utilized, and root is locked out of any remote access.
The best way to explore these new features is by using the ZFSSA image in OCI to test different scenarios.
File Retention Lock is introduced today in the much-awaited release of ZFSSA AK Software OS8.8.45 (aka 2013.1 Update 8.45)
OS8.8.45 introduces File Retention to ZFSSA.
File retention is controlled by a new system attribute timestamp for files that, once set, makes the file read-only and unable to be deleted. Once the date/time specified by that timestamp has passed and the retention has expired, the file may be deleted. No other modification is allowed, even after expiration.
In a filesystem with retention enabled, rename of directories is blocked unless the directory is empty. This is done to preserve the name of a file, including its path, so that its location cannot be hidden or any meaning conveyed by a changed path.
File retention enforces one of two policies, set at filesystem creation:
Privileged mode: Allows a process with the FILE_RETENTION_OVERRIDE privilege to override retention and delete files. This privilege does not allow files to be modified once retained.
Mandatory mode: No privilege or authorization allows deletion of a retained file until the retention timestamp has been surpassed. Mandatory mode's protection extends to the filesystem and pool in that they may not be destroyed until all retention on all files therein has expired. A mandatory-mode-protected filesystem also protects its ancestors and clone descendants from destruction.
NOTE: File retention must be enabled in the filesystem during creation before files can be retained because in most settings, taking away the ability to modify or delete a file would be undesirable behavior.
This post will go through the process of creating a few simple scripts to automate OKV installation using the REST API capability of OKV.
NOTE: This information was provided by the product manager Peter Wahl who has a great blog on the features of OKV and some great "Ask Tom" sessions on OKV (and other security pieces),you can watch and learn more.
Step #1 Configure RESTful Services and download client tool
First you need to configure the OKV server for RESTful Services. The instructions can be found here. This is done by navigating to the System tab and clicking on RESTful Services.
This bring up the window below.
There are three things you want to do from this window.
Click on the "Enable" box to enable RESTful services
Download the okvrestcliepackage.zip which are the client utilities.
Save this setting to enable RESTful services.
Now that we have this file, we need to download it our client and start creating the scripts to automate this process.
I downloaded the zip file to my DB host to configure it. I unzipped it in /home/oracle/okv/rest
NOTE: you can also download it directly from the OKV hosts
Step #2 unzip and configure the client tool
I unzipped the client tool into my home directory on a DB server so I can put together the automation scripts. In my case I unzipped it into /home/oracle/okv/rest. This creates 3 sub directories. I am going to format the output using this command.
In order to configure OKV, I am going to need some variables set in my environment. I can do this manually, but in my case I decided to create a "setenv.sh" script that will set the variables and add the OKV script to my path to be executed. The 2 main variables I will be using are
OKV_RESTCLI_HOME - Location of the scripts that I am going to be installing. If I source the setenv.sh script, it will set the home to this location.
OKV_RESTCLI_CONFIG - Name of the configuration file that contains the rest CLI configuration.
Step #4 - Set initialization parameters in okvrestcli.ini file
Next, I am going to configure the initialization parameters. These are found in the okvrestcli.ini file.
You can see that the file contains a "[Default]" profile and a few other example profiles. We will start with the default profile. In this we are going to set a few of the properties.
LOG_PROPERTY - Location of the logging properties. Default location is ./conf directory.
SERVER - IP address (or DNS) of one or more OKV hosts
OKV_CLIENT_CONFIG - location of the config file. Default location is ./conf directory
USER - OKV user that has authority to administer endpoints an wallets.
PASSWORD - Password for the user, or location of wallet containing the password. I am NOT going to use this as I am going to use a wallet file.
CLIENT_WALLET - I am going to use a wallet to store the password, and this is the location of the wallet file. I will be creating the autologin wallet later.
Below is what my "[Default]" configuration file looks like after my changes. I am going to use the environmental variables I set in the setenv.sh script.
NOTE: I am choosing to store my password in wallet rather than clear text in the .ini file.
Step #5 - Change the okv script to use the variables
Since I chose to use variables (OKV_RESTCLI_HOME) I am changing the OKV script to use those variables
Step #6 Create the wallet to save the password encrypted
Since I chose to put my password in a wallet, I now need to create that wallet. Using the instructions in the document (linked to at the beginning of this blog), I execute the command from the directory I installed into (/home/oracle/okv/rest)
cd /home/oracle/okv/rest
. ./setenv.sh


   create environment variables OKV_RESTCLI_HOME and OKC_RESTCLI_CONFIG

   $OKV_RESTCLI_HOME    :  /home/oracle/okv/rest
   $OKV_RESTCLI_CONFIG  :  /home/oracle/okv/rest/conf/okvrestcli.ini

   Adding $OKV_RESTCLI_BIN to the $PATH


okv admin client-wallet add --client-wallet $OKV_RESTCLI_HOME/conf --wallet-user bgrenn
Password: {my password}
{
  "result" : "Success"
}
Step #7 Create the run-me.sh script
The last step is to create the script that will be executed on the host to create the provision script. In my script, I took the default and did some checking. This script will
Ensure the variable OKV_RESTCLI_HOME is set before it can be executed.
Determine the DB_UNIQUE_NAME from the $ORACLE_BASE/diag/rdbms/*/$ORACLE_SID directory. Solving for the * should give us the DB_UNIQUE_NAME
While executing, it tells you what it believes the DB_UNIQUE_NAME is, and gives you a chance to change it if incorrect.
It will validate if the wallet exists by accessing OKV. If the wallet already exists, it does not try to create it again. If it doesn't exist it will create the wallet and endpoint group.
It will install the client software in $ORACLE_BASE/admin/$DBUNQNAME/wallet/okv
Below is the script I am using.
Step #8 Zip it all up and place it in a location to be downloaded
Below is the scripts that will be part of the zip file.
How to migrate your local TDE wallet to Oracle Key Vault .
Here and here are the links to the 21C document that I used for to go through this process.
Also, in order to keep up on OKV and new features, the Product manager Peter Wahl has a great blog where you can learn about on the latest additions to the product, and new release information.
I am assuming that you installed OKV by this point.
Below are the steps.
1) Add the database/host to OKV as an endpoint.
Remember in OKV, each endpoint is unique, but a wallet is shared between endpoints.
I navigate to the endpoint tab and click on the "Add" button.
I fill in the information for my database (TDETEST from my previous post). This is the CDB, as I am using a UNITED wallet for all PDBs that are a member of my CDB. Once filled in I click on the "Register" button.
Once registered, I can see it on the Endpoint screen. Note the "Enroll Token" column. This is needed to enroll the endpoint itself. Save this token, as this will be needed by the person who actually enrolls each DB host/Database.
2) Create wallet in OKV and associate it with the endpoint(s)
Now that OKV is installed and configured on the client we can create a wallet in OKV to upload the keys into. I am going to start by logging back into OKV and navigating to the wallets tab and clicking on "Create" to create a new wallet.
The screen belows comes up, and I enter the name of the new wallet to hold the keys for my CDB. I then click on save to save the new wallet.
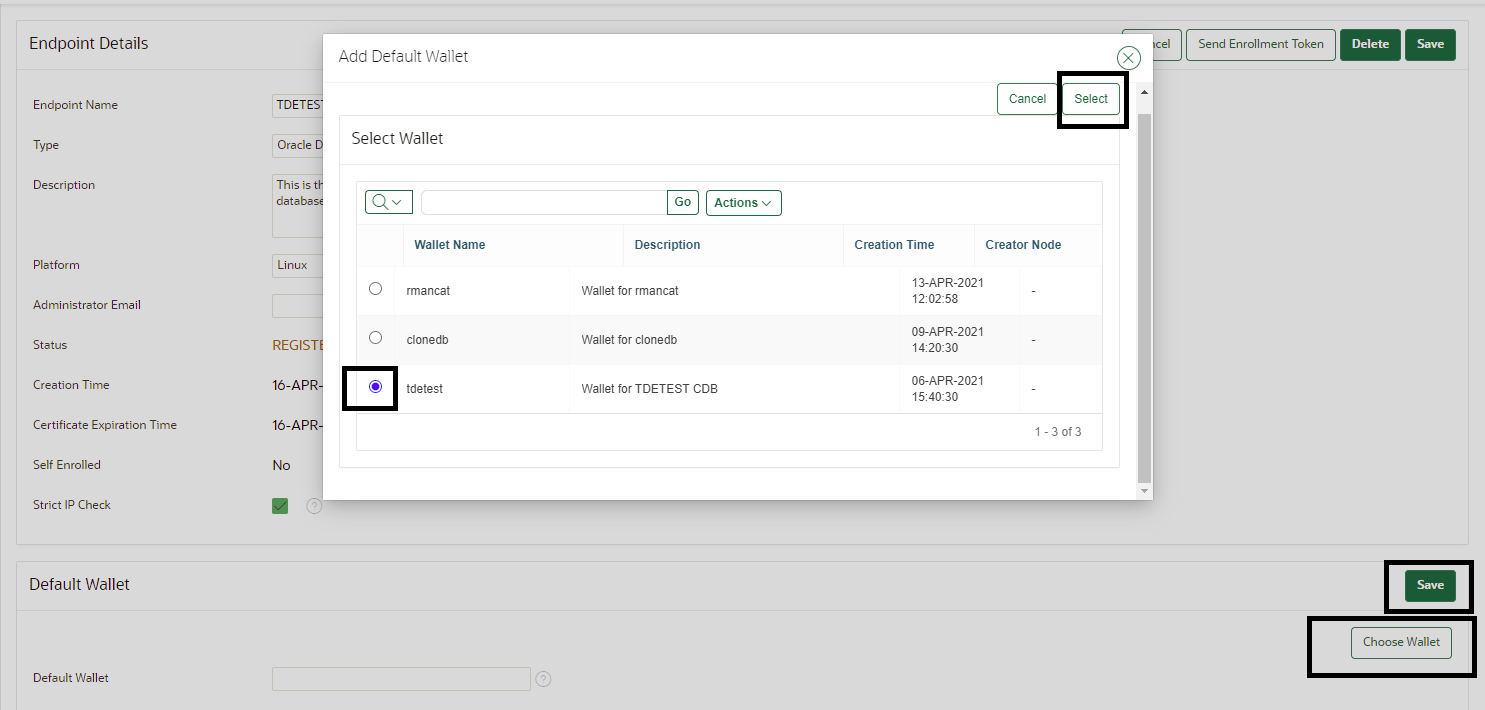
3) Make this wallet the default wallet for the endpoint
Now go to the endpoints tab and click on the "endpoint name"
At this point you want to make this wallet the default wallet for the endpoint. Click on the "Choose Wallet" button, and it will bring up the window in front. Select the correct wallet and click on save. This will set the default wallet for this endpoint when it is enrolled in the next step.
4) Download the OKV client install file
Now that the database/host is registered in OKV (the combination of the 2 is the endpoint), I need to download the jar file which will configure the setting on the database host.
The download is initiated by logging out of the OKV console, and clicking on the "Endpoint Enrollment and Software Download" link on the logon screen. I highlighted it below.
You might not have noticed this link before ! Now click on the link, you don't need to login for this step. It will bring up the window below and in that window you will
Click on the "Submit Token" button, and it will validate the token
Click on "Enroll" to begin the download of the install file. If SMTP was configured, you can also have the software install e-mailed to the endpoint administrator.
The download file is a jar file called okvclient.jar. It is highly recommended that you rename it because it is specific to this endpoint.
5) Transfer the .jar file to the database host and install it.
The pre-requisites are in the install guide. The oracle environment during the install mustbe set to the database you are configuration ($ORACLE_HOME, $ORACLE_BASE, $ORACLE_SID)
My target directory is going to be "/home/oracle/app/oracle/admin/tdetest/wallet/okv" and I copied my .jar file to /home/oracle/app/oracle/admin/tdetest (which I renamed to tdetest_okv.jar).
Execute java passing the location of the jar file, followed by -d "install location"
[oracle@oracle-server okvtest]$ java -jar /home/oracle/app/oracle/admin/tdetest/tdetest_okv.jar -d /home/oracle/app/oracle/admin/tdetest/wallet/okv
Detected JAVA_HOME: /home/oracle/db_19c/jdk
Enter new Key Vault endpoint password (<enter> for auto-login):
Confirm new Key Vault endpoint password:
The endpoint software for Oracle Key Vault installed successfully.
Deleted the file : /home/oracle/app/oracle/okvfiles/okvtest/okvtest_install.jar
[oracle@oracle-server okvtest]$
If this is the first time OKV is being installed on the server, you need to execute the root.sh script (located in the /bin directory within the install location) as root. If it has already been executed, you can skip this step.
Finally, verify that we can connect OKV by executing "okvutil list". If successful, you will receive "default template". This script is located in the /bin directory within the install.
oracle@oracle-server bin]$ ./okvutil list
Enter Oracle Key Vault endpoint password:
Unique ID                               Type            Identifier
E8C825BB-649C-451E-98B8-E128B675FD31    Template        Default template for TDETEST_PRIMARY_NODE1
6) Review how OKV connects to the database.
WALLET_ROOT is set in the database, and within WALLET_ROOT there is an "/okv" directory where the endpoint software must be installed.
On the OS itself, a library is installed (as root if it's not already there) to take care of the encryption
A link is created to a config file for this endpoint. This link is located in $ORACLE_BASE/okv/$ORACLE_SID and links to 2 files that were part of the install. okvclient.lck, and okvclient.ora.
NOTE: okvclient.ora is the configuration file where parameters are set for the endpoint.
7) Upload the keys from the local wallet into OKV
Now we upload the keys from the local wallet into OKV.
Within the upload, I can see where the TDE master keys are being uploaded for my PDBs by looking at the PDB guids.
PDB PDB_ID
SQL> column name format a40
SQL> select name,guid from v$pdbs;

NAME                                     GUID
---------------------------------------- --------------------------------
PDB$SEED                                 BF5039AF39966A70E0536800000A09E1
TDEPDB1                                  BF50708B8BEB0266E0536800000A7B90
TDEPDB2                                  BF5072A8540A032BE0536800000AB0DD
TDEPDB3                                  BF507489CE7703B4E0536800000A8180
And I can look in the wallet in OKV (filtering by Symmetric key) and see the contents that was uploaded from the local wallet. In this screen I can identify the PDB key because I used tags when I created the keys.
8) Add secret to allow use of "External Store".
1) I am going to add the OKV password to the keystore as a secret to allow me to use the "EXTERNAL STORE" instead of the password.
ADMINISTER KEY MANAGEMENT ADD SECRET '0KV2021!' FOR CLIENT 'OKV_PASSWORD' TO LOCAL AUTO_LOGIN KEYSTORE '/home/oracle/app/oracle/admin/tdetest/wallet/tde_seps';
NOTE: As I pointed out in the last post
The keystore must be in a subdirectory of the WALLET_ROOT location called "tde_seps" in order to be found.
The "FOR CLIENT" entry must be 'OKV_PASSWORD' to be found.
It must be AUTO_LOGIN so that it can be opened and used.
2) I am going to add the OKV password to the keystore as a secret to allow me to auto logon to the OKV Keystore.
ADMINISTER KEY MANAGEMENT ADD SECRET '0KV2021!' FOR CLIENT 'HSM_PASSWORD' TO AUTO_LOGIN KEYSTORE '/home/oracle/app/oracle/admin/tdetest/wallet/tde';
3) I need to change the TDE_CONFIGURATION (which is dynamic).
'ALTER SYSTEM SET TDE_CONFIGURATION = "KEYSTORE_CONFIGURATION=OKV|FILE" SCOPE = BOTH;
4) I am going to bounce the database, and ensure that both my file and OKV wallets open up properly.
PDB Name   Type       WRL_PARAMETER                                      Status                         WALLET_TYPE          KEYSTORE Backed Up
---------- ---------- -------------------------------------------------- ------------------------------ -------------------- -------- ----------
CDB$ROOT   FILE       /home/oracle/app/oracle/admin/tdetest/wallet//tde/ OPEN                           AUTOLOGIN            NONE     YES
CDB$ROOT   OKV                                                           OPEN_NO_MASTER_KEY             OKV                  NONE     UNDEFINED
PDB$SEED   FILE                                                          OPEN                           AUTOLOGIN            UNITED   YES
PDB$SEED   OKV                                                           OPEN_NO_MASTER_KEY             OKV                  UNITED   UNDEFINED
TDEPDB1    FILE                                                          OPEN                           AUTOLOGIN            UNITED   YES
TDEPDB1    OKV                                                           OPEN_NO_MASTER_KEY             OKV                  UNITED   UNDEFINED
TDEPDB2    FILE                                                          OPEN                           AUTOLOGIN            UNITED   YES
TDEPDB2    OKV                                                           OPEN_NO_MASTER_KEY             OKV                  UNITED   UNDEFINED
TDEPDB3    FILE                                                          OPEN                           AUTOLOGIN            UNITED   YES
TDEPDB3    OKV                                                           OPEN_NO_MASTER_KEY             OKV                  UNITED   UNDEFINED


10 rows selected.
9) Combine the local wallet File and OKV.
Next I need to migrate the keys using the local wallet. Note this will rekey the database.
ADMINISTER KEY MANAGEMENT SET ENCRYPTION KEY IDENTIFIED BY "0KV2021!" MIGRATE USING "F1LE2021!" WITH BACKUP;
I am going to bounce the database and ensure it comes up with both Keystores opened.
PDB Name   Type       WRL_PARAMETER                                      Status                         WALLET_TYPE          KEYSTORE Backed Up
---------- ---------- -------------------------------------------------- ------------------------------ -------------------- -------- ----------
CDB$ROOT   FILE       /home/oracle/app/oracle/admin/tdetest/wallet//tde/ OPEN                           AUTOLOGIN            NONE     YES
CDB$ROOT   OKV                                                           OPEN                           OKV                  NONE     UNDEFINED
PDB$SEED   FILE                                                          CLOSED                         UNKNOWN              UNITED   UNDEFINED
PDB$SEED   OKV                                                           CLOSED                         UNKNOWN              UNITED   UNDEFINED
TDEPDB1    FILE                                                          OPEN                           AUTOLOGIN            UNITED   YES
TDEPDB1    OKV                                                           OPEN                           OKV                  UNITED   UNDEFINED
TDEPDB2    FILE                                                          OPEN                           AUTOLOGIN            UNITED   YES
TDEPDB2    OKV                                                           OPEN                           OKV                  UNITED   UNDEFINED
TDEPDB3    FILE                                                          OPEN                           AUTOLOGIN            UNITED   YES
TDEPDB3    OKV                                                           OPEN                           OKV                  UNITED   UNDEFINED
9) Combine the local wallet
That's all there is to it !
The most important notes I found during this process
WALLET_ROOT and TDE_CONFIGURATION should be used in 19c.
The password for OKV
add secret to the wallet in WALLET_ROOT/tde_seps using client 'OKV_PASSWORD'
add secret to the wallet in WALLET_ROOT/tde using client 'HSM_PASSWORD'
OKV must be installed in WALLET_ROOT/okv
The local wallet for TDE must be in WALLET_ROOT/tde
This is post #1 in a series of posts explaining how to implement TDE (Transparent Data Encryption). In this first post I will take my Multitenant 19c database (remember Multitenant is mandatory with 21c) and configure TDE in my 3 (no extra license needed) pluggable databases.
The database I created for this example contains 3 PDBs as this will give me the flexibility to unplug and move PDBs around.
The names I used are
TDETEST - This is my CDB, and I will only be encrypting users tablespace and the catalog.
TDEPDB1,TDEPDB2, TDEPDB3 - My 3 PDBs. I will be encrypted all user tablespaces that make up these 3 PDBS .
Since I have only a single instance, the location I chose to put the local wallet file is under $ORACLE_BASE/admin/$ORACLE_SID/wallet (/home/oracle/app/oracle/admin/tdetest/admin).
In a RAC environment you have a few choices of where to put the wallet file. The most important thing though, is to ensure each node has an identical copy in a RAC environment.
In a RAC environment you can put the wallet file:
On the local file system on each node, but be sure they are all identical. It is best to put them within the $ORACLE_BASE to make it easier in an out-of-place upgrade.
On a shared filesystem. This can be ACFS, DBFS, or just NFS.
With ASM. It is possible to set the location to be an ASM file for example "+DATA/TDETEST/wallet"
NOTE: When deciding where to store your TDE wallet there are 2 items to keep in mind.
1) You need to backup your wallet. Without the wallet file you can't access your database. Once encryption is implemented, the wallet needs to be available.
2) The wallet needs to be backed up separate from the database. If the wallet and the Database backup are stored together, anyone can read the backup.
In my further blogs I will be converting from using a local wallet file to store my encryption keys, to using OKV along with a local wallet that caches the autologin information.
To migrate to TDE, I chose to perform the quickest method "Restore tablespace as encrypted". With my test database, I did not have a standby database.
NOTE: With a standby database the fastest way to convert to TDE would be with a "standby first" strategy. This is explained in this MAA document which includes an automated procedure. With this strategy you would convert your standby database to utilize TDE with a restore as encrypted, while the primary database stays untouched. Once the standby is converted, you would perform a switchover (to the standby) and encrypt the "current standby", which was the primary. Once both are encrypted, you would switch back and the process is completed.
Step 1 - Perform a full backup of the database immediately prior to starting the process. Since I am using "restore tablespace as encrypted" this will allow me to open the database with minimal recovery. Once backed up, you also should create a restore point to quickly identify the point after the full backup prior to the encryption.
create restore point pretde;
Step 2 - Set the location of the wallet_root, and the tde configuration. I chose to use the WALLET_ROOT parameter (new with 19 I believe) because it gives the most flexibility. Keep in mind in order to go through step 2 completely the database will need to be bounced.
alter system set WALLET_ROOT='/home/oracle/app/oracle/admin/tdetest/wallet/' scope=spfile;

startup force;

alter system set tde_configuration='KEYSTORE_CONFIGURATION=FILE' scope=both;
Step 3 - We are going to take a look at the database and the parameters that are set for the encryption wallet. Below is the formatted query I am going to be using throughout this post.
Below is the output of the query and the current settings as of this point. You can see that there are rows for all my PDBs, and that the status is "NOT_AVAILABLE" since I have not created a wallet or any master keys yet. You can also see that the keystore is UNITED, meaning that all the keys (both for the CDB and all the PDBs) are assumed to be contained in the same Wallet file.
Also note that the WRL_PARAMETER is set based on the WALLET_ROOT setting. The TDE wallet file is defaulted to be the WALLET_ROOT/tde directory for the CDB.
PDB Name   Type       WRL_PARAMETER                                      Status                         WALLET_TYPE          KEYSTORE Backed Up
---------- ---------- -------------------------------------------------- ------------------------------ -------------------- -------- ----------
CDB$ROOT   FILE       /home/oracle/app/oracle/admin/tdetest/wallet//tde/ NOT_AVAILABLE                  UNKNOWN              NONE     UNDEFINED
PDB$SEED   FILE                                                          NOT_AVAILABLE                  UNKNOWN              UNITED   UNDEFINED
TDEPDB1    FILE                                                          NOT_AVAILABLE                  UNKNOWN              UNITED   UNDEFINED
TDEPDB2    FILE                                                          NOT_AVAILABLE                  UNKNOWN              UNITED   UNDEFINED
TDEPDB3    FILE                                                          NOT_AVAILABLE                  UNKNOWN              UNITED   UNDEFINED
Step 4. Now I need to create the keystore and open it for the CDB, and all my individual PDBs. Note that each PDB shares the keystore with the CDB. In isolated mode, I would create an individual keystore for each PDB and they would be in subdirectories under the WALLET_ROOT location.
But first I need to create the directory to hold the keystore wallet.
ADMINISTER KEY MANAGEMENT CREATE KEYSTORE '/home/oracle/app/oracle/admin/tdetest/wallet/tde' IDENTIFIED BY "F1LE2021!";

ADMINISTER KEY MANAGEMENT SET KEYSTORE OPEN IDENTIFIED BY "F1LE2021!";
alter session set container=tdepdb1;
ADMINISTER KEY MANAGEMENT SET KEYSTORE OPEN IDENTIFIED BY "F1LE2021!" CONTAINER = CURRENT;
alter session set container=tdepdb2;
ADMINISTER KEY MANAGEMENT SET KEYSTORE OPEN IDENTIFIED BY "F1LE2021!"  CONTAINER = CURRENT;
alter session set container=tdepdb3;
ADMINISTER KEY MANAGEMENT SET KEYSTORE OPEN IDENTIFIED BY "F1LE2021!"  CONTAINER = CURRENT;
Now let's look at the encryption settings in v$encryption_wallet. Below you can see that there is a single wallet setting (UNITED keystore), and the status is "OPEN_NO_MASTER_KEY". The master key has not been set for CDB, or the PDBs.
PDB Name   Type       WRL_PARAMETER                                      Status                         WALLET_TYPE          KEYSTORE Backed Up
---------- ---------- -------------------------------------------------- ------------------------------ -------------------- -------- ----------
CDB$ROOT   FILE       /home/oracle/app/oracle/admin/tdetest/wallet//tde/ OPEN_NO_MASTER_KEY             PASSWORD             NONE     UNDEFINED
PDB$SEED   FILE                                                          CLOSED                         UNKNOWN              UNITED   UNDEFINED
TDEPDB1    FILE                                                          OPEN_NO_MASTER_KEY             PASSWORD             UNITED   UNDEFINED
TDEPDB2    FILE                                                          OPEN_NO_MASTER_KEY             PASSWORD             UNITED   UNDEFINED
TDEPDB3    FILE                                                          OPEN_NO_MASTER_KEY             PASSWORD             UNITED   UNDEFINED
Step 5. Now we create the master keys for the CDB and each PDB. A master key is needed to encrypt the tablespace encryption keys stored in the datafiles.
NOTE: I added a tag that identifies the key with the CDB or PDB it is created for. I highly recommend using tags to identify the keys within the wallet. Identifying the master encryption key for an individual PDB will be important when moving PDBs between CDBs.
ADMINISTER KEY MANAGEMENT SET encryption KEY using tag 'TDETEST MASTERKEY_APRIL19' IDENTIFIED BY "F1LE2021!" WITH BACKUP USING 'TDETEST_TDEKEY_APR1_backup';
alter session set container=tdepdb1;
ADMINISTER KEY MANAGEMENT SET encryption KEY using tag 'TDEPDB1 MASTERKEY_APRIL19' IDENTIFIED BY "F1LE2021!" WITH BACKUP USING 'TDEPDB1_TDEKEY_APR1_backup'  container=current;
alter session set container=tdepdb2;
ADMINISTER KEY MANAGEMENT SET encryption KEY using tag 'TDEPDB2 MASTERKEY_APRIL19' IDENTIFIED BY "F1LE2021!" WITH BACKUP USING 'TDEPDB2_TDEKEY_APR1_backup'  container=current;
alter session set container=tdepdb3;
ADMINISTER KEY MANAGEMENT SET encryption KEY using tag 'TDEPDB3 MASTERKEY_APRIL19' IDENTIFIED BY "F1LE2021!" WITH BACKUP USING 'TDEPDB3_TDEKEY_APR1_backup'  container=current;
And once again let's look at the settings in v$encryption_wallet. This time you will see that the wallet is open for all CDBs/PDBs except for the PDB$SEED. The wallet type is "PASSWORD" which means that the wallet needs to be manually opened with a password.
PDB Name   Type       WRL_PARAMETER                                      Status                         WALLET_TYPE          KEYSTORE Backed Up
---------- ---------- -------------------------------------------------- ------------------------------ -------------------- -------- ----------
CDB$ROOT   FILE       /home/oracle/app/oracle/admin/tdetest/wallet//tde/ OPEN                           PASSWORD             NONE     NO
PDB$SEED   FILE                                                          CLOSED                         UNKNOWN              UNITED   UNDEFINED
TDEPDB1    FILE                                                          OPEN                           PASSWORD             UNITED   NO
TDEPDB2    FILE                                                          OPEN                           PASSWORD             UNITED   NO
TDEPDB3    FILE                                                          OPEN                           PASSWORD             UNITED   NO
Step 6 - We have the master keys set and the wallets are open. We now need to implement TDE by encrypted the tablespaces in my PDBs. As I said before, in my example, I used "restore tablespace as encrypted".
Another option is to encrypt online (as of 12c). In this process the database will encrypt each datafile sequentially while the database is online and active.
NOTE : If using online encryption be aware that
It takes much longer than performing a restore, as datafiles are encrypted sequentially. Using "restore tablespace as encrypted" You can parallelize the restore across multiple channels.
The process needs enough space for 2 copies of the largest datafile. If using bigfiles, this can be quite a bit of storage.
You need to monitor the process to ensure it completes successfully.
Next step is I am going to startup mount and open the wallets, restore my 3 PDBs users tablespaces, along with the users tablespace in my CDB, and then recover and open the database.
sqlplus> shutdown immediate;
sqlplus> startup mount;
sqlplus> ADMINISTER KEY MANAGEMENT SET KEYSTORE OPEN IDENTIFIED BY "F1LE2021!";
sqlplus> alter session set container=tdepdb1;
sqlplus> ADMINISTER KEY MANAGEMENT SET KEYSTORE OPEN IDENTIFIED BY "F1LE2021!" CONTAINER = CURRENT;
sqlplus> alter session set container=tdepdb2;
sqlplus> ADMINISTER KEY MANAGEMENT SET KEYSTORE OPEN IDENTIFIED BY "F1LE2021!"  CONTAINER = CURRENT;
sqlplus> alter session set container=tdepdb3;
sqlplus> SDMINISTER KEY MANAGEMENT SET KEYSTORE OPEN IDENTIFIED BY "F1LE2021!"  CONTAINER = CURRENT;

rman target / catalog rmancat/oracle@rmancat

rman> restore tablespace users as encrypted;

rman> restore tablespace tdepdb1:users  as encrypted;
rman> restore tablespace tdepdb2:users  as encrypted;
rman> restore tablespace tdepdb3:users  as encrypted;

rman> recover database;
rman> alter database open;
Step 7 - Make sure all new tablespaces are encrypted by default
In order to ensure all new tablespaces are encrypted I am going to set the database parameter.
sql>alter system set encrypt_new_tablespaces = ALWAYS scope = both sid = '*';
Step 8 - Encrypt all credentials that contained in the root container
In order to encrypt all credentials (like scheduler credentials, and DB Link credentials) that are stored in the system catalogs, you need to login as a user granted "SYSKM" role and execute
sql> alter
database dictionary encrypt credentials container = current;
Step 9 - I am going to verify that the pluggable databases are encrypted, along with the catalog.
First let's look at the existing keys using the query below
I can see the keys that are created in each container, including the ROOT
PDB Name        Activation Time            Key ID                                                  Tag
--------------- -------------------------- ------------------------------------------------------- ----------------------------------------
CDB$ROOT        19-Apr-2021 05:12:41pm     AbwcWGicr0+rvyhrSB+rKQAAAAAAAAAAAAAAAAAAAAAAAAAAAAAA    TDETEST MASTERKEY_APRIL19

TDEPDB1         19-Apr-2021 05:19:11pm     AX9pkB+zQE/Wv6Qek13TeLkAAAAAAAAAAAAAAAAAAAAAAAAAAAAA    TDEPDB1 MASTERKEY_APRIL19

TDEPDB2         19-Apr-2021 05:19:11pm     AUKkROD1TE8wv0jfJhN63JYAAAAAAAAAAAAAAAAAAAAAAAAAAAAA    TDEPDB2 MASTERKEY_APRIL19

TDEPDB3         19-Apr-2021 05:19:13pm     AZUWZDWpxk9sv0GrljDFr7sAAAAAAAAAAAAAAAAAAAAAAAAAAAAA    TDEPDB3 MASTERKEY_APRIL19
I am going to use the query below to look at the encryption setting on each datafile.
Below is the output. I see that all the datafiles were properly encrypted and are available.
PDB Name        Tablespace Name                Encrypted  Master Key ID
--------------- ------------------------------ ---------- ------------------------------------------------------------
CDB$ROOT        SYSAUX                         NO         AbwcWGicr0+rvyhrSB+rKQA=
                SYSTEM                         NO         AbwcWGicr0+rvyhrSB+rKQA=
                TEMP                           NO         AbwcWGicr0+rvyhrSB+rKQA=
                UNDOTBS1                       NO         AbwcWGicr0+rvyhrSB+rKQA=
                USERS                          YES        AbwcWGicr0+rvyhrSB+rKQA=

TDEPDB1         SYSAUX                         NO         AX9pkB+zQE/Wv6Qek13TeLk=
                SYSTEM                         NO         AX9pkB+zQE/Wv6Qek13TeLk=
                TEMP                           NO         AX9pkB+zQE/Wv6Qek13TeLk=
                UNDOTBS1                       YES        AX9pkB+zQE/Wv6Qek13TeLk=
                USERS                          YES        AX9pkB+zQE/Wv6Qek13TeLk=

TDEPDB2         SYSAUX                         NO         AUKkROD1TE8wv0jfJhN63JY=
                SYSTEM                         NO         AUKkROD1TE8wv0jfJhN63JY=
                TEMP                           NO         AUKkROD1TE8wv0jfJhN63JY=
                UNDOTBS1                       YES        AUKkROD1TE8wv0jfJhN63JY=
                USERS                          YES        AUKkROD1TE8wv0jfJhN63JY=

TDEPDB3         SYSAUX                         NO         AZUWZDWpxk9sv0GrljDFr7s=
                SYSTEM                         NO         AZUWZDWpxk9sv0GrljDFr7s=
                TEMP                           NO         AZUWZDWpxk9sv0GrljDFr7s=
                UNDOTBS1                       YES        AZUWZDWpxk9sv0GrljDFr7s=
                USERS                          YES        AZUWZDWpxk9sv0GrljDFr7s=
And I am going to look at the catalog to be sure
select enforcement from DICTIONARY_CREDENTIALS_ENCRYPT;

ENFORCEM
--------
ENABLED
Step 10 - I am adding the ability to access the keystore without having to enter the password. This can make it much easier to open the keystore if you don't chose to make the Keystore Wallet AUTO_LOGON.
I am putting my keystore password in an AUTO_LOGIN wallet as a secret. This wallet needs to be created in a directory called TDE_SEPS. In my case since, I am using WALLET_ROOT, the directory containing the secret must be WALLET_ROOT/tde_seps.
The password portion of "ADMINISTER KEY" becomes IDENTIFIED by EXTERNAL STORE;
NOTE: I am using the phrase "FOR CLIENT 'TDE_WALLET'"
'TDE_WALLET' is necessary to
ADMINISTER KEY MANAGEMENT
     ADD SECRET 'F1LE2021!' FOR CLIENT 'TDE_WALLET'
     USING TAG 'TDE file keystore password'
     TO LOCAL AUTO_LOGIN KEYSTORE '/home/oracle/app/oracle/admin/tdetest/wallet/tde_seps';
Now to verify it I am going to restart my database and open the wallet using the external store (rather than hardcoding in the password).
ADMINISTER KEY MANAGEMENT SET KEYSTORE OPEN IDENTIFIED BY EXTERNAL STORE;

alter session set container=tdepdb1;
ADMINISTER KEY MANAGEMENT SET KEYSTORE OPEN IDENTIFIED BY EXTERNAL STORE CONTAINER = CURRENT;
alter pluggable database  open;

alter session set container=tdepdb2;
ADMINISTER KEY MANAGEMENT SET KEYSTORE OPEN IDENTIFIED BY EXTERNAL STORE  CONTAINER = CURRENT;
alter pluggable database  open;

alter session set container=tdepdb3;
ADMINISTER KEY MANAGEMENT SET KEYSTORE OPEN IDENTIFIED BY EXTERNAL STORE CONTAINER = CURRENT;
alter pluggable database  open;
And finally verify that that the Keystores are open (using the external store) for my CDB and PDBs.
PDB Name   Type       WRL_PARAMETER                                      Status                         WALLET_TYPE          KEYSTORE Backed Up
---------- ---------- -------------------------------------------------- ------------------------------ -------------------- -------- ----------
CDB$ROOT   FILE       /home/oracle/app/oracle/admin/tdetest/wallet//tde/ OPEN                           PASSWORD             NONE     NO
PDB$SEED   FILE                                                          CLOSED                         UNKNOWN              UNITED   UNDEFINED
TDEPDB1    FILE                                                          OPEN                           PASSWORD             UNITED   NO
TDEPDB2    FILE                                                          OPEN                           PASSWORD             UNITED   NO
TDEPDB3    FILE                                                          OPEN                           PASSWORD             UNITED   NO
Step 11 - I am going to change the wallets to be AUTO_LOGIN, bounce the database and verify that the encryption settings are all correct.
sqlplus / as sysdba

sql> ADMINISTER KEY MANAGEMENT SET KEYSTORE CLOSE IDENTIFIED BY EXTERNAL STORE;
sql> ADMINISTER KEY MANAGEMENT CREATE AUTO_LOGIN KEYSTORE FROM KEYSTORE '/home/oracle/app/oracle/admin/tdetest/wallet/tde/' IDENTIFIED BY "F1LE2021!";
sql> shutdown immediate
sql> startup
And v$encryption_wallet shows me that my wallets are all open, and that they are AUTOLOGIN.
PDB Name   Type       WRL_PARAMETER                                      Status                         WALLET_TYPE          KEYSTORE Backed Up
---------- ---------- -------------------------------------------------- ------------------------------ -------------------- -------- ----------
CDB$ROOT   FILE       /home/oracle/app/oracle/admin/tdetest/wallet//tde/ OPEN                           AUTOLOGIN            NONE     NO
PDB$SEED   FILE                                                          OPEN                           AUTOLOGIN            UNITED   NO
TDEPDB1    FILE                                                          OPEN                           AUTOLOGIN            UNITED   NO
TDEPDB2    FILE                                                          OPEN                           AUTOLOGIN            UNITED   NO
TDEPDB3    FILE                                                          OPEN                           AUTOLOGIN            UNITED   NO
Now I am ready to perform a new FULL backup of the pluggable databases, and they are ready for use.
That's all there is to implementing TDE with a wallet file. Next post, I am going to convert my wallet to OKV managed wallets.