Showing posts with label RMAN. Show all posts

Wednesday, May 10, 2023

ZDLRA real-time redo demonstrated

 One of the key features of the ZDLRA is the ability to capture changes from the database "real-time" just like a standby database does. In this blog post I am going to demonstrate what is happening during this process so that you can get a better understanding of how it works.

ZDLRA Real-time Redo


If you look at the GIF above, I will explain what is happening, and show what happens with a demo of the process.

The ZDLRA uses the same process as a standby database.  In fact if you look at the flow of the real-time redo you will notice the redo blocks are sent to BOTH the local redo log files, AND to the staging area on the ZDLRA.  The staging area on the ZDLRA acts just like a standby redo does on a standby database.

As the ZDLRA receives the REDO blocks from the protected database they are validated to ensure that they are valid Oracle Redo block information.  This ensures that a man-in-the-middle attack does not change any of the backup information.  The validation process also assures that if the database is attacked by ransomware (changing blocks), the redo received is not tainted.


The next thing that happens during the process is the logic when a LOG SWITCH occurs.  As we all know, when a log switch occurs on a database instance, the contents of the redo log are written to an archive log.  With real-time redo, this causes the contents of the redo staging area on the ZDLRA (picture a standby redo log) to become a backup set of an archive log.  The RMAN catalog on the ZDLRA is then updated with the internal location of the backup set.


Log switch operation

I am going to go through a demo of what you see happen when this process occurs.

ZDLRA is configured as a redo destination

Below you can see that my database has a "Log archive destination" 3 configured.  The destination itself is the database on the ZDLRA (zdl9), and also notice that the log information will be sent for ALL_ROLES, which will send the log information regardless if it is a primary database or a standby database.
Archive Dest


List backup of recent archive logs from RMAN catalog


Before I demonstrate what happens with the RMAN catalog, I am going to list out the current archive log backup. Below you see that the current archive log backed up to the ZDLRA has the "SEQUENCE #10".

archive log backups prior

Perform a log switch

As you see in the animation at the top of the post, when a log switch occurs, the contents of the redo log in the "redo staging area" are used to create an archive log backup that is stored and cataloged.  I am going to perform a log switch to force this process.

Log switch


List backup of archive logs from RMAN catalog

Now that the log switch occurred, you can see below that there is a new backup set created from the redo staging area.
There are a couple of interesting items to note when you look at the backup set created.

archive logs after


  1. The backup of the archive log is compressed.  As part of the policy on the ZDLRA you have the option to have the backup of the archive log compressed when it is created from the "staged redo". This does NOT require the ACO (Advanced Compression) license. The compressed archive log will be sent back to the DB compressed during a restore operation, and the DB host will uncompress it.  This is the default option (standard compression) and I recommend changing it.  If you decide to compress, then MEDIUM or Low is recommended. Keep this in mind that he this may put more workload on the client to uncompress  the backup sets which may affect recovery times.  NOTE: When using TDE, there will be little to no compression possible.
  2. The TAG is automatically generated. By looking at the timestamp in the RMAN catalog information, you can see that the TAG is automatically generated using the timestamp to make it unique.
  3. The handle begins with "$RSCN_", this is because the backup piece was generated by the ZDLRA itself, and archivelog backup sets will begin with these characters.

Restore and Recovery using partial log information


Now I am going to demonstrate what happens when the database crashes, and there is no time for the database to perform a log switch.

List the active redo log and current SCN

Below you can see that my currently active redo log is sequence # 12.  This is where I am going to begin my test.

begin test


Create a table 

To demonstrate what happens when the database crashes I am going to create a new table. In the table I am going to store the current date, and the current SCN. Using the current SCN we will be able to determine the redo log that contains the table creation.

table create


Abort the database


As you probably know, if I shut down the database gracefully, the DB will automatically clean out the redo logs and archive it's contents. Because I want to demonstrate what happens with crash I am going to shut the database down with an ABORT to ensure the log switch doesn't occur.  Then start the database mount so I can look at the current redo log information

abort


Verify that the log switch did not occur


Next I am going to look at the REDO Log information and verify that my table creation (SCN 32908369) is still in the active redo log and did not get archived during the shutdown.

Log switch doesn't occur

Restore the database


Next I am going to restore the database from backup.


restore

Recover the database


This is where the magic occurs so I am going to show that happens step by step.

Recover using archive logs on disk


The first step the database does is to use the current archive logs to recover the database. You can see in the screenshot below that the database recovers the database using archive logs on disk up to sequence #11 for thread 1.  This contains all the changes for this thread, but does not include what is in the REDO log sequence #12.  Sequence #12 contains the create table we are interested in.

archives on disk

Recover using partial redo log


This step is where the magic of the ZDLRA occurs.  You can see from the screen shot below that the RMAN catalog on the ZDLRA returns the redo log information for Sequence #12 even though it was never archived. The ZDLRA was able to create an archive log backup from the partial contents it had in the Redo Staging area.

rtr recovery

Open the database and display table contents.


This is where it all comes together.  Using the partial redo log information from Redo Log sequence #12, you can see that when the database is opened, the table creation transaction is indeed in the database even though the redo did not become an archive log.
'


Conclusion : I am hoping this post gives you a better idea of how Real-time redo works on the ZDLRA, and how it handles recovering transactions after a database crash

Wednesday, March 1, 2023

Oracle Database recovery using Incremental merge, snapshots, OMF and "switch to copy"

I work with backup and recovery of the Oracle Database, and sometimes this means looking at the Incremental Merge backup strategy.  I know this isn't the best backup/recovery strategy, and below are few posts giving you more detail on the topic.

They have some great points, and I typically don't recommend using incremental merge backups.  The incremental merge backup strategy is almost always paired with snapshots to increase the recovery window.

Below is an image of how these are typically paired with snapshots.


One of the biggest draws of using the incremental merge strategy with snapshots, is the ability to perform a "switch to copy" as a recovery strategy.

NOTE: When you perform "switch to copy" the database is now accessing datafiles using the backup copy.  This is not supported on Exadata for any storage other than Oracle ZFS.

If you review the MOS note "Using External Storage with Exadata (Doc ID 2663308.1)" you will find that "Use of non-Oracle storage for database files is not supported."

Given all of that, I got the question "I am using the incremental merge strategy on Oracle an ZFS appliance using snapshots. If I perform a switch-to-copy recovery of one or more datafiles, how do I avoid forcing a new full backup on the next incremental merge backup?".

I thought this was a great question, and I created a test database, and started googlin'.  Below are some of the posts I looked at.

I started  by using the first post and walked through a testing scenario using a DBCS database in OCI.
My database was a 19.8 database using local storage (to make things easier to see the datafiles), and it was using OMF by default.  
The piece that was missing from the first post was the "alter database move datafile 'xxx' to 'xxx' KEEP;

What I found is that it wasn't so easy with my database using OMF for 2 reasons.
  1. Using OMF, you don't specify the "to 'xxx'" since OMF will automatically name the destination datafile.
  2. Using "KEEP" is ignored when the source file is OMF.  This meant that the original image copy being used by the database is removed when move process completes.  I couldn't catalog the image copy.
Since it took a bit of research to find the best strategy I wanted to share the process that I would recommend when dealing with OMF and non-OMF image copy backups with snapshots.

NON-OMF image copy backups

  1. Snap the backup storage just to preserve the starting point. --> optional but recommended
  2. Take the tablespaces offline
  3. Perform a "switch to copy" of the datafiles --> This will use the incremental merge backup.
  4. Recover the datafiles
  5. Bring the tablespaces online ---> Application is running using the external image copy
  6. Perform an "alter database move datafile 'xxx' to 'xxx' KEEP; --> Using keep will preserve the original copy, but will only work if the image copy is NOT OMF. If the destination is an OMF file, you will not use the "to"
  7. Catalog the image copy that was preserved with the "KEEP" ensuring you use the same tag used for the incremental merge. "catalog datafilecopy '+fra/ocm121/datafile/MONSTER.346.919594959' level 0 TAG 'incr_update';"
  8. The next incremental merge will pick up with the updated image copy.

OMF image copy backups

  1. Snap the backup storage to create a copy for the switch to copy.
  2. Unmount the "current" image copy 
  3. Mount the snap copy using the same mount point as the "current" image copy.
  4. Take the tablespaces offline
  5. Perform a "switch to copy" of the datafiles --> This will use the snap copy of the incremental merge backup on external storage.
  6. Recover the datafiles
  7. Bring the tablespaces online ---> Application is running using external copies.
  8. Perform an "alter database move datafile 'xxx' ; --> Since the source is an OMF file you cannot use "KEEP" to preserve the original copy. The original copy will be removed.
  9. Once all moves are complete, unmount the snapped copy.
  10. Mount the "current" copy. This is as of when you started this process.
  11. Catalog the image copy for all datafiles that performed the "switch to copy" ensuring you use the same tag used for the incremental merge "catalog datafilecopy '+fra/ocm121/datafile/MONSTER.346.919594959' level 0 TAG 'incr_update';"
  12. You can now destroy the snap that was created to perform the switch to copy.
  13. The next incremental merge will pick up with the current image datafile copies where it left off.
As you can see, using OMF greatly complicates preserving the incremental merge backup, and forces you to start at the last backup.

Friday, July 29, 2022

OCI Database backups with retention lock

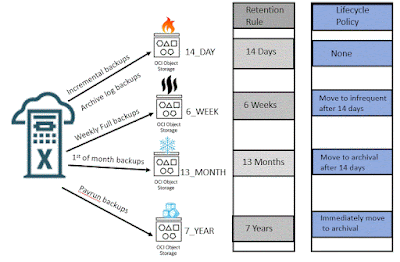
 OCI Object Storage provides both lifecycle rules and retention lock.  How to take advantage of both these features isn't always as easy as it looks.

 In this post I will go through an example customer request and how to implement a backup strategy to accomplish the requirements.

OCI Buckets

This image above gives you an idea of what they are looking to accomplish.

Requirements

  • RMAN retention is to keep a 14 day point in time recovery window
  • All long term backups beyond 14 days are cataloged as KEEP backups
  • All buckets are protected with a retention rule to prevent backups from being deleted before they become obsolete
  • Backups are moved to lower tier storage when appropriate to save costs.

Backup strategy

  • A full backup is taken every Sunday at 5:30 PM and this backup is kept for 6 weeks.
  • Incremental backups are taken Monday through Saturday at 5:30 PM and are kept for 14 days
  • Archive log sweeps are taken 4 times a day and are kept for 14 days
  • A backup is taken the 1st day of the month at 5:30 PM and this backup is kept for 13 months.
  • A full backup is taken following the Tuesday morning bi-weekly payroll run and is kept for 7 years
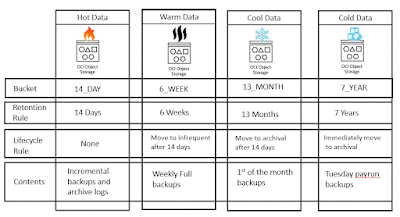
This sounds easy enough.  If you look at the image above you can what this strategy looks like in general. I took this strategy and mapped it to the 4 buckets, how they would be configured, and what they would contain. This is the image below.

OCI Object rules


Challenges


As I walked through this strategy I found that it involved some challenges. My goal was limit the number of full backups to take advantage of current backups.  Below are the challenges I realized exist with this schedule
  • The weekly full backup taken every Sunday is kept for longer than the incremental backups and archive logs. This caused 2 problems
    1. I wanted to make this backup a KEEP backup that is kept for 6 weeks before becoming obsolete.  Unfortunately KEEP backups are ignored as part of an incremental backup strategy. I could not create a weekly full backup that was both a KEEP backup and also be used as part of  incremental backup strategy.
    2. Since the weekly full backup is kept longer than the archive logs, I need to ensure that this backup contains the archive logs needed to defuzzy the backup without containing too many unneeded archive logs
  • The weekly full backup could fall on the 1st of the month. If this is the case it needs to be kept for 13 months otherwise it needs to be kept for 6 weeks.
  • I want the payrun backups to be immediately placed in archival storage to save costs.  When doing a restore I want to ignore these backups as they will take longer to restore.
  • When restoring and recovering the database within the 14 day window I need to include channels allocated to all the buckets that could contain those buckets. 14_DAY, 6_WEEK,  and 13_MONTH.

Solutions

I then worked through how I would solve each issue.

  1. Weekly full backup must be both a normal incremental backup and KEEP backup - After doing some digging I found the best way to handle this issue was to CHANGE the backup to be a KEEP backup with either a 6 week retention, or a 13 month retention from the normal NOKEEP type. By using tags I can identify the backup I want change after it is no longer needed as part of the 14 day strategy.
  2. Weekly full backup contains only archive logs needed to defuzzy - The best way to accomplish this task is to perform an archive log backup to the 14_DAY bucket immediately before taking the weekly full backup
  3. Weekly full backup requires a longer retention - This can be accomplished by checking if the the full backup is being executed on the 1st of the month. If it is the 1st, the full backup will be placed in the 13_MONTH bucket.  If it is not the 1st, this backup will be placed in the 6_WEEK bucket.  This backup will be created with a TAG with a format that can be used to identify it later.
  4. Ignore bi-weekly payrun backups that are in archival storage - I found that if I execute a recovery and do not have any channels allocated to the 7_YEAR bucket, it will may try to restore this backup, but it will not find it and move to the next previous backup. Using tags will help identify that a restore from the payrun backup was attempted and ultimately bypassed.
  5. Include all possible buckets during restore - By using a run block within RMAN I can allocate channels to different buckets and ultimately include channels from all 3 appropriate buckets.
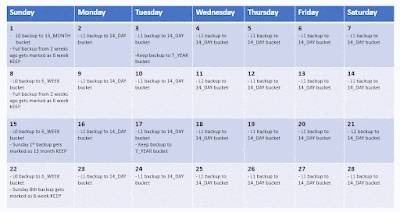
Then as a check I drew out a calendar to walk through what this strategy would look like.

OCI backup schedule


Backup examples

Finally I am including examples of what this would look like.

Mon-Sat 5:30 backup job


dg=$(date +%Y%m%d)
rman <<EOD
run {
ALLOCATE CHANNEL daily1 DEVICE TYPE     'SBT_TAPE' PARMS  'SBT_LIBRARY=/home/oracle/cloudbackup/lib/libopc.so ENV=(OPC_PFILE=/home/oracle/ociconfig/config/14_DAY.ora)';
ALLOCATE CHANNEL daily2 DEVICE TYPE     'SBT_TAPE' PARMS  'SBT_LIBRARY=/home/oracle/cloudbackup/lib/libopc.so ENV=(OPC_PFILE=/home/oracle/ociconfig/config/14_DAY.ora)';
backup incremental level 1 database tag="incr_backup_${dg}" plus archivelog tag="arch_backup_${dg}";
   }
exit
EOD

Sat 5:30 backup job schedule

1) Clean up archive logs first


dg=$(date +%Y%m%d:%H)
rman <<EOD
run {
ALLOCATE CHANNEL daily1 DEVICE TYPE     'SBT_TAPE' PARMS  'SBT_LIBRARY=/home/oracle/cloudbackup/lib/libopc.so ENV=(OPC_PFILE=/home/oracle/ociconfig/config/14_DAY.ora)';
ALLOCATE CHANNEL daily2 DEVICE TYPE     'SBT_TAPE' PARMS  'SBT_LIBRARY=/home/oracle/cloudbackup/lib/libopc.so ENV=(OPC_PFILE=/home/oracle/ociconfig/config/14_DAY.ora)';
backup archivelog tag="arch_backup_${dg}";
   }
exit
EOD

2a) If this 1st of the month then execute this script to send the full backup to the 13_MONTH bucket


dg=$(date +%Y%m%d)
rman <<EOD
run {
ALLOCATE CHANNEL monthly1 DEVICE TYPE     'SBT_TAPE' PARMS  'SBT_LIBRARY=/home/oracle/cloudbackup/lib/libopc.so ENV=(OPC_PFILE=/home/oracle/ociconfig/config/13_MONTH.ora)';
ALLOCATE CHANNEL monthly2 DEVICE TYPE     'SBT_TAPE' PARMS  'SBT_LIBRARY=/home/oracle/cloudbackup/lib/libopc.so ENV=(OPC_PFILE=/home/oracle/ociconfig/config/13_MONTH.ora)';
backup incremental level 1 database tag="full_backup_${dg}" plus archivelog tag="full_backup_${dg}";
   }
exit
EOD


2b) If this is NOT the 1st of the month execute this script and send the full backup to the 6_WEEK bucket

dg=$(date +%Y%m%d)
rman <<EOD
run {
ALLOCATE CHANNEL weekly1 DEVICE TYPE     'SBT_TAPE' PARMS  'SBT_LIBRARY=/home/oracle/cloudbackup/lib/libopc.so ENV=(OPC_PFILE=/home/oracle/ociconfig/config/6_WEEK.ora)';
ALLOCATE CHANNEL weekly2 DEVICE TYPE     'SBT_TAPE' PARMS  'SBT_LIBRARY=/home/oracle/cloudbackup/lib/libopc.so ENV=(OPC_PFILE=/home/oracle/ociconfig/config/6_WEEK.ora)';
backup incremental level 1 database tag="full_backup_${dg}" plus archivelog tag="full_backup_${dg}";
   }
exit
EOD


3a) If today is the 15th then change the  full backup to a 13 month retention


dg=$(date --date "-14 days" +%Y%m%d)
rman <<EOD
CHANGE BACKUPSET TAG="full_backup_${dg}" keep until time 'sysdate + 390';
EOD

3b) If today is NOT the 14th then change the  full backup to a 6 week retention


dg=$(date --date "-14 days" +%Y%m%d)
rman <<EOD
CHANGE BACKUPSET TAG="full_backup_${dg}" keep until time 'sysdate + 28';
EOD

Tuesday after payrun backup job 

1) Clean up archive logs first


dg=$(date +%Y%m%d:%H)
rman <<EOD
run {
ALLOCATE CHANNEL daily1 DEVICE TYPE     'SBT_TAPE' PARMS  'SBT_LIBRARY=/home/oracle/cloudbackup/lib/libopc.so ENV=(OPC_PFILE=/home/oracle/ociconfig/config/14_DAY.ora)';
ALLOCATE CHANNEL daily2 DEVICE TYPE     'SBT_TAPE' PARMS  'SBT_LIBRARY=/home/oracle/cloudbackup/lib/libopc.so ENV=(OPC_PFILE=/home/oracle/ociconfig/config/14_DAY.ora)';
backup archivelog tag="arch_backup_${dg}";
   }
exit
EOD

2) Execute the keep backup


dg=$(date +%Y%m%d)
rman <<EOD
run {
ALLOCATE CHANNEL yearly1 DEVICE TYPE     'SBT_TAPE' PARMS  'SBT_LIBRARY=/home/oracle/cloudbackup/lib/libopc.so ENV=(OPC_PFILE=/home/oracle/ociconfig/config/7_YEAR.ora)';
ALLOCATE CHANNEL yearly2 DEVICE TYPE     'SBT_TAPE' PARMS  'SBT_LIBRARY=/home/oracle/cloudbackup/lib/libopc.so ENV=(OPC_PFILE=/home/oracle/ociconfig/config/7_YEAR.ora)';
backup database tag="payrun_backup_${dg}" plus archivelog tag="full_backup_${dg}" keep until time 'sysdate + 2555';
   }
exit
EOD


Restore example

Now in order to restore, I need to allocate channels to all the possible buckets. Below is the script I used  to validate this with a "restore database validate" command.


run {
ALLOCATE CHANNEL daily1 DEVICE TYPE     'SBT_TAPE' PARMS  'SBT_LIBRARY=/home/oracle/cloudbackup/lib/libopc.so ENV=(OPC_PFILE=/home/oracle/ociconfig/config/14_DAY.ora)';
ALLOCATE CHANNEL daily2 DEVICE TYPE     'SBT_TAPE' PARMS  'SBT_LIBRARY=/home/oracle/cloudbackup/lib/libopc.so ENV=(OPC_PFILE=/home/oracle/ociconfig/config/14_DAY.ora)';
ALLOCATE CHANNEL weekly1 DEVICE TYPE     'SBT_TAPE' PARMS  'SBT_LIBRARY=/home/oracle/cloudbackup/lib/libopc.so ENV=(OPC_PFILE=/home/oracle/ociconfig/config/6_WEEK.ora)';
ALLOCATE CHANNEL weekly2 DEVICE TYPE     'SBT_TAPE' PARMS  'SBT_LIBRARY=/home/oracle/cloudbackup/lib/libopc.so ENV=(OPC_PFILE=/home/oracle/ociconfig/config/6_WEEK.ora)';
ALLOCATE CHANNEL monthly1 DEVICE TYPE     'SBT_TAPE' PARMS  'SBT_LIBRARY=/home/oracle/cloudbackup/lib/libopc.so ENV=(OPC_PFILE=/home/oracle/ociconfig/config/13_MONTH.ora)';
ALLOCATE CHANNEL monthly2 DEVICE TYPE     'SBT_TAPE' PARMS  'SBT_LIBRARY=/home/oracle/cloudbackup/lib/libopc.so ENV=(OPC_PFILE=/home/oracle/ociconfig/config/13_MONTH.ora)';
restore database validate;
    }


Below is what I am seeing in the RMAN log because I picked a point in time where I want it to ignore the 7_YEAR backups.

In this case you can see that it tried to retrieve the Payrun backup but failed back to the previous backup with tag "FULL_073122". This is the backup I want.


channel daily1: starting validation of datafile backup set
channel daily1: reading from backup piece h613o4a4_550_1_1
channel daily1: ORA-19870: error while restoring backup piece h613o4a4_550_1_1
ORA-19507: failed to retrieve sequential file, handle="h613o4a4_550_1_1", parms=""
ORA-27029: skgfrtrv: sbtrestore returned error
ORA-19511: non RMAN, but media manager or vendor specific failure, error text:
   KBHS-07502: File not found
KBHS-01404: See trace file /u01/app/oracle/diag/rdbms/acmedbp/acmedbp/trace/sbtio_4819_140461854265664.log for det
failover to previous backup

channel daily1: starting validation of datafile backup set
channel daily1: reading from backup piece gq13o3rm_538_1_1
channel daily1: piece handle=gq13o3rm_538_1_1 tag=FULL_073122
channel daily1: restored backup piece 1
channel daily1: validation complete, elapsed time: 00:00:08


That's all there is to it. Tags are very help helpful to identify the correct backups.


Friday, July 15, 2022

File Retention Lock on ZFSSA

File Retention Lock was recently released on ZFSSA and I wanted to take the time to explain how to set the retention time and view the retention of locked files. Below is an example of what happens. You can see that the files are locked until January 1st 2025

ZFS Retention Lock


The best place to start for information on how this works is by looking at my last blog post on authorizations.

First I will go through the settings that available at the share/project level


Grace period

The grace period is used to automatically lock a file when there has not been updates to the file for this period of time.
If the automatic file retention grace period is "0" seconds, then the default retention is NOT in effect.


NOTE: even with a grace period of "0" seconds files can be locked by manually setting a retention period. 
 Also, once a grace period is set (> "0") it cannot be increased or disabled.
Finally, if you set the grace period to a long period (to ensure all writes are to a file are completed), you can lock the file by removing the write bit. This does the same thing as expiring the grace period.

Below is an example

chmod ugo-w *

Running the "chmod" will  remove the write bit, and immediate cause all files to lock.

Default retention

The most common method to implement file retention is by using the default retention period. This causes the file to be locked for the default retention when the grace period expires for a file.
Note that the file is locked as of the time the grace period expires. For example, if I have a grace period of 1 day (because I want the ability to clean up a failed backup) and a default file retention period of 14 days, the file will be locked for 14 days AFTER the 1 day grace period. The lock on the file will expire 15 days after the file was last written to.

zfs file retention lock


In the example above you can see that all files created on this share are created with a default retention of 1 day (24 hours).

NOTE: If the grace period is not > "0' these settings will be ignored and files will not be locked by default.

Minimum/Maximum File retention

The second settings you see on the image above are the "minimum file retention period" and the "maximum file retention period".

These control the retention settings on files which follows the rules below.

  • The default retention period for files MUST be at least the minimum file retention period, and not greater than the maximum file retention period.

  • If the retention date is set manually on a file, the retention period must fall within the minimum and maximum retention period.

Display current Lock Expirations.

In order to display the lock expiration on Linux the first thing you need to do is to change the share/project setting "Update access time on read" to off . Through the CLI this is "set atime=false" on the share.


zfssa file retention lock

Once this settings is made, the client will then display the lock time as the "atime". In my example at the top of the blog, you can see by executing "ls -lu" the file lock time is displayed.

NOTE: you can also use the find command to search for files using the "atime" This will allow to find all the locked files.

Below is an example of using the find command to list files that have an lock expiration time in the future.


export CURRENT_DATE=`date +"%y-%m-%d %H:%M:%S"`
find . -type f -newerat "$CURRENT_DATE" -printf '%h\t%AD%AH:%AM:%AS\t%s \n'


Manually setting a retention date


It is possible to set a specific date/time that a file is locked until. You can even set the retention date on a file that currently locked (it must be a date beyond the current lock data).

NOTE: If you try to change the retention date on a specific file, the new retention date has to be greater than current retention date (and less than or equal to the maximum file retention period). This makes sense.  You cannot lower the retention period for a locked file.

Now how do you manually set the retention date ?  Below is an example of how it is set for a file.

Setting File retention lock

There are 3 steps that are needed to lock the file with a specific lock expiration date.

1. Touch the file and set the access date. This can be done with
    • "-a" to change the access date/time
    • "-d" or "-t" to specify the date format
 2. Remove the write bit with chmod guo-2

3.  execute a cmod to make the file read only.

Below is an example where I am taking a file that does not contain retention, and setting the date to January 1, 2025.


First I am going to create a file and touch it setting the atime to a future data.

$echo 'xxxx' > myfile4.txt

$ls -al myfile4.txt
-rw-r--r--. 1 nobody oinstall 5 Jul 15 20:40 myfile3.txt

$ls -lu myfile3.txt
-rw-r--r--. 1 nobody oinstall 5 Jul 15 20:40 myfile3.txt

$ touch -a -t "2501011200" myfile3.txt
$ ls -lu myfile3.txt
-rw-r--r--. 1 nobody oinstall 5 Jan  1  2025 myfile3.txt
$rm myfile3.txt
$ls -lu myfile3.txt
ls: cannot access myfile3.txt: No such file or directory


You can see that I set the "atime" and it display a future date, but I was still able to delete the file.

Now I am going to move to  remove the write bit before deleting.

$echo 'xxxx' > myfile4.txt

$ls -al myfile4.txt
-rw-r--r--. 1 nobody oinstall 5 Jul 15 20:40 myfile3.txt

$ls -lu myfile3.txt
-rw-r--r--. 1 nobody oinstall 5 Jul 15 20:40 myfile3.txt

$ touch -a -t "2501011200" myfile3.txt
$ ls -lu myfile3.txt
-rw-r--r--. 1 nobody oinstall 5 Jan  1  2025 myfile3.txt
$chmod ugo-w  myfile3.txt
$rm myfile3.txt
ls: cannot access myfile3.txt: No such file or directory


Still, I am able to delete the file.. Finally I am going to do all three 

$echo 'xxxx' > myfile4.txt

$ls -al myfile4.txt
-rw-r--r--. 1 nobody oinstall 5 Jul 15 20:40 myfile3.txt

$ls -lu myfile3.txt
-rw-r--r--. 1 nobody oinstall 5 Jul 15 20:40 myfile3.txt

$ touch -a -t "2501011200" myfile3.txt
$ ls -lu myfile3.txt
-rw-r--r--. 1 nobody oinstall 5 Jan  1  2025 myfile3.txt
$chmod ugo-w  myfile3.txt
$chmod a=r  myfile3.txt
#$rm myfile3.txt
rm: remove write-protected regular file ‘myfile3.txt’? y
rm: cannot remove ‘myfile3.txt’: Operation not permitted


Summary to manually set the lock on a file

If the file is NOT current locked  (the grace period is "0" or the grace period has not expired).


The commands below will lock the file "myfile.txt" until 01/01/25 12:00.

touch -a -t "2501011200" myfile.txt
chmod ugo-w  myfile.txt
chmod a=r  myfile.txt


If the file is already locked 

The commands below will adjust the lock on the file "myfile.txt" until 01/01/25 12:00.


touch -a -t "2501011200" myfile.txt


Monday, March 29, 2021

ZDRLA adds smart incremental to be even smarter.

 Recently version 19.1.1.2 of ZDLRA software was released, and one the features is something called "Smart Incremental".  I will walk through how this feature works, and help you understand why features like this are "ZDLRA Only".


I am going to start by walking through how incremental backups become "virtual full backups", and that will give you a better picture of how "smart incremental" is possible.

The most important thing to understand about these features is that the RMAN catalog itself is within the ZDLRA  AND the ZDLRA has the ability to update the RMAN catalog.

How does a normal backup strategy work ? 

That is probably the best place to start.  What DBAs typically do is perform a WFDI (Weekly Full Daily Incremental) backup.  To keep my example simple, I will use the following assumptions.
  • My database contains 3 datafile database. SYSTEM, SYSAUX, USERS, but I will only use the example of backing up datafile users.
  • Each of these 3 datafiles are 50 GB in size
  • I am only performing a differential backup which creates a backup containing the changes since the last backup (full OR incremental).
  • My database is in archivelog  *
* NOTE: With ZDLRA you can back up a nologging database, and still take advantage of virtual fulls. The database needs to be in a MOUNTED state when performing the incremental backup.

If placed in a table the backups for datafile USERS would look this. Checkpoint SCN is the current SCN number of the database at the start of the backup.


If I were to look at what is contained in the RMAN catalog (RC_BACKUP_DATAFILE), I would see the same backup information but I would see the SCN information 2 columns.
  • Incremental change # is the oldest SCN contained in the backupset. This is the starting SCN number of the previous backup, this backup is based on.
  • Checkpoint Change # is  starting SCN number of the backup.  Everything newer than this SCN (including this SCN) needs to be defuzzied.


Normal backup progression (differential)


When performing an incremental RMAN backup of a datafile, the first thing that RMAN does is decide which blocks needs to be backed up. Because you are performing an incremental backup,  you may be backing up all of the blocks, only some of the blocks, or even none of the blocks if the file has not changed.
This is a decision RMAN makes by querying the RMAN catalog entries (or the controlfile entries if you not using an RMAN catalog).

Now let's walk through this decision process.  Each RMAN incremental differential's starting SCN is based on the beginning SCN of the previous backup (except for the full).


By looking at the RMAN catalog (or controlfile), RMAN determines  which blocks need to be contained in each incremental backup.


Normal backup progression (cumulative differential)


Up to release 19.1.1.2, the recommendation was to perform a Cumulative Differential backup. The cumulative differential backup compares the starting SCN number of the last full backup to determine the starting point of the incremental backup (rather than the last incremental backup) .
The advantage of the cumulative over differential, is that a cumulative backups can be applied to the last full and take the place of applying multiple differential backups.  However, cumulative backups are bigger  every day that passes between full backups because they contain all blocks since the last full.

Below is what a cumulative schedule would look like and you can compare this to the differential above.
You can see that each cumulative backups starts with the Checkpoint SCN of the last full to ensure that all blocks changed since the full backup started are captured.


The RMAN catalog entries would look like this.


If you were astute, you would notice a few things happened with the cumulative differential vs the differential.
  • The backup size got bigger every day
  • The time it took to perform the incremental backup got longer
  • The range of SCNs contained in the incremental is larger for a cumulative backup.

ZDLRA backup progression (cumulative differential)

As  you most likely know, one the most important features of the ZDLRA is the ability to create a "virtual full" from an incremental backup.,

If we look at what happens with a cumulative differential (from above), I will fill in the virtual full RMAN catalog entries by shading them light green.

The process of performing backups on the ZDLRA is exactly the same as it is for the above cumulative, but the RMAN catalog looks like this.


What you will noticed by looking at this compared to the normal cumulative process that
  • For every cumulative incremental backup there is a matching virtual full backup  The Virtual full backup appears (from the newly inserted catalog entry) to have beeen taken at the same time, and the same starting SCN number as the cumulative incremental. Virtual full backups, and incremental backups match time, and SCN as catalog entries.
  • The size of the virtual full is 0 since it is virtual and does not take up any space.
  • The completion time for the cumulative incremental backup is the same as the differential backups.  Because the RMAN logic can see the virtual full entry in the catalog, it executes the cumulative incremental EXACTLY as if it is the first differential incremental following a full backup.
Smart Incremental backups -

Now all of this led us to smart incremental backups. Sometimes the cumulative backup process doesn't work quite right.  A few of the reasons this can happen are.

  • You perform a full backup to a backup location other than the ZDLRA. This could be because you are backing up to the ZDLRA for the first time replacing a current backup strategy, or maybe you created a special backup to disk to seed a test environment (Using a keep backup for this will alleviate this issue).  The cumulative incremental backup will compare against the last full regardless of where it was taken (there is exceptions if you always use tags to compare).
  • You implement TDE or rekey the database.  Implementing TDE (Transparent Data Encryption) changes the blocks, but does not change the SCN numbers of the blocks. A new full backup is required.
Previously, you would have to perform a special full backup to correct these issues. In the example below you can see what happens (without smart incremental) to the RMAN catalog if you perform a backup on Thursday at 12:00 to disk to refresh a development environment.


Since the cumulative backups are based on the last full backup, the Thursday - Saturday backups contain all the blocks that have changed since the disk backup started on Thursday at 12:00.
And, since it is cumulative, each days backup is larger, and takes longer.

This is when you would typically have to force a new level 0 backup of the datafile.


What the smart incremental does

Since the RMAN catalog is controlled by the ZDLRA it can correct the problem for you. You no longer need to perform cumulative backups as the ZDLRA can fill in any issues that occur.

In the case of the Full backup to disk, it can "hide" that entry, and continue to correctly perform differential backups. It would "hide" the disk backup that occured, and inform the RMAN client that the last full backup as of Thursday night is NOT the disk backup, but it is the previous virtual full backup.
\


 In the case of the TDE, it can "hide" all of the Level 0 virtual full backups, and the L1 differential backups (which will force a new level 0).


All of this is done without updating the DB client version. All the magic is done within the RMAN catalog on the ZDLRA.

Now isn't that smart ?


Tuesday, February 2, 2021

ZDLRA - Using Protection Policies to manage databases that have migrated or to be retired

 One the questions that keeps coming up with ZDLRA is how to manage the backups for a database that has either

  • Been migrated to another ZDRA
  • Been retired, but the backup needs to be kept for a period of time


The best way to deal with this by the use of Protection Policies.

How Protection Policies work:


If you remember right, Protection Policies are way of grouping databases together that have the same basic characteristics.

The most important of which are :

Name/Description             - Used to identify the Protection Policy
Recovery Window Goal    - How many days of recovery do you want to store at a minimum 
Max Retention Window    - (Optional) Maximum number of days of backups you want to keep
Unprotected Window        - (Optional) Used to set alerts for databases that are no longer receiving recovery data.

One of the common questions I get is.. What happens if I change the Protection Policy associated with my database ?

Answer :  By changing the Protection Policy a database is associated with, you are only changing the metadata.  Once the change is made, the database follows the Protection Policy rules it is now associated with, and no longer is associated with the old Protection Policy

How this plays out with a real example is... 
My Database (PRODDB) is a member of a Protection Policy (GOLD) which has a Recovery Window Goal of 20 days, and a Max Retention Window of 40 days (the default value being 2x the Recovery Window Goal).
My Database (PRODDB) currently has 30 days of backups, which is right in the middle. 


 What would normally happen for this database is (given enough space), backups will continue to be kept until PRODDB has 40 days of backups.  On day 41, a maintenance job (which runs daily) will execute, and find that my database, PRODDB, has exceeded it's Recovery Window Goal.  This job will remove all backups (in a batch process for efficiency) that are older than 20 days.

BUT ........................

Today, I moved my database, PRODDB, to a new protection policy (Silver) which only has a 10 day Recovery Window Goal, and a Max Recovery Window of 20 Days.


As I pointed out, the characteristics of the NEW Protection Policy will be used, and the next time the daily purge occurs, this database will be flagged, and all backups greater than the Recovery Window Goal will be purged.


Retiring databases: - 

One very common question how to handle the retiring of database.  As you might know, when you remove a database from the ZDLRA, ALL backups are removed from ZDLRA.
When a database is no longer sending backups to the ZDLRA,  the backups will continue to be purged until only a single level 0 backup remains.  This is to ensure that at least one backup is kept, regardless of the Max Recovery Window.
The best way to deal with Retiring database (and still keep the last Level 0 backup) through the use of Protection Policies.
In my example for my database PRODDB, I am going to retire the database instead of moving it to the Silver policy.  My companies standard is to  keep the final backup for my database available for 90 days, and on day 91 all backups can be removed.

These are requirements from the above information.
  • At least 1 backup is kept for 90 days, even though my Max Recovery Window was 40 days.
  • I want to know when my database has been retired for 90 days so I can remove it from the ZDLRA.
In order to accomplish both of these items, I am going to create a Protection Policy named RETIRED_DB with the following attributes
  • Recovery Window Goal of 2 days
  • Max Recovery Window of 3 Days
  • Unprotected Data Window of 90 days
  • New Alert in OEM to tell me when a database in this policy violates its Unprotected Data Window
If you look closely at the attributes, you will noticed that I decreased the Recovery Window Goal to allow backups to be removed after 3 days.  I also set the Unprotected Data Window to be 90 days.
What this looks like over  time is 


As you can see by moving it to the new policy, within a few days, all backups except for the most recent Full back is removed.  You can also see that on day 91 (when it's time to remove this database) I will be getting an alert.

Migrating Databases:

Migrating databases is very similar to retiring databases, except that I don't want remove the old backups until they naturally expire.  For my example of PRODB with a Recovery Window Goal of 20 days, as soon as I have a new Level 0 on the new ZDLRA, I will move this database to a new policy (GOLD_MIGRATED) with the following attributes.
  • Recovery Window Goal of 20 days, since I still need to preserve old backups
  • Max Recovery Window goal of 21 days. This will  remove the old backups as they age off.
  • Unprotected Data Window of 21 days, which will alert me that it time to remove this database.
How this would look over time time is.


Conclusion:

When retiring or migrating databases, Protection Policies can be leveraged to both
  • Ensure backups are removed as they age out until only a single L0 (Full) remains
  • Alert you when it is time to remove the database from the ZDLRA.

Friday, November 6, 2020

Cloud restores to a RAC cluster with RMAN.

 This post is about an RMAN command you probably never thought much about,"Autolocate". I know I never did until I started testing restores from a cloud store.


Now let's see what it is, what it does.

First let's see what the documentation says it does.

"RMAN automatically performs autolocation of all files that it must back up or restore. If you use the noncluster file system local archiving scheme, then a node can only read the archived redo logs that were generated by an instance on that node. RMAN never attempts to back up archived redo logs on a channel it cannot read.

During a restore operation, RMAN automatically performs the autolocation of backups. A channel connected to a specific node only attempts to restore files that were backed up to the node. For example, assume that log sequence 1001 is backed up to the drive attached to node1, while log 1002 is backed up to the drive attached to node2. If you then allocate channels that connect to each node, then the channel connected to node1 can restore log 1001 (but not 1002), and the channel connected to node2 can restore log 1002 (but not 1001)."

After reading this, you are probably wondering why this matters when restoring from a cloud store.

To show you, I will walk through what happens during the "autolocate" process.

First, as you would guess, the "autolocation" occurs before any restore operations can start.

Also, this only comes into play when restoring to multiple nodes in the RAC cluster using channels allocated to the different nodes..

To show why it's important to understand it, I will walk through the test case that I had.

EXAMPLE environment:

MYDB - I have a very large Database, 100 TB composed of 8,000 individual datafiles.

DB Host - I have 8 nodes in my RAC cluster

BACKUP - I backed up to a cloud store with a filesperset 1, section size 32G. since my datafiles where all 32G, they would be individual pieces even with a different filesperset.  My backup is composed of ~8,000 individual backup pieces.

RESTORE - In order to improve my restore performance I configured my restore across all 8 nodes.


What happens:

What the "autolocate" does, by default, is it validates that each backup piece is available from each node.  This is a serial process for each backup, AND for each node.

This turned out ot be a slow process due to the # of validations that needed to be performed. For my example it validated 8,000 X 8 = 64,000 validations.  

Also, I found that this serial process took a lot of time.  Even though each validation takes a fraction of a second, the total time for the validation becomes significant.  In my test case, 8 pieces/second were being validated.

This added up because below is what was happening.

START RESTORE :  00:00

    Node 1 - validate 500 pieces : 01:02

    ......

    Node 1 - validate 5000 pieces : 10:25

    ....

    Node 1 - validate 8000 pieces : 16:40

    Node 2 - start validation : 16:40

    ....

    ....

     Node 8 - validate 8000 pieces    2 : 13:20

BEGIN Restoring files.


So how to get around this issue? If you are sure that all backupieces you are restoring are available from every node in your cluster, you can set it off at the beginning of your restore operation.

RMAN> set autolocate off;

During my testing, it bypassed the validation step, and started restoring the database within a few seconds.

This is something to keep in mind, if you see a gap in time between starting a restore on a RAC cluster, and when it starts assigning datafiles to channels.