Thursday, January 31, 2019

TDE Implementation first 30 days

This blog post is on the immediate effect of implementing TDE in your database backup storage.


In the last blog post I mentioned that after implementing TDE you need to explicitly perform a full backup on all tablespaces you encrypt.
  • If you are performing an incremental strategy (level 0 and level 1) then explicitly perform a level 0 backup.
  • If you are using an incremental merge backup (BACKUP INCREMENTAL LEVEL 1 for RECOVERY of COPY), you must create a new image copy and start a new divergent backup
The reason a full explicit backup is needed is that the SCN number of the underlying data blocks do not change when you implement encryption.  Because of this, any backup strategy you are using does not recognize that the the blocks have changed.  This is true even with the ZDLRA.

Above is the reason for this post.  If you have an unencrypted database, and you implement TDE on all tablespaces, then perform a full backup of all tablespaces, you will have 2 copies of your backups for a period of time.

I am going to take a closer look at what this means to my backup storage when implementing TDE.

For my example, I'm going to use the same example I used in the last post.
Below is what it looks like.


Using my example dataset for a just a weekly full backup and a daily incremental backup (using deduplication) you can see that

The data in my database is 35 GB ( the fully allocated size is 50 GB).
The amount of change over 30 days is 70 GB.
Compressing both of these, the final size is 41.5 GB used.

Prior to implementing TDE, I am using 41.5 consistently to store 30 days of compressed backups for my 50GB database.

The next column shows what happens when after implementing TDE.  The full backup size compressed is now 43.9 GB and the amount of change over 30 days is 54 GB compressed.
After implementing TDE, I am using 97.9 GB consistently to store 30 days of compressed backups for my 50 GB database.

Now let's see what first 30 days looks like.


This shows the unencrypted backups (purple) and how they start to age off and get removed on day 31.  You can also see how the encrypted backups (gray) grow over time and the will stabilize to the size you see on day 31.

You can see that there is an immediate impact to the backup usage. That growth continues until the old backup is finally ages off.

You need to plan for TDE ahead of time.  For my example dataset, the storage needed more than doubled.


Friday, January 25, 2019

Implementing TDE

This blog post is about what happens when you implement TDE (Transparent Data Encryption) in your database.

I started with 2 other blog posts, but I soon realized that this is a HUGE topic with ramifications throughout the database system.

Well let's start at the beginning.
I wanted to know what happens when you implement TDE.
The 3 items that I keep hearing are

  1. Encrypted data will not compress
  2. Encrypted data will not dedupe
  3. Implementing Advanced compression in the database will mitigate the loss of compression to encryption by compressing the data before encrypting


Now in order to investigate this further, I had some restrictions that affected my testing.

  • I had no access to a deduplicating appliance to test point 2
  • I didn't have a real data set to use.  I ended up using the SOE schema in swingbench 
  • The only way I could test the effect of compression was to compress the backupset.  Most appliances (including the ZDLRA) break the file up into pieces and compress each piece. I couldn't emulate the affect of doing that.
Now for my testing dataset.  I created a dataset in the SOE tablespace that in uncompressed.  I then took that dataset and created a second copy of the schema with advanced compression in place in the SOE_COMPRESSED tablespace.

When I finished this I had 2 tablespaces comprised of 10 x 5 GB datafiles.
SOE                              --> uncompressed copy of data
SOE_COMPRESSED --> Advanced compression (ACO) copy of data


In the graphs above you can see  that out of the 50 GB of allocated space
uncompressed  --> 35.8 GB of used space
compressed      -->  24.9 GB of used space

These are the datasets I am going to use throughout my testing.

I started by taking these 2 datasets and seeing what happens with the 2 full backup types
L0               --> Full backups saved as backupset
image copy --> Full copy of datafile.

Below is what I found when I compressed both these backup types.


This was very helpful to see what happens.

For my uncompressed dataset (35 GB), I was able to compress the file down to 20 GB.
For my uncompressed image copy (35 GB used) I was able to compress the file down to 18 GB
For my compressed dataset (24 GB), I was able to compress the file down to 18 GB
For my compressed image copy (24 GB), I was able to compress the file down to 18 GB.

So what I learned is no matter how I compressed the data, in the database (ACO), or just compress the backup, the final size is still ~18 GB.

Now we have some benchmarks on what happens when I just compress the backups.

I started with encrypting the image copy.  This was one area that I wanted to learn more about for 2 reasons.

  1. Many of the newer backup strategies use the "incremental merge" process that started with 10G of oracle. I was curious what happens to image copies when you implement TDE.
  2. Many of the Flash arrays use compression to get more usable storage from the smaller SSD drives.  Looking at what happens with compressing the datafile copies gives a lot of insight into how those flash arrays will be affected by TDE.


You can see from the above testing there was a very significant impact on the compressed size of the image copy.  Both compressed and uncompressed data compressed nicely when it was unencrypted.  After encrypting the dataset, the compressed size is about 3x larger than the compressed size.

This gives me the answer on how it will affect these 2 areas.


  1. If using an "incremental merge" based backup that is stored on compressed storage, you will need 3x the amount of storage for your backups.
  2. If using Flash storage for your database files that utilizes compression, you will need 3x the amount of database storage.
OK.. There's the first answer I was looking for.

Now let's see what happens with my Level 0 backups.


With level 0 backups, I can see the benefit of compressing the data first.
I can also see the effect of encryption.

Compressing the data first saved me a about a 1/3 of the size of the data, and about 1/3 of the size of the backupset compressed (once encrypted).


Now let's take a look of the effect of encryption on the change rate.  I updated one of the tables in the database to create a change rate, and I looked at both the archive logs and the incremental backup.


Wow.. What stood out to me on this testing is the size of the archive logs.  Adding Advanced Compression to the database decreased the size of the incremental backups (expected), but increased the size of the archive logs.  Then when I looked at the compressed size (both with and without encryption) compressing the data in the database increased the size of the archive logs.

This showed me a lot of what happens with TDE.  What I learned through this was.


  1. Encrypted data indeed does not compress, in fact it can get much bigger.
  2. Implementing Advanced Compression does not always mitigate the effects of encryption. Depending on the dataset, it might have very limited effect.
  3. The compressed size of datafiles and image copy backups may increase by 3x or more depending on the amount of free space you typically have in your datafiles..


Thursday, January 3, 2019

Verifying you have a recoverable backup

As you probably know the best way to validate that you can recover your database to a specific point-in-time is to perform a point-in-time recovery of the database and successfully open it. That isn't always possible due to the size of the database, infrastructure necessary, and the time it takes to go through the process.  To verify recoverability there are several commands that give you all the pieces necessary, but it is important to understand what each command does.

Restore Validate -  The restore validate command can be performed for any database objects including the whole database to verify the files are valid.  This command can be used to restore as of the current time (default), but you can also specify a previous point-in-time.  The validate verifies that the files are available and also checks for corruption.  By default it checks for physical corruption, but it can also check for logical corruption. This command reads through the backup pieces 
Examples of restore validate for different cases.
verify current backup -
RMAN> RESTORE DATABASE VALIDATE;
RMAN> RESTORE ARCHIVELOG ALL VALIDATE;
This will verify that the last full backup (level 0) does not contain corruption, and it verifies that archivelogs exist throughout the recovery window, and that they do not contain corruption. 
verify previous backup -
RMAN> RESTORE DATABASE VALIDATE UNTIL TIME "to_date('xx/xx/xx xx:xx:xx','mm/dd/yy hh24:mi:ss')";
This will verify that the full backup performed prior to the "until time" is available and does not contain corruption.
Restore Preview - The restore preview can be used to identify the backup pieces necessary for a restore AND recovery of the database.  The preview will show all the datafile backups (both full and incremental), along with the archive logs needed.  The restore preview does not check for corruption, it simply lists the backup pieces necessary.

Validate -  The validate command can be performed on any database objects along with backupsets. Unlike restore, you cannot give it an "until time", you must identify the object you want to validate.  By default it checks for physical corruption, but it can also check for logical corruption.

It is critical to understand exactly what all three commands do to ensure you can efficiently recover to a previous point-in-time.  It takes a combination of 2 commands (plus an extra to be sure).

So let's see how I can test if I can recover to midnight on the last day of the previous month.  My backup strategy is "Weekly full/Daily incremental" backups.  I perform my full backups on Saturday night and keep my backups for 90 days. My archive logs are kept on disk for 20 days.

It is now 12/15/18 and I want to verify that I can recover my database to 23:59:59 on 11/30.

First I want to perform a restore validate of my database using until time.
RMAN > restore validate database UNTIL TIME "to_date('11/30/18 23:59:59','mm/dd/yy hh24:mi:ss')";
By looking through the logs, I can see the this command performed a validation of the Level 0 (full) backup I performed on 11/24/18.  It did not validate any of the incremental backups or archive logs that I will need to recover the database.
Now I want to perform a restore validate of my archive logs using until time.
RMAN > restore validate archivelog UNTIL TIME "to_date('11/30/18 23:59:59','mm/dd/yy hh24:mi:ss')";
By looking through the logs, I can see that this command validated the backup of all my older archive logs (older than 20 days), and it validated the FRA copy of my archive logs that were 20 days or newer.
There are couple of issues with this that jump out at me.
1) My incremental backups are NOT validated.  Yes I know I can recover to the  point-in-time I specified, but all I verified is that it is possible by applying 6 days of archive logs.
2) I don't know if any of my newer backups of archive logs are corrupt.  The validation of archive logs only validated backups of archivelogs that are NOT on disk. I still need to validate the archive log backups for archive logs that will age off from the FRA in a few days to be sure..
3) The process doesn't check or validate a backup of the controlfile.  If I am restoring to another server (or if I lose my database completely) I want to make sure I have a backup of the controlfile to restore.
The only way to be sure that I have an efficient, successful recovery to this point in time is to combine the 2 commands and use that information to validate all the pieces necessary for recovery.
Here are the steps to ensure I have valid backups of all the pieces necessary to restore efficiently.
1) Perform a restore preview and write the output to a log file.
2) Go through the output from step 1 and identify all the "BS KEY" (backupset key) values.
3) Perform a "validate backupset xx;" using the keys from step 2 to ensure all datafile backups (both full and incremental backups) are valid.
4) Go through the output from step 1 and identify the archive log sequences needed.
5) Identify the backupsets that contain all log sequences needed (my restore preview pointed to the archive logs on disk).
6) Perform a "validate backupset xx;" using the keys from step 5.
7) Perform a restore controlfile to a dummy location using the UNTIL time.
As you can see the "restore validate" is not enough to ensure efficient recovery. It only ensures that the you have a valid RESTORE not a valid recovery.
The ZDLRA does constant recovery checks using the virtual full backups, and archive logs.
The ZDLRA ensures you can quickly AND successfully recover to any point-in-time within your retention window.


Friday, November 30, 2018

TDE–How to implement TDE in your database and what to think about (part 2)

This is the second part in a series on implementing TDE and what happens to the sizing.

At first my plan was to encrypt the dataset I created in my first post, but instead I compressed it.

At this point (and throughout this post), I am working with an un-encrypted dataset.

One of the first things to understand about Encryption is that encrypted data DOES NOT compress.
This is critical when understanding what happens when you implement TDE.

One way to save storage when implementing TDE is to implement encryption AND compression together.

In order to break down the affects of encryption on compressed data VS uncompressed data, I took my dataset (the SOE dataset from swing bench) and I compressed it.  I implemented Advanced compression on the tables, and I compressed the indexes and rebuilt them.

I now have 2 copies of the same dataset. 1 is compressed, and 1 is not.

Now let's take a look at the sizing of the Data sets and I will go through the same backup procedures and see what happens.

SEGMENT_NAME              SEGMENT_TYPE Space Used uncompressed   Space Used Compressed SPACE_SAVINGS
------------------------- ------------ ------------------------- -------------------- -------------
ADDRESSES                 TABLE           3,392 MB                  3,264 MB                      3
ADDRESS_CUST_IX           INDEX             703 MB                    728 MB                     -3
ADDRESS_PK                INDEX             662 MB                    888 MB                    -34
CARDDETAILS_CUST_IX       INDEX             703 MB                    562 MB                     20
CARD_DETAILS              TABLE           2,048 MB                  1,600 MB                     21
CARD_DETAILS_PK           INDEX             662 MB                      0 MB                    100
CUSTOMERS                 TABLE           3,328 MB                  2,880 MB                     13
CUSTOMERS_PK              INDEX             443 MB                      0 MB                    100
CUST_ACCOUNT_MANAGER_IX   INDEX             417 MB                    272 MB                     34
CUST_DOB_IX               INDEX             528 MB                    280 MB                     47
CUST_EMAIL_IX             INDEX             975 MB                    280 MB                     71
CUST_FUNC_LOWER_NAME_IX   INDEX             683 MB                    280 MB                     58
INVENTORIES               TABLE             176 MB                    176 MB                      0
INVENTORY_PK              INDEX              18 MB                      0 MB                    100
INV_PRODUCT_IX            INDEX              16 MB                     12 MB                     24
INV_WAREHOUSE_IX          INDEX              16 MB                     12 MB                     24
ITEM_ORDER_IX             INDEX           2,000 MB                  1,770 MB                     11
ITEM_PRODUCT_IX           INDEX           1,768 MB                  1,301 MB                     26
LOGON                     TABLE           1,728 MB                  1,728 MB                      0
ORDERENTRY_METADATA       TABLE               0 MB                      0 MB                      0
ORDERS                    TABLE           3,968 MB                  2,816 MB                     29
ORDER_ITEMS               TABLE           6,976 MB                  4,992 MB                     28
ORDER_ITEMS_PK            INDEX           2,234 MB                      0 MB                    100
ORDER_PK                  INDEX             632 MB                      0 MB                    100
ORD_CUSTOMER_IX           INDEX             671 MB                    480 MB                     28
ORD_ORDER_DATE_IX         INDEX             752 MB                    439 MB                     41
ORD_SALES_REP_IX          INDEX             594 MB                    438 MB                     26
ORD_WAREHOUSE_IX          INDEX             709 MB                    438 MB                     38
PRD_DESC_PK               INDEX               0 MB                      0 MB                    100
PRODUCT_DESCRIPTIONS      TABLE               0 MB                      0 MB                      0
PRODUCT_INFORMATION       TABLE               0 MB                      0 MB                      0
PRODUCT_INFORMATION_PK    INDEX               0 MB                      0 MB                    100
PROD_CATEGORY_IX          INDEX               0 MB                      0 MB                      0
PROD_NAME_IX              INDEX               0 MB                      0 MB                      0
PROD_SUPPLIER_IX          INDEX               0 MB                      0 MB                   -100
WAREHOUSES                TABLE               0 MB                      0 MB                      0
WAREHOUSES_PK             INDEX               0 MB                      0 MB                    100
WHS_LOCATION_IX           INDEX               0 MB                      0 MB                   -100


Here is the total savings by compressing both tables and indexes with advanced compression.

Space Used uncompressed   Space Used Compressed  SPACE_SAVINGS
------------------------- ---------------------- -------------
  36,804 MB                 25,636 MB                       30


Now to compare this with the previous data uncompressed I am going to backup by tablespace.  Below is the sizing of the backups. I used a tag to identify the backups.


-rw-rw----. 1 oracle oracle 26773323776 Nov 29 17:02 COMPRESSED_SOE.bkp
-rw-rw----. 1 oracle oracle 38441140224 Nov 29 17:04 UNCOMPRESSED_SOE.bkp
-rw-rw----. 1 oracle oracle 10987765760 Nov 29 18:35 BASIC_COMPRESSED_SOE.bkp
-rw-rw----. 1 oracle oracle 11135655936 Nov 29 18:36 BASIC_COMPRESSED_SOE_COMPRESSED.bkp
-rw-rw----. 1 oracle oracle 13360308224 Nov 29 20:12 MEDIUM_COMP_SOE_COMPRESSED.bkp
-rw-rw----. 1 oracle oracle 14383603712 Nov 29 20:12 MEDIUM_COMPRESSED_SOE_.bkp
-rw-rw----. 1 oracle oracle  9420791808 Nov 30 00:12 HIGH_COMP_SOE_COMPRESSED.bkp
-rw-rw----. 1 oracle oracle  9112944640 Nov 30 00:23 HIGH_COMPRESSED_SOE.bkp


Now I'm going to put that in a table and a chart to compare..

First the table of sizes


Now the chart


Now by looking at the chart it is apparent what happens with compression and the data.


  • Compression in the database reduced the size of the data by 30%
  • An uncompressed backupset matched the size of the data
  • Once I compressed the backupset, the difference is size was minimal.

** Bottom line - Compressing the data in the database saved on the uncompressed backupsize. Once the backupset is compressed the final size is about the same.

** Final conclusion -- Most modern backup appliances (ZDLRA, ZFS, DD) compress the backups.  When using those appliances with unencrypted data, the final size is the same regardless of whether the data is compressed in the Database.

Now that I've looked at both compressed and uncompressed data at the DB and backupset I am going to compress the data.  Next post.


Thursday, November 15, 2018

TDE–How to implement TDE in your database and what to think about (part 1)

This is the first part in a series of blog posts on TDE.
Many organizations are moving to TDE, and this can have a dramatic affect on your systems.
TDE impacts 2 areas
1) Post encryption compression goes away.  Encrypted data can’t be compressed.  Now why do I mention “Post encryption” ? This is because data can be compressed before encrypting.  Compressed data in your database (HCC, OLTP, basic etc.) is compressed PRIOR to encryption.  Utilizing compression in your database not only saves you disk space on your storage system, but it also saves you disk space for your backups.  The loss of compression post encryption can have many consequences you might not immediately think of
    • if you are using SSD storage that compresses blocks, you need to take into account the extra storage needed
    • If you are using a De-duplication appliance you will lose most of the benefits of de-duplication.
    • If you are compressing your backups, you will lose the benefits gained from compression (small backups and lowered network traffic).
2) Moving to TDE requires more space during the migration. Rebuilding the tablespaces with a newly encrypted copy is done by creating a second copy of each datafile (encrypted), and then removing the pre-encrypted copy.  The database switches to the new datafile when the process is complete.  This utilizes additional storage for the second copy of the datafiles.  The other migration impact is an increase in backup storage.  After encrypting tablespaces, a new level 0 backup is needed to ensure you are restoring to an encrypted copy of the data. Remember the encryption process changes all the blocks in the datafiles. I will discuss the backup implications more later.

Now I’m going to start by describing the dataset I used for testing.
In order to create this dataset I used the oewizard from Swingbench

Here are the objects and the sizes.

SEGMENT_NAME              SEGMENT_TYPE TABLESPACE_NAME SPACE_USED
------------------------- ------------ --------------- ------------
ADDRESSES                 TABLE        SOE                3,392 MB
ADDRESS_CUST_IX           INDEX        SOE                  703 MB
ADDRESS_PK                INDEX        SOE                  662 MB
CARDDETAILS_CUST_IX       INDEX        SOE                  703 MB
CARD_DETAILS              TABLE        SOE                2,048 MB
CARD_DETAILS_PK           INDEX        SOE                  662 MB
CUSTOMERS                 TABLE        SOE                3,328 MB
CUSTOMERS_PK              INDEX        SOE                  443 MB
CUST_ACCOUNT_MANAGER_IX   INDEX        SOE                  417 MB
CUST_DOB_IX               INDEX        SOE                  528 MB
CUST_EMAIL_IX             INDEX        SOE                  975 MB
CUST_FUNC_LOWER_NAME_IX   INDEX        SOE                  683 MB
INVENTORIES               TABLE        SOE                  176 MB
INVENTORY_PK              INDEX        SOE                   18 MB
INV_PRODUCT_IX            INDEX        SOE                   16 MB
INV_WAREHOUSE_IX          INDEX        SOE                   16 MB
ITEM_ORDER_IX             INDEX        SOE                2,000 MB
ITEM_PRODUCT_IX           INDEX        SOE                1,768 MB
LOGON                     TABLE        SOE                1,728 MB
ORDERENTRY_METADATA       TABLE        SOE                    0 MB
ORDERS                    TABLE        SOE                3,968 MB
ORDER_ITEMS               TABLE        SOE                6,976 MB
ORDER_ITEMS_PK            INDEX        SOE                2,234 MB
ORDER_PK                  INDEX        SOE                  632 MB
ORD_CUSTOMER_IX           INDEX        SOE                  671 MB
ORD_ORDER_DATE_IX         INDEX        SOE                  752 MB
ORD_SALES_REP_IX          INDEX        SOE                  594 MB
ORD_WAREHOUSE_IX          INDEX        SOE                  709 MB
PRD_DESC_PK               INDEX        SOE                    0 MB
PRODUCT_DESCRIPTIONS      TABLE        SOE                    0 MB
PRODUCT_INFORMATION       TABLE        SOE                    0 MB
PRODUCT_INFORMATION_PK    INDEX        SOE                    0 MB
PROD_CATEGORY_IX          INDEX        SOE                    0 MB
PROD_NAME_IX              INDEX        SOE                    0 MB
PROD_SUPPLIER_IX          INDEX        SOE                    0 MB
WAREHOUSES                TABLE        SOE                    0 MB
WAREHOUSES_PK             INDEX        SOE                    0 MB
WHS_LOCATION_IX           INDEX        SOE                    0 MB


TOTAL                                                                                 36,804 MB

Here is the total size for the data

TABLESPACE_NAME   FILE_ID FILE_NAME            SPACE_USED   TOTAL_ALLOCATED
--------------- --------- -------------------- ------------ --------------------
SYSTEM                  1 system01.dbf              819 MB       830 MB
SYSAUX                  3 sysaux01.dbf              809 MB       860 MB
UNDOTBS1                4 undotbs01.dbf             369 MB    29,180 MB
SOE                     5 soe_1.dbf               3,600 MB     5,120 MB
USERS                   7 users01.dbf                 5 MB         5 MB
SOE                     8 soe_2.dbf               3,841 MB     5,120 MB
SOE                     9 soe_3.dbf               3,822 MB     5,120 MB
SOE                    10 soe_4.dbf               3,825 MB     5,120 MB
SOE                    11 soe_5.dbf               3,806 MB     5,120 MB
SOE                    12 soe_6.dbf               3,728 MB     5,120 MB
SOE                    13 soe_7.dbf               3,781 MB     5,120 MB
SOE                    14 soe_8.dbf               3,442 MB     5,120 MB
SOE                    15 soe_9.dbf               3,464 MB     5,120 MB
SOE                    16 soe_10.dbf              3,495 MB     5,120 MB


===================================================================================================================

Total                                   38,303 MB      60,820 MB      22,517 MB

From above I can see that I am using 38 GB of space, out of the 61 GB of space allocated.
Now I created a backup set . With no compression the size of the backup set is about the size data used.
[oracle@oracle-server]$ ls -al
total 38910628
drwxrwx---. 2 oracle oracle          58 Nov 15 16:34 .
drwxrwx---. 3 oracle oracle          24 Nov 15 16:23 ..
-rw-rw----. 1 oracle oracle 39844478976 Nov 15 16:37 o1_mf_nnnd0_TAG20181115T163432_fyvsm8rz_.bkp
[oracle@oracle-server]$

Just to save my spot .I’m going to create a restore point to make this the starting point of all my testing.
SQL> create restore point new_database;

Restore point created.


Now let’s look at what happens when I compress the backup of this database

 oracle oracle 39844478976 Nov 15 16:37 o1_mf_nnnd0_TAG20181115T163432_fyvsm8rz_.bkp   ---> Original backup
 oracle oracle 11424759808 Nov 15 17:09 o1_mf_nnndf_TAG20181115T165247_fyvtoj7m_.bkp   ---> Basic Compression
 oracle oracle  9468592128 Nov 15 18:33 o1_mf_nnndf_TAG20181115T174452_fyvxq4s2_.bkp   ---> High Compression
 oracle oracle 14488240128 Nov 15 18:44 o1_mf_nnndf_TAG20181115T183319_fyw0l08k_.bkp   ---> Medium Compression

Finally I took an incremental merge backup to see what happens with that.

ls -al
total 62300276
drwxrwx---. 2 oracle oracle       4096 Nov 16 09:47 .
drwxrwx---. 7 oracle oracle         92 Nov 14 13:24 ..
-rw-rw----. 1 oracle oracle 5368717312 Nov 16 09:38 o1_mf_soe_fyxolco8_.dbf
-rw-rw----. 1 oracle oracle 5368717312 Nov 16 09:39 o1_mf_soe_fyxon2o4_.dbf
-rw-rw----. 1 oracle oracle 5368717312 Nov 16 09:40 o1_mf_soe_fyxoohtl_.dbf
-rw-rw----. 1 oracle oracle 5368717312 Nov 16 09:41 o1_mf_soe_fyxopwy8_.dbf
-rw-rw----. 1 oracle oracle 5368717312 Nov 16 09:41 o1_mf_soe_fyxorb2f_.dbf
-rw-rw----. 1 oracle oracle 5368717312 Nov 16 09:42 o1_mf_soe_fyxosq7c_.dbf
-rw-rw----. 1 oracle oracle 5368717312 Nov 16 09:43 o1_mf_soe_fyxov49x_.dbf
-rw-rw----. 1 oracle oracle 5368717312 Nov 16 09:44 o1_mf_soe_fyxowklr_.dbf
-rw-rw----. 1 oracle oracle 5368717312 Nov 16 09:44 o1_mf_soe_fyxoxyl8_.dbf
-rw-rw----. 1 oracle oracle 5368717312 Nov 16 09:45 o1_mf_soe_fyxozcq9_.dbf
-rw-rw----. 1 oracle oracle 5368717312 Nov 16 09:46 o1_mf_soe_fyxp0rwd_.dbf
-rw-rw----. 1 oracle oracle  692068352 Nov 16 09:47 o1_mf_sysaux_fyxp3gc4_.dbf
-rw-rw----. 1 oracle oracle  859840512 Nov 16 09:46 o1_mf_system_fyxp2z72_.dbf
-rw-rw----. 1 oracle oracle 3187679232 Nov 16 09:46 o1_mf_undotbs1_fyxp2666_.dbf


Backup Method                    Backup Size         
Image Copy 62 GB
No Compression 40 GB
Basic Compression 11 GB
Medium Compression         14 GB
High Compression 95 GB


My next Blog will cover taking this data set and compressing it.


Wednesday, August 8, 2018

Restoring from multiple nodes in a RAC cluster

My previous post involved backing up from all nodes in a RAC cluster.  You can find it here.

In that post I explained why it is important to use multiples nodes to increase your throughput.

In this post I will explain how to restore using multiple nodes in the clusters.

First let's start with my database and drop it.

I stopped my database and went to ASM and removed all files from the disk group.


Step 1 -- Find the DBID from the rman catalog


select db_id,REG_DB_UNIQUE_NAME from db;

     DB_ID REG_DB_UNIQUE_NAME
---------- ------------------------------
4099465517 db1
3776942889 BRYAN
3281763275 db2
2294802577 db3

There it is !  My database BRYAN has a DBID of 3776942889


Step 2 --  Create a small initfile to use to start the database nomount.


db_name='bryan'
memory_target=1G
processes = 150


Step 3 --  start the database nomount.


startup nomount;
ORACLE instance started.

Total System Global Area 1073741824 bytes
Fixed Size            2932632 bytes
Variable Size          616562792 bytes
Database Buffers      394264576 bytes
Redo Buffers           59981824 bytes


Step 4 -- Connect to RMAN using the target / and catalog {my_rman_catalog}


Recovery Manager: Release 12.1.0.2.0 - Production on Wed Aug 8 11:26:18 2018

Copyright (c) 1982, 2014, Oracle and/or its affiliates.  All rights reserved.

connected to target database: BRYAN (not mounted)
connected to recovery catalog database


Step 5 -- Set the DBID of the database.


RMAN set dbid=3776942889;

executing command: SET DBID
database name is "BRYAN" and DBID is 3776942889


Step 6 - Restore the SPFILE.


RMAN> run
2> {
3> allocate CHANNEL sbt1 DEVICE TYPE 'SBT_TAPE'  FORMAT   '%d_%U' PARMS  "SBT_LIBRARY=/u01/app/oracle/product/12.1.0.2/dbhome_1/lib/libra.so, ENV=(RA_WALLET='location=file:/u01/app/oracle/product/12.1.0.2/dbhome_1/dbs/zdlra credential_alias=zdl2ing-scan:1521/zdlra:dedicated')";
4> restore spfile;
5> }

allocated channel: sbt1
channel sbt1: SID=133 device type=SBT_TAPE
channel sbt1: RA Library (ZDLRA) SID=72F1DBDB0D05BC0FE05375AF880AE677

Starting restore at 08-AUG-2018 11:41:30

channel sbt1: starting datafile backup set restore
channel sbt1: restoring SPFILE
output file name=/u01/app/oracle/product/12.1.0.2/dbhome_1/dbs/spfilebryan1.ora
channel sbt1: reading from backup piece c-3776942889-20180808-0b
channel sbt1: piece handle=c-3776942889-20180808-0b tag=TAG20180808T093007
channel sbt1: restored backup piece 1
channel sbt1: restore complete, elapsed time: 00:00:25
Finished restore at 08-AUG-2018 11:43:22
released channel: sbt1


Step 7 - from asmcmd copy the spfile into ASM, and remove it from the OS.


ASMCMD> mkdir +datac1/bryan
ASMCMD> mkdir +datac1/bryan/parameterfile
ASMCMD> cp /u01/app/oracle/product/12.1.0.2/dbhome_1/dbs/spfilebryan1.ora +datac1/bryan/parameterfile/spfilebryan.ora
copying /u01/app/oracle/product/12.1.0.2/dbhome_1/dbs/spfilebryan1.ora -> +datac1/bryan/parameterfile/spfilebryan.ora
ASMCMD> 


Step 8 - point the initfile to use the spfile on both instances. and restart the instance nomount using the spfile


Step 9 - Modify the service to use the spfile location


srvctl modify database -db bryan -spfile '+DATAC1/bryan/parameterfile/spfilebryan.ora'


Step 10 - recreate the password file and change the service to point to it.


orapwd file=+DATAC1/bryan/PASSWORD/pwdbryan.ora dbuniquename=bryan

srvctl modify database -db bryan -pwfile '+DATAC1/bryan/PASSWORD/pwdbryan.ora'


Step 11 - Restore the controlfiles


RMAN> set dbid=3776942889;

executing command: SET DBID
database name is "BRYAN" and DBID is 3776942889

RMAN> run
2> {
3> allocate CHANNEL sbt1 DEVICE TYPE 'SBT_TAPE'  FORMAT   '%d_%U' PARMS  "SBT_LIBRARY=/u01/app/oracle/product/12.1.0.2/dbhome_1/lib/libra.so, ENV=(RA_WALLET='location=file:/u01/app/oracle/product/12.1.0.2/dbhome_1/dbs/zdlra credential_alias=zdl2ing-scan:1521/zdlra:dedicated')";
4> restore controlfile;
5> }

allocated channel: sbt1
channel sbt1: SID=568 instance=bryan1 device type=SBT_TAPE
channel sbt1: RA Library (ZDLRA) SID=72F21BF1040F9F09E05375AF880A4C78

Starting restore at 08-AUG-2018 11:59:25

channel sbt1: starting datafile backup set restore
channel sbt1: restoring control file
channel sbt1: reading from backup piece c-3776942889-20180808-0b
channel sbt1: piece handle=c-3776942889-20180808-0b tag=TAG20180808T093007
channel sbt1: restored backup piece 1
channel sbt1: restore complete, elapsed time: 00:00:02
output file name=+DATAC1/BRYAN/CONTROLFILE/current.708.983620771
output file name=+DATAC1/BRYAN/CONTROLFILE/current.710.983620771
Finished restore at 08-AUG-2018 11:59:31
released channel: sbt1


Step 11 - Mount the database on all the nodes.


srvctl start database -d bryan -o mount

Step 12 - Connect to rman using the service, and restore the database.


rman

Recovery Manager: Release 12.1.0.2.0 - Production on Wed Aug 8 12:51:41 2018

Copyright (c) 1982, 2014, Oracle and/or its affiliates.  All rights reserved.

RMAN> connect target sys/bryan@bryan

connected to target database: BRYAN (DBID=3776942889, not open)

RMAN> connect catalog /@zdl2ing-scan:1521/zdlra:dedicated

connected to recovery catalog database

RMAN> restore database;


Step 13. - Now let's check the log and make sure it restoring across all nodes.


Starting restore at 08-AUG-2018 12:52:07
allocated channel: ORA_SBT_TAPE_1
channel ORA_SBT_TAPE_1: SID=595 instance=bryan2 device type=SBT_TAPE
channel ORA_SBT_TAPE_1: RA Library (ZDLRA) SID=72F2D881B658956EE05376AF880A153A
allocated channel: ORA_SBT_TAPE_2
channel ORA_SBT_TAPE_2: SID=64 instance=bryan1 device type=SBT_TAPE
channel ORA_SBT_TAPE_2: RA Library (ZDLRA) SID=72F2D88B3E252398E05375AF880A7E91
allocated channel: ORA_SBT_TAPE_3
channel ORA_SBT_TAPE_3: SID=604 instance=bryan2 device type=SBT_TAPE
channel ORA_SBT_TAPE_3: RA Library (ZDLRA) SID=72F2D894B4979578E05376AF880A512C
allocated channel: ORA_SBT_TAPE_4
channel ORA_SBT_TAPE_4: SID=586 instance=bryan1 device type=SBT_TAPE
channel ORA_SBT_TAPE_4: RA Library (ZDLRA) SID=72F2D89E2F8D23B1E05375AF880AADDA
allocated channel: ORA_SBT_TAPE_5
channel ORA_SBT_TAPE_5: SID=613 instance=bryan2 device type=SBT_TAPE
channel ORA_SBT_TAPE_5: RA Library (ZDLRA) SID=72F2D8A7B4E7958BE05376AF880ADDE6
allocated channel: ORA_SBT_TAPE_6
channel ORA_SBT_TAPE_6: SID=622 instance=bryan2 device type=SBT_TAPE
channel ORA_SBT_TAPE_6: RA Library (ZDLRA) SID=72F2D8B13CF99592E05376AF880A55C4
allocated channel: ORA_SBT_TAPE_7
channel ORA_SBT_TAPE_7: SID=595 instance=bryan1 device type=SBT_TAPE
channel ORA_SBT_TAPE_7: RA Library (ZDLRA) SID=72F2D8BADCBC2404E05375AF880A42C0
allocated channel: ORA_SBT_TAPE_8
channel ORA_SBT_TAPE_8: SID=631 instance=bryan2 device type=SBT_TAPE
channel ORA_SBT_TAPE_8: RA Library (ZDLRA) SID=72F2D8C482E695ACE05376AF880A4989


OK.. I can see it is restoring on both instances.

Step 14 - shutdown down all instances


srvctl stop database -d bryan

Step 15 - Start up the first instance mount in RMAN and recover the database.


RMAN> startup mount;

Oracle instance started
database mounted

Total System Global Area   62813896704 bytes

Fixed Size                     7661424 bytes
Variable Size               9261025424 bytes
Database Buffers           53418655744 bytes
Redo Buffers                 126554112 bytes

RMAN> recover database;

Starting recover at 08-AUG-2018 13:00:15
allocated channel: ORA_SBT_TAPE_1
channel ORA_SBT_TAPE_1: SID=586 instance=bryan1 device type=SBT_TAPE
channel ORA_SBT_TAPE_1: RA Library (ZDLRA) SID=72F2F5883A878935E05375AF880A8E9B
...
starting media recovery

channel ORA_SBT_TAPE_1: starting archived log restore to default destination
channel ORA_SBT_TAPE_1: restoring archived log
archived log thread=1 sequence=91
channel ORA_SBT_TAPE_1: reading from backup piece $RSCN_1594143_RTIM_983531820_THRD_1_SEQ_91_CTKEY_5520974_BACKUP
channel ORA_SBT_TAPE_2: starting archived log restore to default destination
channel ORA_SBT_TAPE_2: restoring archived log
archived log thread=2 sequence=34
channel ORA_SBT_TAPE_2: reading from backup piece $RSCN_1594143_RTIM_983531820_THRD_2_SEQ_34_CTKEY_5520979_BACKUP
channel ORA_SBT_TAPE_1: piece handle=$RSCN_1594143_RTIM_983531820_THRD_1_SEQ_91_CTKEY_5520974_BACKUP tag=TAG20180808T105809
channel ORA_SBT_TAPE_1: restored backup piece 1
channel ORA_SBT_TAPE_1: restore complete, elapsed time: 00:00:01
channel ORA_SBT_TAPE_2: piece handle=$RSCN_1594143_RTIM_983531820_THRD_2_SEQ_34_CTKEY_5520979_BACKUP tag=TAG20180808T105736
channel ORA_SBT_TAPE_2: restored backup piece 1
channel ORA_SBT_TAPE_2: restore complete, elapsed time: 00:00:01


Step 16  - Open the instance and startup the other instances.


That's it !

Backing up a RAC database with all nodes

Backing up a RAC environment from multiple DB nodes


I've been working with many customers who have never performed a multi-node backup for a RAC database.

If you didn't already know, in a RAC environment you can backup from more than 1 DB node.

Backing up from multiple DB nodes can be very important for a large multi-terabyte database to give you faster backup times.


** Keep in mind these throughput numbers would be the same for restore capability.

PART 1 - WHY


Why would I want to go through the trouble of backing up on multiple nodes ?

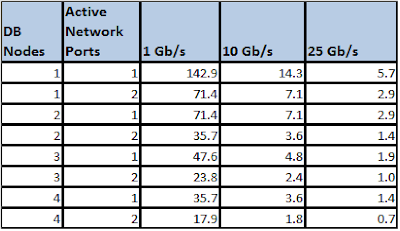
When looking at backup rates, the number to keep in mind is the backup rate for each network speed.

1   Gb/s  == 350 GB/hr
10 Gb/s == 3.5 TB/hr
25 Gb/s == 8.8 TB/hr

**  Note that networks are measured in small "b" which is bits/seconds
**  Database size is measured in large "B" which is Bytes.

The chart below gives you an idea of the impact of adding active network ports, and how the speed of the ports affects the backup throughput.


Using this chart you can calculate how long it will take to backup your large database.

Here is the example of the number of hours it would take to backup a 50 T database..


PART 2 -  How ?


When performing a backup, the backup process uses channels.  I'm guessing you probably already knew that.  
Each allocated channel connects to a database instance and sends the backup through that channel to the backup location (disk, media manager, etc).
By default the allocated channel connects to the database instance that the RMAN process is executed from.
What this means is... if you are "inst_id 1" and execute a backup, all channels will be connected to "inst_id 1".

This can be changed within the channel allocation by using a channel parameter named "CONNECT".

The connect (as you expect) uses an ID and Password (or a wallet) to connect to a specific service, or by specifying an EZ Connect string.

For my example I am going to use a configure channel setting and a common service that is shared across all nodes and let it balance. the other options are

  • Create a specific service to control which instances are available for backing up.  
  • Manually allocate channels and specify the instance name in the connection.

Step 1 - Create a user for backing up


I'm going assume you are already on 12c, which contains the sysbackup role.
I'm going to create a user ,"backup_only", specifically for backing up, and I am going to use a complicated password.
Next,  I am going to grant that user sysbackup privlege.

SQL  create user backup_only identified by kkk3223490sf9090fjkljkl3590;

User created.

SQL   grant sysbackup to backup_only;

Grant succeeded.


Step 2 - Change the channel configuration to use this user


Now I am going to configure my channel to use this user for the connect clause.

Below is the statement I'm executing.  ** Notice I added the "as sysbackup" to the connection.

CONFIGURE CHANNEL DEVICE TYPE 'SBT_TAPE' connect 'backup_only/kkk3223490sf9090fjkljkl3590@bryan as sysbackup' FORMAT   '%d_%U' PARMS  "SBT_LIBRARY=/u01/app/oracle/product/12.1.0.2/dbhome_1/lib/libra.so, ENV=(RA_WALLET='location=file:/u01/app/oracle/product/12.1.0.2/dbhome_1/dbs/zdlra credential_alias=zdl2ing-scan:1521/zdlra:dedicated')";


This is for a ZDLRA so I have the additional information it needs for the library etc.

Notice that the I am including the id/password and tnsnames entry in the connection string.

This is what happens when I execute the configure command.


RMAN  
RMAN CONFIGURE CHANNEL DEVICE TYPE 'SBT_TAPE' connect * FORMAT   '%d_%U' PARMS  "SBT_LIBRARY=/u01/app/oracle/product/12.1.0.2/dbhome_1/lib/libra.so, ENV=(RA_WALLET='location=file:/u01/app/oracle/product/12.1.0.2/dbhome_1/dbs/zdlra credential_alias=zdl2ing-scan:1521/zdlra:dedicated')";
old RMAN configuration parameters:
CONFIGURE CHANNEL DEVICE TYPE 'SBT_TAPE' FORMAT   '%d_%U' PARMS  "SBT_LIBRARY=/u01/app/oracle/product/12.1.0.2/dbhome_1/lib/libra.so, ENV=(RA_WALLET='location=file:/u01/app/oracle/product/12.1.0.2/dbhome_1/dbs/zdlra credential_alias=zdl2ing-scan:1521/zdlra:dedicated')";
new RMAN configuration parameters:
CONFIGURE CHANNEL DEVICE TYPE 'SBT_TAPE' CONNECT '*' FORMAT   '%d_%U' PARMS  "SBT_LIBRARY=/u01/app/oracle/product/12.1.0.2/dbhome_1/lib/libra.so, ENV=(RA_WALLET='location=file:/u01/app/oracle/product/12.1.0.2/dbhome_1/dbs/zdlra credential_alias=zdl2ing-scan:1521/zdlra:dedicated')";
new RMAN configuration parameters are successfully stored
starting full resync of recovery catalog
full resync complete


One thing that stands out is that the connection information doesn't appear in the channel.  it is obfuscated by the '*' even though it is stored.


Step 3 - Execute backup


I can now execute my backup from either OEM, or from the command line.

This can be monitored (to ensure multiple nodes are used) by looking at the channel allocation in the output log of the backup.


Starting backup at 2018-08-08 09:27:17
allocated channel: ORA_SBT_TAPE_1
channel ORA_SBT_TAPE_1: SID=218 instance=bryan2 device type=SBT_TAPE
channel ORA_SBT_TAPE_1: RA Library (ZDLRA) SID=72EFFBF5EAF19225E05376AF880A0BA7
allocated channel: ORA_SBT_TAPE_2
channel ORA_SBT_TAPE_2: SID=245 instance=bryan2 device type=SBT_TAPE
channel ORA_SBT_TAPE_2: RA Library (ZDLRA) SID=72EFFBFF3A0E9235E05376AF880A1C6D
allocated channel: ORA_SBT_TAPE_3
channel ORA_SBT_TAPE_3: SID=615 instance=bryan1 device type=SBT_TAPE
channel ORA_SBT_TAPE_3: RA Library (ZDLRA) SID=72EFFC0907A51E40E05375AF880AA173
allocated channel: ORA_SBT_TAPE_4
channel ORA_SBT_TAPE_4: SID=299 instance=bryan2 device type=SBT_TAPE
channel ORA_SBT_TAPE_4: RA Library (ZDLRA) SID=72EFFC128EDD9244E05376AF880A6B6B
allocated channel: ORA_SBT_TAPE_5
channel ORA_SBT_TAPE_5: SID=64 instance=bryan2 device type=SBT_TAPE
channel ORA_SBT_TAPE_5: RA Library (ZDLRA) SID=72EFFC1BD2EF924AE05376AF880A68B2
allocated channel: ORA_SBT_TAPE_6
channel ORA_SBT_TAPE_6: SID=64 instance=bryan1 device type=SBT_TAPE
channel ORA_SBT_TAPE_6: RA Library (ZDLRA) SID=72EFFC2595C71E53E05375AF880AA8D1
allocated channel: ORA_SBT_TAPE_7
channel ORA_SBT_TAPE_7: SID=74 instance=bryan2 device type=SBT_TAPE
channel ORA_SBT_TAPE_7: RA Library (ZDLRA) SID=72EFFC2FA4979254E05376AF880AF834
allocated channel: ORA_SBT_TAPE_8


Above is the example from my output.. You can see the that there were 8 channels allocated, and 5 of the channels were on the first instance and 3 were allocated on the second instance.

That's all there is to it !!

Next blog post is going to be restoring across multiple nodes in a RAC cluster.