Sunday, April 1, 2018

ZDLRA "Store and Forward " feature

Most people didn't notice, but there was a new feature added to the ZDLRA called "store and forward".

Documentation on how to implement it is in the "ZDLRA Administration Guide" under the topic of implementing high availability strategies. 

Within that you will find the section on
"Managing Temporary Outages with a Backup and Redo Failover Strategy". This section describes what I have called “store and forward”.

ZDLRA offers the customer the ability to send backups (Redo logs and Level 1 backups) to an alternate ZDLRA location.  This provides an efficient HA solution for this information if the primary ZDLRA can't be reached.


Now in order to explain how Store and Forward works, first lets take a look at the architecture.  

  • We have a database we are backing up called "PROTDB"
  • We have 2 different ZDLRA's. Store and Forward requires a minimum of 2 ZDLRA appliances in a datacenter. In this case some of the databases have one of their ZDLRAs as their backup target and the remaining databases have the other ZDLRA as their backup target.
  • For databases backing up to ZDLRA #1 "RA01" will be the preferred ZDLRA that their Level 1 backups and the redo log stream will go to.  ZDLRA #2 "RA02" will be the alternate ZDLRA that Level 1 backups and the redo log stream will go to in the event of an outage communicating with preferred ZDLRA "RA01".
  • The reverse will be true for databases backing up to ZDLRA #2 with the alternate being ZDLRA #1

NOTE : A database has to be unique within a ZDLRA. What this means is that the alternate ZDLRA cannot already used for replication or to backup a dataguard copy of the same database. 


Now that we have defined the architecture let's go through the pieces that make up the store-and-forward methodology.

First however I will define what I mean by "Upstream" and "downstream".

UPSTREAM - This is the ZDLRA that sends replicated backup copies.  

DOWNSTREAM - This is the ZDLRA that receives the replicated backup copies.

A ZDLRA can act as both an UPSTREAM and a DOWNSTREAM. This is common when a customer has 2 active datacenters.  Each ZDLRA acts as both an Upstream (receiving backups directly) and as a Downstream (receiving replicated backups).

In the store-and-forward methodology backups are sent to the Downstream as the primary, and the Upstream as the Alternate.  This allows for backups to replicate from the Alternate (Upstream) to the Primary (Downstream).  This will be explained as you walk through flow.


Configuring Store-and-Forward


1) Configure "RA01" to be the down stream replicated pair of RA02. 
2) Ensure that the protected database ("PROTDB") is added to policies on both RAs (this process is described in the 12.2 admin guide)
3) Ensure "PROTDB"  has a wallet entries for both RAs, and that it the database is properly registered in both RMAN catalogs (using the admin guide).
3) Configure real-time redo apply using "RA01" as the primary RA and "RA02" as the alternate.

NOTE: Real-time redo isn't mandatory to use but it makes the switching over of redo a lot easier. I will show how the environment looks with real-time redo.  if you are manually sending archive logs and level 0 backups, the flow will be similar.


Real-time Redo flow


First lets take a look at the configuration for real-time redo.

Below is the configuration for a database with both a primary and and alternate ZDLRA. Working with an alternate destination is well described in this blog post.


Primary ZDLRA (RA01) configuration


LOG_ARCHIVE_DEST_3=“SERVICE=<"RA01" string from wallet>”, VALID_FOR=(ALL_LOGFILES, ALL_ROLES) ASYNC DB_UNIQUE_NAME=’<"RA01" ZDLRA DB>’ noreopen alternate=log_archive_dest_4;

log_archive_dest_state_3=enable;


Alternate ZDLRA (RA02) configuration


LOG_ARCHIVE_DEST_4=“SERVICE=<"RA02" string from wallet>”, VALID_FOR=(ALL_LOGFILES, ALL_ROLES) ASYNC DB_UNIQUE_NAME=’<"RA02" ZDLRA DB> ;
LOG_ARCHIVE_STATE__4=alternate;


Below is what the flow looks like.

Redo log traffic and backups are sent from "PROTDB" to "RA01".  "RA02" (since it is the upstream pair of "RA01") is aware of the backups in it's RMAN catalog.


Now let's take a look at the status of the destinations


SQL> select dest_id, dest_name, status from 
v$archive_dest_status where status <> 'INACTIVE';
DEST_ID DEST_NAME STATUS
---------- --------------------- ---------
 1 LOG_ARCHIVE_DEST_3 VALID
 2 LOG_ARCHIVE_DEST_4 UNKNOWN

You can see that the redo logs are sent to DEST_3 ("RA01") and DEST_4 ("RA02") is not active.


Now lets see what happens when "RA01" can't be reached.


SQL> select dest_id, dest_name, status from 
v$archive_dest_status where status <> 'INACTIVE';
DEST_ID DEST_NAME STATUS
---------- --------------------- ---------
 1 LOG_ARCHIVE_DEST_3 DISABLED
 2 LOG_ARCHIVE_DEST_4 VALID

After the second failed attempt, the original destination is marked as disabled, and the alternate is valid.

Below you can see that the redo logs, and the backups (Level 1) are being sent to "RA02".

"PROTDB" connects to the catalog on "RA02" which is aware of the previous backups and synchronizes its backup information with the control file.

This allows the next Level 1 incremental backup to be aware of the most current virtual full backup on "RA01".

This also allows the redo log stream to continue where it left off with "RA01".  The RMAN catalog on "RA02" is aware of all redo logs backups on "RA01" and is able to continue with the next log.


Now lets see what happens when "RA01" becomes available.


When "RA01" becomes available, you start the replication flow downstream. This will allow all the backups (redo and/or Level 1) to replicate to "RA01", be applied to the RA, and update the RMAN catalog.

Once this complete, RA01 will have virtualized any backups, along with storing and cataloging all redo logs captured.


BUT, at this point the primary log destination is still disabled so we need to renable it to start the redo log flow back.


SQL> alter system set log_archive_dest_state_3=enable;
System altered.
SQL> alter system set log_archive_dest_state_4=alternate;
System altered.

Once this is complete.  We are back to where we started.


That's it.

Store-and-forward is a great HA solution for capturing real-time redo log information to absorb any hiccups that may occur.

Thursday, March 15, 2018

Backup and Recovery of Multitenant Databases

This post covers what you need to consider around backup/recovery when implementing true multitenant databases (More than 1 PDB).

First the architecture of CDB and PDBs that matter with recovery.


What you notice (and what I highlighted) is that redo logs, archived redo logs, and flashback logs are associated with the CDB.

I verified this by querying against the v$parameter view to display where these can be modified
Parameter Name               Session      System     Instance    PDB
------------------------------ ---------- ---------- ---------- ----------
log_archive_dest_1             TRUE        IMMEDIATE  TRUE       FALSE
db_recovery_file_dest          FALSE       IMMEDIATE  FALSE      FALSE


This is important to understand when considering backup/recovery.
 This means

  •  Archiving is an all or nothing choice.  The CDB is either in ARCHIVELOG or NOARCHIVELOG mode.  All PDB's inherit this from CDB.
  • Force logging is at the CDB level, the PDB level and the tablespace level.
  • There is one set of archive logs and redo logs.
  • DG is all or nothing.
  • There is one location for flashback logs
  • There is one BCT file (block change tracking).  
  • PDB recovery is within the same CDB
Let's understand the implications one step at time.

Archiving is all or nothing.

If you do want to perform a large load of a PDB nologging, which I commonly do for POC's, you cannot turn off archive logging for a single PDB.  

Make sure you group together databases that have the requirement for noarchivelog.  In my case where I perform POCs and to quickly load data, I can load the PDB in a noarchive container, and later unplug and plug it into a the proper container later.


Force logging is at the CDB level, the PDB level and the tablespace level.


There are now 3 levels you can set/override force logging.  Here  is a great article going through the possible logging levels.  The most interesting one I saw in this was the PDB logging and the introduction of the command..

SQL alter pluggable database pdb1 disable force logging;

Pluggable database altered.

SQ select pdb_name, logging, force_logging, force_nologging from cdb_pdbs;

PDB_NAME   LOGGING   FORCE_LOGGING   FORCE_NOLOGGING
---------- --------- --------------- ---------------
PDB1       LOGGING   NO              NO

Enabling force logging is recommended when using Dataguard, or GoldenGate to ensure you capture all changes.  However there may some controlled circumstances where you want to have nologging operations.  In my prior blog I wrote about the issues that can occur with logical corruption after recovery.


There is one set of archive logs and redo logs.


This is something you need to keep in mind for active very active databases.  If you combine 2 databases into the same CDB, you may have to double the size/quantity of the redo logs.  It will also affect the recovery time of a single PDB.  The archive logs restored and read will contain all transactions for all PDBs.

The extra workload of the combined logging, is something to keep in mind.


DG is an all or nothing.


Yes, as you would imagine from above, all the redo log stream goes to the dataguard database and gets applied, and all PDBs have a Dataguard PDB.

This is something to think about as it's a little different from non-CDB procedures.

  For new PDBs


        If you have active DG, the Dataguard PDB will be cloned from seed database just like it does on the primary database

      If you don't have active DG, you have to copy over the datafiles from the primary database (or restore) onto the Dataguard database server.

  For existing PDBs unplugging and plugging


        If you want to keep DG you have to plug into a CDB that already has DG configured.  You would unplug from the primary database, and unplug from the standby database.

       When plugging in, you would plug into the standby CDB first, then plug into the Primary CDB.  This ensures that the standby database is ready when log information starts coming over from the primary CDB


There is one location for flashback logs


This item isn't a big deal.  All the archive logs, and all the flashback logs go to the same location.  The size of the fast recovery area is managed as a whole.

There is one BCT file (block change tracking). 


This means that when you unplug/plug between CDBs, there is no chance of  performing an incremental backup.

I did notice that the V$BLOCK_CHANGE_TRACKING view contains the container ID. I also noticed that 18.1 contains the ability to restore between CDBs ( I believe).

PDB recovery is within the same CDB


I believe this changed with 18.1, but I'm not positive.  When you register your "database" in the RMAN catalog, the CDB database gets registered.  All the PDBs within the CDB are backed up with the CDB's DBID.  Each individual PDBs backup are cataloged within the CDB by container ID. Yes you can backup PDB's individually and you can recover the PDBs individually.  However, once you unplug from the CDB and plug into another CDB, you need to take a new  full backup.  From an RMAN catalog standpoint, the PDB is now part of a new database.

Below is an example of  the output from

RMAN> List backup of pluggable database pocpdb2;


        Piece Name: +RECOC1/POCCDB/675073AC990B6478E05370A1880AEC9C/BACKUPSET/2018_03_14/nnndn1_tag20180314t131530_0.330.970751731
  List of Datafiles in backup set 498531
  Container ID: 4, PDB Name: POCPDB2
  File LV Type Ckp SCN    Ckp Time  Abs Fuz SCN Sparse Name
  ---- -- ---- ---------- --------- ----------- ------ ----
  15   1  Incr 111150927  14-MAR-18              NO    +DATAC1/POCCDB/675073AC990B6478E05370A1880AEC9C/DATAFILE/system.298.970659025
  16   1  Incr 111150927  14-MAR-18              NO    +DATAC1/POCCDB/675073AC990B6478E05370A1880AEC9C/DATAFILE/sysaux.299.970659025
  17   1  Incr 111150927  14-MAR-18              NO    +DATAC1/POCCDB/675073AC990B6478E05370A1880AEC9C/DATAFILE/undotbs1.297.970659025
  18   1  Incr 111150927  14-MAR-18              NO    +DATAC1/POCCDB/675073AC990B6478E05370A1880AEC9C/DATAFILE/undo_2.301.970659041
  19   1  Incr 111150927  14-MAR-18              NO    +DATAC1/POCCDB/675073AC990B6478E05370A1880AEC9C/DATAFILE/users.302.970659041


Notice that Container ID, and the PDB name is given.


Backing up a  PDB


PDBs can be backed up with the CDB, or by themselves (just like datafiles can).

RMAN  > backup incremental level 1 database plus archivelog not backed up;

A single PDB is backed up by specifying the PDB.

RMAN  > backup incremental level 1 pluggable database pocpdb2 plus archivelog not backed up;

Restoring a PDB


RMAN  > restore pluggable database pocpdb1;
RMAN > recover pluggable database pocpdb1;
RMAN> alter pluggable database pocpdb1 open;


if you are migrating from non-CDB to using multiple PDB's (true multi tenant) you should think through all the ramifications of backup/recovery.

Sunday, February 25, 2018

Is corruption always true corruption ?


Well the short answer is that there are different types of corruption.  I am writing this blog because I recently ran across “nologging” corruption which is considered softl corruption, and the handling of this type of corruption has changed across versions (which I will cover at the end of this article).

First, how does this happen ?  It can be seen in a physical standby, but you can also get this type of corruption in a Primary database.  I will go through how to reproduce this type of corruption shortly. 

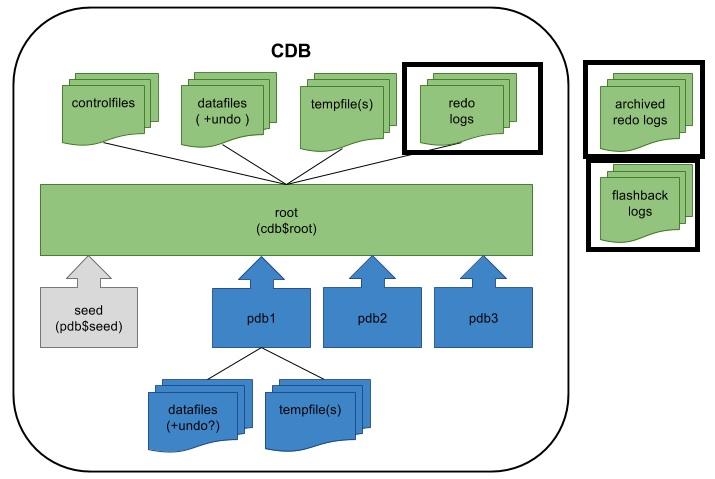
Next, what is nologging ?  Nologging processes are direct path updates to the database that do not contain detailed log information.  Notice I used the word “detailed” .  This is because some logging is captured as to what blocks are updated, but the individual updates are not captured.
Nologging is most common in datawarehouse load processes (ELT)  that are part of workflow that can be restarted.  Often tables are created during this processing that are only kept as part of the processing.  Nologging can also be used for performing large inserts into existing tables.  Because this type of processing tends to be “logging intensive”, and steps can be re-run, nologging is utilized for these objects.  Nologging can speed up processing by performing limited logging.  The downside of nologging is that for objects updated with nologging, there is no point in time recovery capability.  The object can only be restore/recovered to the point where a backup is taken (full or incremental).  More on that later.

I will start by showing a nologging workflow.

Below are the steps on how to reproduce a nologging test.


  1)      Ensure that force_logging=false   ---  If FORCE_LOGGING is turned on, any nologging processing is handled as logging


SQL> select force_logging from v$database;


FOR
---
NO


2)   Create a nologging table


SQL>  create table bgrenn.test nologging as select * from dba_objects where 0=1;

Table created.
 

3)      Ensure the new table is nologging


SQL> select owner,table_name,logging from dba_tables where owner='BGRENN';

OWNER                          TABLE_NAME                     LOG
------------------------------ ------------------------------ ---
BGRENN                         TEST                           NO


4)      Perform a full backup of the database


RMAN> backup incremental level 0 database;

Starting backup at 23-february -2018 12:45:45
using target database control file instead of recovery catalog

allocated channel: ORA_DISK_1
channel ORA_DISK_1: SID=1069 device type=DISK
allocated channel: ORA_DISK_2
channel ORA_DISK_1: starting incremental level 0 datafile backup set
channel ORA_DISK_1: specifying datafile(s) in backup set
input datafile file number=00005 name=/oradata/db1/soe.dbf
channel ORA_DISK_7: starting incremental level 0 datafile backup set
channel ORA_DISK_7: specifying datafile(s) in backup set
input datafile file number=00004 name=/oradata/db1/users01.dbf
channel ORA_DISK_7: starting piece 1 at 23-february -2018 12:46:22
channel ORA_DISK_8: starting incremental level 0 datafile backup set
channel ORA_DISK_8: specifying datafile(s) in backup set
including current SPFILE in backup set
channel ORA_DISK_8: starting piece 1 at 23-february -2018 12:46:28
channel ORA_DISK_2: finished piece 1 at 23-february -2018 12:46:30

….
Finished backup at 23-february -2018 12:50:01


5)      Update the table no logging using append hint

SQL> insert into /*+ append */ bgrenn.test select * from dba_objects nologging;

68947 rows created.

SQL> Commit;


6)      Switch the logfile to ensure the changes are written to archive logs.

SQL> alter system switch logfile;


OK. Now we have done a Full backup of the database, and performed a nologging change to my table “bgrenn.test”.  I did a log switch to ensure the change is written to the archive log.

The next step is to reproduce the nologging “soft corruption” through a restore.
At this point, blocks containing my table were inserted into, but the actual changes were not logged.  The block numbers were written to the log file, and on recovery these blocks will be marked as being changed.


1)      Check for block corruption before restoring

SQL> select * from v$database_block_corruption;

no rows selected


2)       Retart the database mount and restore the database

RMAN> connect target /

connected to target database: DB16 (DBID=3618808394)

RMAN> shutdown immediate;

using target database control file instead of recovery catalog
startup mount;
database closed
database dismounted
Oracle instance shut down
using target database control file instead of recovery catalog
startup mount;
database closed
database dismounted
Oracle instance shut down


RMAN> startup mount;

connected to target database (not started)
Oracle instance started
database mounted

Total System Global Area   14564409344 bytes

Fixed Size                     2149720 bytes
Variable Size               6308233896 bytes
Database Buffers            8187281408 bytes
Redo Buffers                  66744320 bytes

RMAN> restore database;

Starting restore at 23-february -2018 12:55:54
allocated channel: ORA_SBT_TAPE_1
channel ORA_SBT_TAPE_1: SID=1110 device type=SBT_TAPE
channel ORA_SBT_TAPE_1: Oracle Secure Backup
allocated channel: ORA_DISK_1
channel ORA_DISK_1: SID=1109 device type=DISK
channel ORA_DISK_5: starting datafile backup set restore
channel ORA_DISK_5: specifying datafile(s) to restore from backup set
channel ORA_DISK_5: restoring datafile 00004 to /oradata/db1116/users01.dbf
channel ORA_DISK_5: reading from backup piece /u01/app/oracle/flash_recovery_area/DB1116/backupset/2018_02_23/o1_mf_nnnd0_TAG20180223T12454
7_f90vwp3j_.bkp
Finished restore at 23-february -2018 12:57:41


3)      Recover database


RMAN> recover database;

Starting recover at 23-february -2018 12:58:22
using channel ORA_SBT_TAPE_1
using channel ORA_DISK_1
using channel ORA_DISK_2
using channel ORA_DISK_3
using channel ORA_DISK_4
using channel ORA_DISK_5
using channel ORA_DISK_6
using channel ORA_DISK_7
using channel ORA_DISK_8

starting media recovery
media recovery complete, elapsed time: 00:00:01

Finished recover at 23-february -2018 12:58:23

RMAN> alter database open;

database opened

RMAN>


4)      Check for corruption after restoring the database


SQL> select * from v$database_block_corruption;

no rows selected


5)      Select from the table in which we ran our nologging process


SQL> select * from bgrenn.test;
select * from bgrenn.test
                     *
ERROR at line 1:
ORA-01578: ORACLE data block corrupted (file # 4, block # 60)
ORA-01110: data file 4: '/oradata/db1/users01.dbf'
ORA-26040: Data block was loaded using the NOLOGGING option


6)      Check corruption again


SQL> select * from v$database_block_corruption;

no rows selected


7)       Validate datafile


RMAN> validate datafile 4;

Starting validate at 23-february -2018 14:15:36
using target database control file instead of recovery catalog
allocated channel: ORA_DISK_1
channel ORA_DISK_1: SID=1107 device type=DISK
channel ORA_DISK_8: SID=1073 device type=DISK
channel ORA_DISK_1: starting validation of datafile
channel ORA_DISK_1: specifying datafile(s) for validation
input datafile file number=00004 name=/oradata/db1/users01.dbf
channel ORA_DISK_1: validation complete, elapsed time: 00:00:01
List of Datafiles
=================


File Status Marked Corrupt Empty Blocks Blocks Examined High SCN
---- ------ -------------- ------------ --------------- ----------
4    OK     1016           307          1440            1760824163
  File Name: /oradata/db1/users01.dbf
  Block Type Blocks Failing Blocks Processed
  ---------- -------------- ----------------
  Data       0              63             
  Index      0              2              
  Other      0              1068           

Finished validate at 23-february -2018 14:15:42


Now this is where it gets interesting between version of Oracle.  Oracle 10g/11.1 reports this soft corruption differently from Oracle 11.2, and  both of these report it differently from 12.1+

Oracle 11.1   -
1)      Check for corruption in v$DATABASE_BLOCK_CORRUPTION  -- NOTE the corrupt_type only reports "CORRUPTION"


SQL> select * from v$database_block_corruption;

     FILE#     BLOCK#     BLOCKS CORRUPTION_CHANGE# CORRUPTIO
---------- ---------- ---------- ------------------ ---------
         4         60         13         1760822701 CORRUPT
         4         74         15         1760822716 CORRUPT
         4         90         15         1760822716 CORRUPT
         4        106         15         1760822730 CORRUPT
         4        122         15         1760822730 CORRUPT
         4        138         15         1760822745 CORRUPT
         4        154         15         1760822745 CORRUPT
         4        170         15         1760822759 CORRUPT
         4        267        126         1760822759 CORRUPT
         4        395        126         1760822763 CORRUPT
         4        523        126         1760822767 CORRUPT
         4        651        126         1760822771 CORRUPT
         4        779        126         1760822775 CORRUPT
         4        907        126         1760822779 CORRUPT
         4       1035        126         1760822784 CORRUPT
         4       1163         16         1760822788 CORRUPT


2)      Definition  of  CORRUPTION_TYPE

·         ALL ZERO - Block header on disk contained only zeros. The block may be valid if it was never filled and if it is in an Oracle7 file. The buffer will be reformatted to the Oracle8 standard for an empty block.
·         FRACTURED - Block header looks reasonable, but the front and back of the block are different versions.
·         CHECKSUM - optional check value shows that the block is not self-consistent. It is impossible to determine exactly why the check value fails, but it probably fails because sectors in the middle of the block are from different versions.
·         CORRUPT - Block is wrongly identified or is not a data block (for example, the data block address is missing)
·         LOGICAL - Specifies the range is for logically corrupt blocks. CORRUPTION_CHANGE# will have a nonzero values

3)      OEM Schedule Backup screen shows corruption

Oracle 11.2   -
1)      Check for corruption in v$DATABASE_BLOCK_CORRUPTION  -- NOTE 11.2 reports the soft corrupt in the view as "NOLOGGING" corruption.


SQL> select * from v$database_block_corruption;

     FILE#     BLOCK#     BLOCKS CORRUPTION_CHANGE# CORRUPTIO
---------- ---------- ---------- ------------------ ---------
         4         60         13         1760822701 NOLOGGING
         4         74         15         1760822716 NOLOGGING
         4         90         15         1760822716 NOLOGGING
         4        106         15         1760822730 NOLOGGING
         4        122         15         1760822730 NOLOGGING
         4        138         15         1760822745 NOLOGGING
         4        154         15         1760822745 NOLOGGING
         4        170         15         1760822759 NOLOGGING
         4        267        126         1760822759 NOLOGGING
         4        395        126         1760822763 NOLOGGING
         4        523        126         1760822767 NOLOGGING
         4        651        126         1760822771 NOLOGGING
         4        779        126         1760822775 NOLOGGING
         4        907        126         1760822779 NOLOGGING
         4       1035        126         1760822784 NOLOGGING
         4       1163         16         1760822788 NOLOGGING


2)      Definition  of  CORRUPTION_TYPE
·         ALL ZERO - Block header on disk contained only zeros. The block may be valid if it was never filled and if it is in an Oracle7 file. The buffer will be reformatted to the Oracle8 standard for an empty block.
·         FRACTURED - Block header looks reasonable, but the front and back of the block are different versions.
·         CHECKSUM - optional check value shows that the block is not self-consistent. It is impossible to determine exactly why the check value fails, but it probably fails because sectors in the middle of the block are from different versions.
·         CORRUPT - Block is wrongly identified or is not a data block (for example, the data block address is missing)
·         LOGICAL - Block is logically corrupt
·         NOLOGGING - Block does not have redo log entries (for example, NOLOGGING operations on primary database can introduce this type of corruption on a physical standby)

3)      OEM Schedule Backup screen shows corruption


Oracle 12.1   -
1)      Check for corruption in v$DATABASE_BLOCK_CORRUPTION  -- NOTE - 12.1 does not report it as corruption, but is reported in a new view  V$NONLOGGED_BLOCK


SQL> select * from v$database_block_corruption;

no rows selected


SQL> select file#,block#,blocks from v$nonlogged_block

     FILE#     BLOCK#     BLOCKS
---------- ---------- ----------
         6       6786        126
         6       6914        126
         6       7042        126
         6       7170        126
         6       7298        126
         6       7426        126
         6       7554        126
         6       7682        126
         6       7810        126
         6       7938        126
         6       8066        126

     FILE#     BLOCK#     BLOCKS
---------- ---------- ----------
         6       8194        126
         6       8322        126
         6       8512         64

47 rows selected.


2)      Definition  of  CORRUPTION_TYPE
·         ALL ZERO - Block header on disk contained only zeros. The block may be valid if it was never filled and if it is in an Oracle7 file. The buffer will be reformatted to the Oracle8 standard for an empty block.
·         FRACTURED - Block header looks reasonable, but the front and back of the block are different versions.
·         CHECKSUM - optional check value shows that the block is not self-consistent. It is impossible to determine exactly why the check value fails, but it probably fails because sectors in the middle of the block are from different versions.
·         CORRUPT - Block is wrongly identified or is not a data block (for example, the data block address is missing)
·         LOGICAL - Block is logically corrupt

3)      OEM Schedule Backup screen

Nothing appears


Now we have seen how to recreate “soft corruption” caused by nologging.  I have also shown how this is displayed in different versions of Oracle.

There are a few items to note that I have learned from this testing.

·        This is considered “soft corruption” so it is not reported when restoring a database.  This makes it very hard detect.

·        The ZDLRA does validation during backups, but since this is “soft corruption”, the database is backed up without no alerting.

·        OEM reports this corruption differently between versions.  With version 12.1 it is no longer reported in V$DATABASE_BLOCK_CORRUPTION, so OEM does not alert on this.

How to avoid Nologging corruption.

Ensure that you schedule backups when there isn’t any nologging operations occurring.This is a situation where the ZDLRA shines.  You can take an incremental backup before and after your nologging process then you have the capability to perform a full restore from either of these checkpoints.