If you are configuring backups to utilize the Autonomous Recovery Service, there are some prerequisites that you need to be aware of. If your Oracle Database was originally created in OCI and has always been OCI, those prerequisites are already configured for your database. But, if you migrated a database to an OCI service, you might not realize that these items are required.
Prerequisites for Autonomous Recovery Service
1) WALLET_ROOT must be configured in the SPFILE.
WALLET_ROOT is a new parameter that was added in 19c, and its purpose is to replace the SQLNET.ENCRYTPION_WALLET_LOCATION in the sqlnet.ora file. Configuring the encryption wallet location in the sqlnet.ora file is depreciated.
WALLET_ROOT points to the directory path on the DB node(s) where the encryption wallet is stored for this database, and possibly the OKV endpoint client if you are using OKV to manage your encryption keys.
WALLET_ROOT allows each database to have it's own configuration location specific to each database.
There is a second parameter that goes with WALLET_ROOT that tells the database what kind of wallet is used (file, HSM or OKV), and that parameter is tde_configuration.
Running the script below should return the WALLET_ROOT location, and the tde_configuration information.
Checking the WALLET_ROOT and tde_configuration
Below you can see that both of these parameters are configured and I am using a wallet file.
Parameter            Value
-------------------- ------------------------------------------------------------
wallet_root          /var/opt/oracle/dbaas_acfs/bgrenndb/wallet_root
tde_configuration    keystore_configuration=FILE
2) Encryption keys must be configured and available
In order to leverage the Autonomous Recovery Service, you must have an encryption key set and available for the CDB and each PDB. If you migrated a non-TDE database (or plugged in a nonTDE PDB) to OCI you might not have configured encryption for one ore more PDBs. The next step is to ensure that you have an encryption key set, and the wallet is open. The query below should return "OPEN" for each CDB/PDB showing that the encryption key is available.
Below is the output from the query showing that the wallet is open for the CDB and the PDBs.
   INST_ID PDB Name   Type       WRL_PARAMETER                                                Status
---------- ---------- ---------- ------------------------------------------------------------ ---------------
         1 BGRENNPDB1 FILE                                                                    OPEN
           CDB$ROOT   FILE       /var/opt/oracle/dbaas_acfs/bgrenndb/wallet_root/tde/         OPEN
           PDB$SEED   FILE                                                                    OPEN

         2 BGRENNPDB1 FILE                                                                    OPEN
           CDB$ROOT   FILE       /var/opt/oracle/dbaas_acfs/bgrenndb/wallet_root/tde/         OPEN
           PDB$SEED   FILE                                                                    OPEN
3) All tablespaces are TDE encrypted
TDE encryption is mandatory in OCI, and the Autonomous Recovery Service cannot be used if all of your tablespaces are not encrypted. Below is a query to run that will tell you if your tablespaces are all encrypted.
In my case I can see that all of the tablespaces are encrypted
Encrypted tablespace information
------------------------------------------------------------
Number of encrypted tablespaces   :      12
Number of unencrypted tablespaces :      0
                                         ----
Total Number of tablespaces       :      12
To find any tablespaces that are not encrypted you can run the query below.
Pre-authenticated URLs in OCI are fast becoming one of my favorite features of using object storage. In this blog post I will explain how I am using them for both:
Storing the current copy of my backup scripts and dynamically pulling it from my central repository
uploading all my logs files to a central location
PROBLEM:
The problem I was trying to solve, is that I wanted to create a script to run on all my database nodes to create a weekly archival backup.
Since I have databases that are both Base DB databases, and ExaCS I found that I was continuously making changes to my backup script. Sometimes it was checking something different in my environment, and sometimes it was improving the error checking.
Each time I made a change, I was going out to every DB host and copying the new copy of my script.
Eventually I realized that Pre-authenticated URLs could not only help me ensure all my DB hosts are running the current copy of my backup script, they could be the central log location.
Solution:
Solution #1 - Script repository
The first problem I wanted to solve, was that I wanted to configure a script repository that I could dynamically pull the most current copy of my scripts from. Since I am running in OCI, I was looking for a "Cloud Native" solution rather than using NFS mounts that are shared across all my DB hosts.
To complicate things, I have databases that are running in different tenancies.
Step #1 - Store scripts in a bucket
The first step was to create a bucket in OCI to store both the scripts and logs. Within that bucket, under "More Actions" I chose "Create New Folder" and I created 2 new folders, "logs" and "scripts".
Then within the scripts folder I uploaded by current scripts
rman.sh - My executable script that will set the environment and call RMAN
backup.rman - My RMAN script that contains the RMAN command to backup my database.
Step #2 - Create a Pre-Authenticated Request
The next step was to create a Pre-Authenticated request on the "scripts" folder. Next to the scripts folder I clicked on the 3 dots and chose "Create Pre-Authenticated Request".
On the window that came up, I changed the expiration to be 1 year in the future (the default is 7 days). I chose the "Objects with prefix" box so that I could download any scripts that I put in this folder to the DB hosts. I also made sure the "Access Type" is "Permit object reads on those with specified prefix".
I did not chose "Enable Object Listing".
These settings will allow me to download the scripts from this bucket using the Pre-Authenticated URL only. From this URL you will not be able to list the objects, or upload any changes.
Step #3 - Create wrapper script to download current scripts
Then using the Pre-Authenticated URL in a wrapper script, I download the current copies of the scripts to the host and then executed my execution script (rman.sh) with a parameter.
Below you can see that I am using curl to download my script (rman.sh) and storing it my local script directory (/home/oracle/archive_backups/scripts). I am doing the same thing for the RMAN command file.
Once I download the current scripts, I am executing the shell script (rman.sh) .
curl -X GET https://{my tenancy}.objectstorage.us-ashburn-1.oci.customer-oci.com/p/{actual URL is removed }/n/id20skavsofo/b/bgrenn/o/scripts/rman.sh --output /home/oracle/archive_backups/scripts/rman.sh
curl -X GET https://{my tenancy}.objectstorage.us-ashburn-1.oci.customer-oci.com/p/{actual URL is removed }/n/id20skavsofo/b/bgrenn/o/scripts/backup.rman --output /home/oracle/archive_backups/scripts/backup.rman


/home/oracle/archive_backups/scripts/rman.sh $1
Solution #2 - Log repository
The second problem I wanted to solve was to make it easy review the execution of my scripts. I don't want to go to each DB host and look at the log file. I want to have the logs stored in a central location that I can check. Again Pre-Authenticated URLs to the rescue !
Step #1 - Create the Pre-Authenticated URL
In the previous steps I already create a "logs" folder within the bucket. In this step I want to create a Pre-Authenticated URL like I did for the scripts, but in this case I want to use it to store the logs.
Like before I chose "Create Pre-Authenticated Request" for the "logs" folder.
This time, I am choosing "Permit object writes to those with the specified prefix". This will allow me to write my log files to this folder in the bucket, but not list the logs, or download any logs.
Step #2 - Upload the log output from my script
The nice thing was once I implemented Solution #1, and had all of my DB nodes already downloading the current script. I updated the script to add an upload to object storage of the log file and they will all use my new script.
In my script I already had 2 variables set
NOW - The current date in "yyyymmdd" format
LOGFILE - The name of the output log file from my RMAN backup.
Now all I had to do was to add a curl command to upload my log file to the bucket.
Note I ma using the NOW variable to create a new folder under "logs" with the data so that my script executions are organized by date.
curl --request PUT --upload-file /home/oracle/archive_backups/logs/${LOGFILE} https://{My tenancy}.objectstorage.us-ashburn-1.oci.customer-oci.com/p/{URL removed}/n/id20skavsofo/b/bgrenn/o/logs/${NOW}/${LOGFILE}
BONUS
If I wanted to get fancy I could have put my LOGS in a new bucket, and configured a lifecycle management rule to automatically delete logs after a period of time from the bucket.
RMAN create standby database - Are you like me and use "restore database" for large databases, or like most people (based on my Linkedin poll) and use "duplicate for standby"?
The table below shows you the 3 main differences between the 2 methods.
This post started with a discussion within my team around which method you use. I, being of the "restore database" camp, didn't realize how commonly used "duplicate for standby" is.
I have also dug through the documentation, and there is no common method that is mentioned. Even the 21c documentation for creating a standby database doesn't mention using the duplicate command.
I also was pointed to a MOS note that goes through creating a standby directly from the primary across multiple nodes, and with encryption. Creating a Physical Standby database using RMAN restore database from service (Doc ID 2283978.1)
Well in this post, I will explain why "restore database" has been my preference.
NOTE : If you are creating a standby database that is encrypted and the source database is not (creating a standby database in OCI for example) then I have instructions at the end of this post for how to use "Restore Database" to create a hybrid standby database.
Duplicate database for standby
From the poll I ran, this is the most common way to create a standby database. It is probably the simplest way also because a lot of the configuration of the standby database is done automatically as part of the automated process.
Below is the simplified steps to perform this process.
PRE work
Create simple initfile on the standby host. The real SPFILE will be brought over as part of the duplication process. This may contain location parameters for datafiles and redo logs if different from the primary.
Create directories on the standby host. This includes the audit directory, and possibly the database file directories if they are different from the host.
Startup nomount.
Duplicate
The duplicate process automatically performs these major steps using the standby as an auxiliary instance.
Create an SPFILE. The process creates an SPFILE for the standby and sets parameters for the standby.
Shutdown/Startup standby database. This will use the newly created SPFILE during the rest of the processing
Restore backup controlfile for standby database. The controlfile for the standby database is put in place, and the spfile is updated to it's location
Mount controlfile . Mount the controlfile that was restored
Restore database . Restore the datafiles files for the CDB and PDBs to their new location on the standby
Switch datafile . Uses the new location of the datafiles that were restored.
Create standby redo logs.
Set parameters for standby database. The parameters necessary to communicate with the primary database are set.
Put standby in recover mode . By this time, you should have set the primary database to communicate with the standby database.
NOTES
If you noticed above, I highlighted the second step which forces a shutdown/startup of the standby database. Because of this step, it is not possible to use this method and restore across nodes in a RAC database. This can cause the duplicate operation to take much longer for larger databases.
Then in step #5 you can see that the "Restore Database" is automatic in the processing and it is not possible to perform a "restore as encrypted" if you are migrating to OCI from a non-TDE database. The duplicate process does support "restore as encrypted", but only for creating a new Database, not a standby database.
Restore Database
This is the method that I've always used. There is no automation, but it gives you much more control over the steps.
PRE work
Restore copy of prod SPFILE to standby host. For this process, it doesn't matter if it is an intifile or spfile. In this file you set all the parameters that are needed for the standby database to communicate with the primary and store datafiles/logfiles in the correct location.
Create directories on the standby host. This includes the audit directory, and possibly the database file directories if they are different from the host.
Startup nomount.
Create copy of primary controlfile for standby. This will be used for the standby database, and should contain the backup catalog of the primary database, and the RMAN settings including the channel definitions.
Copy standby controlfile to standby host. The controlfile is copied to the standby host, and may be put in ASM at this point. Ensure the spfile points to the controlfile (and/or srvctl).
Alter database mount. Mount the controlfile.
Start up ALL nodes in the RAC cluster in mount mode. This will allow you to restore the database across ALL nodes in the RAC cluster, and include all the networking from these nodes. For a large database hosted on multiple DB nodes this can make a HUGE difference when restoring the database.
Create (or copy) TDE wallet. If the standby database is going to be TDE, then include the wallet if the primary is TDE, or create a new wallet and key if the standby database is going to be TDE.
Restore Database
The restore process is a manual process
RMAN Connect to database (and possibly RMAN catalog). Connect to the database and make sure you have access to the backups. For ZDLRA this may mean connecting to the RMAN catalog.
Restore Database (as encrypted). This will restore the database to the new location. With Restore Database, the database can be encrypted during the restore operation. With 19c it is supported to have the standby database be encrypted without the primary database being encrypted (Hybrid dataguard).
Switch datafile . Uses the new location of the datafiles that were restored.
Recover database. This will use the archive logs that are cataloged to bring the standby database forward
Create standby redo logs.
Set parameters for standby database. The parameters necessary to communicate with the primary database are set.
Put standby in recover mode . By this time, you should have set the primary database to communicate with the standby database.
NOTES
With the restore database, there are 2 sections I highlighted and these are the advantages that I love about using this method.
RMAN is restoring across multiple nodes in a RAC cluster which can make the restore operation much faster.
Restore as encrypted allows you take a database that may have TDE partially implemented, or not implemented and create a new standby database that is encrypted. With the duplicate method, TDE would have to be implemented separately.
If you are restoring a VERY large database (200 TB for example) that was not TDE from object storage to the Exadata Cloud Service, both of these advantages can make a HUGE difference when creating a standby database.
Comparison
The chart below compares the the differences between "Duplicate Database" and "Restore Database".
WARNING: When using a ZDLRA for backups, it is NOT recommended to use the "Restore Database" to clone a database as a new copy. Registering the restored copy can cause issues with the RMAN catalog because the "restore database" leaves entries in the RC_SITE table.
Data Guard Hybrid Cloud Configuration
The ability to create a hybrid cloud configuration was introduced in Version 19.16 and there is a great blog post from Glen Hawkins explaining this feature.
This feature allows you have your Primary database remain unencrypted (no ASO license), but still have the standby database in OCI be TDE encrypted.
In this section I want to talk about how you can use "Restore Database as Encrypted" to implement this configuration quickly.
If you want to implement this feature using "Duplicate for standby" you have to separately encrypt the datafiles once they are restored in OCI. This can be done online, or offline, but it is still a time consuming task.
Prepare the primary and future standby databases
The first step is prepare the primary database and future standby database by creating a wallet file and setting encryption keys. There is a great video put together by Peter Wahl (PM for TDE and OKV) that goes through a lot of the steps.
Below is a summary of the steps you need to perform. You can follow along the steps in Peter's video and I will point out where in the video you will find each step.
Create the directories on the primary (3:40) - Directories are specified in the video and need to be created on all nodes in a RAC cluster.
Create the directories on the standby database (4:18) -Directories are specified in the video and need to be created on all nodes in a RAC cluster.
Set the wallet_root in the primary (4:25) - This is set in the SPFILE only
Set tablespace_encryption to decrypt_only on primary (4:40) - This is set in the SPFILE only
Set the default algorithm to AES256 on primary (4:50) - This is set in the SPFILE only
Set wallet_root on standby, tablespace_encryption to auto_enable, and default algorithm on standby -- This is set in the initfile that you create prior to performing the restore. This step is different from the video because there is no standby at this point.
Bounce the primary database (5:50) - This can be in a rolling manner.
Create a password protected wallet on the primary (7:25) - This gets created in the default location specified from WALLET_ROOT
Create an auto open wallet on the primary (7:30) - This will make it automatically open for the database.
Set the encryption keys in the primary (7:40) - The keys will be created so that they can be used when restoring the datafiles on the standby database.
Copy the wallets from the primary to the standby (7:55) - This provides the standby database with the keys to encrypt.
The latest release of ZFS (8.8.63) contains 2 new features associated with File Retention lock.
File retention (deletion or hold) after file expiration
Allow permission changes on retained files.
File retention on expiry policy
This new setting for projects/shares defaults to "off" which is the normal behavior of unlocking files, but leaving them on the filesystem. In order to delete files you need to wait until the retention period expires, and then you can delete the file.
There are 2 new settings you can use to work with locked files to change this behavior.
Delete
When set to "Delete", files will be immediately deleted when their retention lock expires. This can be very useful if you want files to be automatically cleaned up at the end of their retention without having to create a deletion process.
There are a few items to be aware of the automatic deletion process.
DO NOT use this with an RMAN retention window. Customers typically use a weekly full/daily incremental backup strategy with RMAN. With this strategy, a weeks worth of backups (all dependent on the oldest full backup) are deleted together. Deleting backups as soon as they expire would delete backups too soon. Even with archival backups I recommend letting RMAN perform the deletions, otherwise you risk having a file deleted too early.
Be careful changing this setting on an existing share. This setting takes effect immediately and will affect ALL files that have a retention lock. Any files that were locked, but their retention lock expired will be deleted when this setting is applied.
Hold
When set to "Hold", any files that have, or have had a retention lock will be affected. This setting immediately prevents the deletion of all retention locked files until the hold is removed regardless of when the lock is set to expire. Keep in mind that while a hold is in place, the files still have a retention lock with an expiration date.
Removing the hold: When you remove the hold, the normal expiration date takes effect. If you remove the hold by changing the expiry policy to "Delete", ALL files that have an expired retention will be immediately deleted. If you change the expire policy to "Off", the files remain, and you must manually delete them.
NOTE: Be very careful when changing the Expiry Policy. The new setting immediately affects existing files, not just new files going forward, unlike the other file retention settings.
Allow permission changes on retained files
What happens normally : When a file has a retention lock set, you are protecting this file from both being deleting AND from being updated. Because you were not allowed to update the file permissions, you were not able to change the settings from the default of -r--r-----+ while the file was locked.
This could be an issue depending on what type of file you are protecting. There are some cases where you want to make this file either
An executable file, not just a read only file.
readable by any user.
When you attempted to make this change to a locked file the update would fail with a "Operation not permitted".
-r--r-----+ 1 oracle oinstall 792 Dec  4  2023 testfile
[oracle@ssh-server rmanbackups]$ ls -al testfile
-r--r-----+ 1 oracle oinstall 792 Dec  4 20:26 testfile
[oracle@ssh-server rmanbackups]$ chmod 550 testfile
chmod: changing permissions of 'testfile': Operation not permitted
[oracle@ssh-server rmanbackups]$ chmod 444 testfile
chmod: changing permissions of 'testfile': Operation not permitted
[oracle@ssh-server rmanbackups]$
What this setting does: When you check the setting for "Allow permission changes on retained files" you are IMMEDIATELY able to change the permissions on files that are locked. The files are still protected from making them writable, but you can adjust both the "r" - read and "x" execute settings for all users.
NOTE: this setting does take affect immediately and will affect all currently locked files regardless of when they were created.
One topic that has been coming a lot as customers look at options for offsite protected backups, is the use of the Oracle Database Backup Cloud Service. This service can be used either directly from the database itself leveraging an RMAN tape library, or by performing a copy-to-cloud from the ZDLRA. In this post I will try to consolidate all the information I can find on this topic to get you started.
Overview
The best place to start is by downloading, and reading through this technical brief.
This document walks you through what the service is and how to implement it. Before you go forward with the Backup Cloud Service I suggest you download the install package and go through how to install it.
The key points I saw in this document are
RMAN encryption is mandatory - In this brief you will see that the backups being sent to OCI MUST be encrypted, and the brief explains how to create an encrypted backup. Included in the Backup Cloud Service is the use of encryption and compression (beyond basic compression) without requiring the ASO, or ACO license.
How to install the client files - The brief explains the parameters that are needed to install the client files, and what the client files are that get installed. I will go into more detail later on explaining additional features that have been added recently.
Config file settings including host - The document explains the contents of the configuration file used by the Backup Cloud Service library. It also explains how to determine the name of the host (OCI endpoint) based on the region you are sending the backups to.
Channel configuration example - There is an example channel configuration to show you how to connect to the service.
Best practices - The document includes sample scripts and best practices to use when using the Backup Cloud Service.
Lifecycle policies and storage tiers - This is an important feature of using the Backup Cloud Service, especially for long term archival backups. You most likely want have backups automatically moved to low cost archival storage after uploading to OCI.
NOTE: When using lifecycle polies to manage the storage tiers it is best to set the "-enableArchiving" and "-archiveAfterBackup" parameters when installing the backup module for a new bucket. There are small metadata files that MUST remain in standard storage, and the installation module creates a lifecycle rule with the bucket that properly archives backup pieces, leaving the metadata in standard storage.
Download
The version of the library on OTN (at the time I am writing this) is NOT the current release of the library, and that version does not support retention lock of objects.
Documentation on the newer features can be found here, using retention lock can be found here, and there is a oci_readme.txt file that contains all the parameters available.
Updates
There were a few updates since the tech brief was written, and I will summarize the important ones here. I also spoke the PM who is working on an updated brief that will contain this new information.
newRSAKeyPair - The installer is now able to generate the key pair for you making it much easier to generate new key pair. In order to have the installer ONLY create a new key pair pair, just pass the installer the "walletDir" parameter. The installer will generate both a public and private key, and place them in the walletDir (see below).
 /u01/app/oracle/product/19c/dbhome_1/jdk/bin/java -jar oci_install.jar -newRSAKeyPair -walletDir /home/oracle/oci/wallet
Oracle Database Cloud Backup Module Install Tool, build 19.18.0.0.0DBBKPCSBP_2023-09-21
OCI API signing keys are created:
  PRIVATE KEY --> /home/oracle/oci/wallet/oci_pvt
  PUBLIC  KEY --> /home/oracle/oci/wallet/oci_pub
Please upload the public key in the OCI console.
Once you generate the public/private key, you can upload the public key to the OCI console. This will show you the fingerprint, and you can execute the installer using the private key file.
"immutable-bucket" and "temp-metadata-bucket" - The biggest addition to library is the ability to support the use of retention rules on buckets containing backups. The uploading of backups is monitored by using a "heartbeat" file, and this file is deleted when the upload is successful. Because all objects in a bucket are locked, the "heartbeat" object must be managed from a second bucket without retention rules. This is the temp-metadata-bucket. When using retention rules you MUST have both buckets set in the config file.
NOTE:
I ran into 2 issues when executing this script.
1) When trying to execute the jar file, I used the default java version in my OCI tenancy that is located in "/user/bin". The installer received a java error
In order to properly execute the installer, I used the java executable located in $ORACLE_HOME/jdk/bin
2) When executing the jar file with my own RSA key that I had been previously used with OCI object storage, I received a java error.
Exception in thread "main" java.lang.RuntimeException: Could not produce a private key at oracle.backup.util.FileDownload.encode(FileDownload.java:823) at oracle.backup.util.FileDownload.addBmcAuthHeader(FileDownload.java:647) at oracle.backup.util.FileDownload.addHttpAuthHeader(FileDownload.java:169) at oracle.backup.util.FileDownload.addHttpAuthHeader(FileDownload.java:151) at oracle.backup.opc.install.BmcConfig.initBmcConnection(BmcConfig.java:437) at oracle.backup.opc.install.BmcConfig.initBmcConnection(BmcConfig.java:428) at oracle.backup.opc.install.BmcConfig.testConnection(BmcConfig.java:393) at oracle.backup.opc.install.BmcConfig.doBmcConfig(BmcConfig.java:250) at oracle.backup.opc.install.BmcConfig.main(BmcConfig.java:242) Caused by: java.security.spec.InvalidKeySpecException: java.security.InvalidKeyException: IOException : algid parse error, not a sequence
I found that this was caused by the PKCS format. I was using a PKCS1 key, and the java installer was looking for a PKCS8 key. The header in my private key file contained "BEGIN RSA PRIVATE KEY".
In order to convert my private PKCS1 key "oci_api_key.pem" to a PKCS8 key "pkcs8.key" I ran.
The next step is to execute the install. For my install I also wanted configure a lifecycle rule that would archive backups after 14 days. In order to implement this, I had the script create a new bucket "bsgtest". Below is parameters I used (note I used "..." to obfuscate the OCIDs).
This created a new bucket "bsgtest" containing a lifecycle rule.
I then added a 14 day retention rule to this bucket, and created a second bucket "bsgtest_meta" for the temporary metadata. If you want to make this rule permanent you enable retention rule lock which I highlighted on the screenshot below.
I then updated the config file to use the metadata bucket because I set a retention rule on the main bucket. Note that there is also a parameter that determines how long archival objects are cached in standard storage before they are returned to archival storage.
Once you execute the installer you will be able to begin backing up to OCI object storage. Don't forget that you need to:
Change the default device type to SBT_TAPE
Change the compression algorithm. I recommend "medium" compression.
Configure encryption for database ON.
Configure the device type SBT_TAPE to send COMPRESSED BACKUPSET to optimize throughput and storage in OCI.
Create a default channel configuration for SBT_TAPE (or allocate channels manually) that use the library that was downloaded, and point to the configuration file for the database.
If you do not use ACO and don't have a wallet , manually set an encryption password in your session.
I recommend sending a "small" backup piece first to ensure that everything is properly configured. My favorite command is
RMAN>backup incremental level 0 datafile 1;
Datafile 1 is always the system tablespace.
Below is what my configuration looks like for RMAN specifically for what I changed to use the Backup Cloud Service.
CONFIGURE BACKUP OPTIMIZATION ON;
CONFIGURE DEFAULT DEVICE TYPE TO 'SBT_TAPE';
CONFIGURE CONTROLFILE AUTOBACKUP FORMAT FOR DEVICE TYPE SBT_TAPE TO '%F'; # default
CONFIGURE DEVICE TYPE 'SBT_TAPE' PARALLELISM 4 BACKUP TYPE TO COMPRESSED BACKUPSET;
CONFIGURE CHANNEL DEVICE TYPE 'SBT_TAPE' PARMS  'SBT_LIBRARY=/home/oracle/oci/lib/libopc.so ENV=(OPC_PFILE=/home/oracle/oci/config/backupconfig.ora)';
CONFIGURE ENCRYPTION FOR DATABASE ON;
CONFIGURE ENCRYPTION ALGORITHM 'AES256'; # default
CONFIGURE COMPRESSION ALGORITHM 'MEDIUM' AS OF RELEASE 'DEFAULT' OPTIMIZE FOR LOAD TRUE;
Network Performance
One of the big areas that comes up with using the Backup Cloud Service, is understanding the network capabilities.
The best place to start is with this MOS note
RMAN> run {
2> allocate channel foo device type sbt  PARMS  'SBT_LIBRARY=/home/oracle/oci/lib/libopc.so ENV=(OPC_PFILE=/home/oracle/oci/config/backupconfig.ora)';
3>  send channel foo 'NETTEST 1000M';
4> }

allocated channel: foo
channel foo: SID=431 device type=SBT_TAPE
channel foo: Oracle Database Backup Service Library VER=19.0.0.1

released channel: foo
RMAN-00571: ===========================================================
RMAN-00569: =============== ERROR MESSAGE STACK FOLLOWS ===============
RMAN-00571: ===========================================================
RMAN-03002: failure of send command at 11/22/2023 14:12:04
ORA-19559: error sending device command: NETTEST 1000M
ORA-19557: device error, device type: SBT_TAPE, device name:
ORA-27194: skgfdvcmd: sbtcommand returned error
ORA-19511: non RMAN, but media manager or vendor specific failure, error text:
   KBHS-00402: NETTEST sucessfully completed
KBHS-00401: NETTEST RESTORE: 1048576000 bytes received in 15068283 microseconds
KBHS-00400: NETTEST BACKUP: 1048576000 bytes sent
Executing Backups
Now to put it all together I am going to execute a backup of datafile 1. My database is encrypted, so I am going to set a password along with the encryption key.
 set encryption on identified by oracle;

executing command: SET encryption

RMAN>  backup incremental level 0 datafile 1;

Starting backup at 22-NOV-23
allocated channel: ORA_SBT_TAPE_1
channel ORA_SBT_TAPE_1: SID=404 device type=SBT_TAPE
channel ORA_SBT_TAPE_1: Oracle Database Backup Service Library VER=19.0.0.1
allocated channel: ORA_SBT_TAPE_2
channel ORA_SBT_TAPE_2: SID=494 device type=SBT_TAPE
channel ORA_SBT_TAPE_2: Oracle Database Backup Service Library VER=19.0.0.1
allocated channel: ORA_SBT_TAPE_3
channel ORA_SBT_TAPE_3: SID=599 device type=SBT_TAPE
channel ORA_SBT_TAPE_3: Oracle Database Backup Service Library VER=19.0.0.1
allocated channel: ORA_SBT_TAPE_4
channel ORA_SBT_TAPE_4: SID=691 device type=SBT_TAPE
channel ORA_SBT_TAPE_4: Oracle Database Backup Service Library VER=19.0.0.1
channel ORA_SBT_TAPE_1: starting incremental level 0 datafile backup set
channel ORA_SBT_TAPE_1: specifying datafile(s) in backup set
input datafile file number=00001 name=/u01/app/oracle/oradata/ACMEDBP/system01.dbf
channel ORA_SBT_TAPE_1: starting piece 1 at 22-NOV-23
channel ORA_SBT_TAPE_1: finished piece 1 at 22-NOV-23
piece handle=8t2c4fmi_1309_1_1 tag=TAG20231122T150554 comment=API Version 2.0,MMS Version 19.0.0.1
channel ORA_SBT_TAPE_1: backup set complete, elapsed time: 00:00:35
Finished backup at 22-NOV-23

Starting Control File and SPFILE Autobackup at 22-NOV-23
piece handle=c-1654679317-20231122-01 comment=API Version 2.0,MMS Version 19.0.0.1
Finished Control File and SPFILE Autobackup at 22-NOV-23
Restoring
Restoring is very easy as long as you have the entries in your controlfile. If you don't then there is a
script included in the installation that can catalog the backup pieces and I go through that process here.
This also allows you to display what's in the bucket.
Buckets 1 vs many
If you look at what created when executing backup you will see that there is a set format for the backup pieces. Below are the 2 backup pieces that I created
8t2c4fmi_1209_1_1 - This is the backup of datafile 1 for my database ACMEDBP
c-16546791317-20231122-01 - This is the controlfile backup for this database
Notice that the DB name is not in the name of the backup pieces, or in the visible nesting.
If you think about a medium sized database (let's say 100 datafiles), that has 2 weeks of backups (14 days), you would have 1,400 different backup pieces for the datafiles within the "sbt_catalog" directory.
My recommendation is to group small databases together in the same bucket (keeping the amount of backup pieces to a manageable level).
For large database (1,000+ datafiles), you can see where a 30 day retention could become 30,000+ backup pieces.
Having a large number of objects within a bucket increases the time to report the available backup pieces. There is no way to determine which database the object is a member of without looking at the metadata.
Keep this in mind when considering how many buckets to create.
Oracle DB Recovery Service recently added a new feature to protect backups from being prematurely deleted, even by a tenancy administrator. This new feature adds a retention lock to the Backup Retention Period at the policy level. The image below shows the new settings that you see within the protection policy.
Enabling retention lock
The recovery service comes with some default policies that appear as "oracle defined" policy types
NameBackup retention period
Platinum 46 days
Gold 65 days
Silver 35 days
Bronze 14 days
These policies can't' be changed, and they do not enable retention lock.
In order to implement a retention lock you need to create a new protection policy or update an existing user defined protection policy.
Step #1 Set/Adjust "Backup retention period"
If you are creating a new "user defined" protection policy, you need to set the backup retention to a number of days between 14 and 95. You should also take this opportunity to adjust the backup retention of an existing policy, if appropriate, before it is locked.
NOTE: Once a retention lock on the protection policy is activated (discussed in step #3), the backup retention period cannot be decreased, it can only be increased.
Step #2 Click on "enable retention lock"
This step is pretty straightforward. But the most important item to know is that the retention lock is not immediately in effect. Much like the "retention lock" that is set on object storage, there is a minimum period of at least 14 days before the lock is "active".
Note: Once the grace period has expired for the policy (explained later in this blog post) the "retention lock" is permanent and cannot be removed.
Step #3 Set "Scheduled lock time"
As I said in the previous step, the lock isn't immediately active. In this step you set the future date/time that the lock time becomes active, and this Date/Time must be at least 14 days in the future. This provides a grace period that delays when the lock on the policy becomes active. You have up until the lock activation date/time to adjust the scheduled lock time further into the future if it becomes necessary to further day lock activation.
Grace Period
I wanted to make sure I explain what happens with this grace period so that you can plan accordingly.
If you change an existing "user defined" policy to enable the retention lock, any databases that are a member of this policy will not have locked backups until the scheduled lock date/time activates the lock.
If you add databases to a protection policy that has a retention lock enabled, the backups will not be locked until whichever time is farther in the future.
Scheduled lock time for the policy if the retention lock has not yet activated.
14 days after the database is added to the protection policy.
Databases can be removed from a retention locked protection policy during this grace period.
If the policy itself is still within it's grace period from activating, the backup retention period can be adjusted down for the protection policy.
NOTE: This 14 day grace period allows you to review the estimated space needed. On the protected database summary page, for each database, you can see the "projected space for policy" in the Space Usage section. This value can be used to estimate the "locked backup" utilization.
What happens with a retention lock ?
Once the grace period expires the backups for the protected database are time locked and can't be prematurely deleted.
The backups are protected by the following rules.
1. The database cannot be moved to another policy. No user within the tenancy, including an administrator can remove a database from it's retention enabled policy. If it becomes necessary to move a database to another policy , an SR needs to raised, and security policies are followed to ensure that this is an approved change.
2. There is always a 14 day grace period in which changes can be made before the backups become locked. This is your window to verify the backup storage usage required before the lock activates.
3. Even if you check the "72 hour termination option" on the database, backups are locked throughout the retention window.
Comments:
This is a great new feature that protects backups from being deleted by anyone in the tenancy, including tenancy administrators. This provides an extra layer of security from an attack with compromised credentials. Because the lock is permanent, always use the 14 day grace period to ensure the usage and duration is appropriate for you database.
One topic that has been coming up over and over this year is Cyber Vault. In this post I am going to through the characteristics I commonly see when a customer build a Cyber Vault. The image below gives you a good idea of what is involved.
Characteristics of a Cyber Vault
NTP and DNS services.: Because a Cyber Vault is often isolated from the rest of the datacenter it is critical to have NTP service. Proper time management is critical to ensuring backups are kept for the proper retention. DNS isn't critical, but it is definitely very helpful in configuring infrastructure. In many cases "/etc/hosts" can get around this, but is a pain to maintain.
Firewalls: Configuring firewalls, and isolated networks is critical to ensure the Cyber Vault is isolated. The vault is often physically in the same datacenter, with network isolation providing the protection. Be sure to understand what ports, networks, and traffic direction is utilized on all infrastructure so you can proper set firewall rules.
Air Gap: Creating an Air-Gap has become the standard to protect backups in the Cyber Vault. The Air Gap is often open for only a few hours a day at random times to ensure that the opening isn't predictable. To limit the exposure time, it is critical to maximize the networking into the vault, and minimize the amount of data necessary to transfer.
NOTE: Not all customers choose to have an Air Gap. Having an Air Gap that is closed for long periods of times ensures there is less chance of intrusions, BUT it guarantees long periods of data loss when a restoration is performed. This is most critical to decide with databases that are always changing.
Break-the-glass: There needs to be control on who gets access into the vault, and an approval process to ensure that all access is planned and controlled.
Backup validation: There needs to be a validation process in a vault to ensure that the backups are untouched. When the backups contain executables, this is typically scanning for ransomware signatures. When backups are Oracle Backups, performing "Restore Database Validate" is the gold standard for validating backups.
Clean Room: A clean room is an environment where backups can tested, This can be a small environment (a server or 2) or it can be large enough to restore and run the whole application.
Monitoring and reporting infrastructure : For Oracle this OEM (Cloud Control). It is critical that any issues are alerted and reported outside the vault.
Audit Reports: Audit reports are critical to ensuring that the backups in the Cyber Vault are secured. Audit reports will capture any changes to the environment, and any issues with the backups themselves.
BONUS: One thing that customers don't often think about is encryption keys. Implementing TDE on Oracle Databases is an important part of protecting your data from exfiltration. But you should also ensure that you have a secure backup of you encryption keys in the Vault.
OKV (Oracle Key Vault) is the best way of managing the keys for Oracle databases.
ZFS can be configured to use Oracle Key Vault (OKV) as a KMIPs cluster to store it's encryption keys. In this blog post I will go through how to configure my ZFS replication pair to utilize my OKV cluster and take advantage of the Raw Crypto Replication mode introduced in 8.8.57.
OKV Cluster Environment:
First I am going to describe the environment I am using for my OKV cluster.
I have 2 OKV servers, OKVEAST1 ( IP:10.0.4.230) and OKVEAST2 (IP: 10.0.4.254). These OKV servers are both running 21.6 (the current release as of writing this post).
ZFS replication Pair:
For my ZFS pair, I am using a pair of ZFS hosts that I have been running for awhile. My first ZFS host is "testcost-a" (IP: 10.0.4.45) and my second ZFS host is "zfs_s3"( IP: 10.0.4.206). Both of these servers are running the 8.8.60 release.
For my replication, I already have "testcost-a" configured as my upstream, and "zfs_s3" configured as the downstream.
Steps to configure encryption using OKV
Documentation:
The documentation I am using to configure ZFS can be found in the 8.8.x Storage Administrators guide. I did look through the documentation for OKV, and I didn't find anything specific that needs to be done when using OKV as a KMIP server.
Step #1 - Configure endpoints/wallets in OKV
The first step is to create 2 endpoints in OKV and assign a shared wallet between these 2 endpoints.
I am starting by creating a single wallet that I am going to use share the encryption keys between my 2 ZFS replication pairs. I
The next step after creating the wallet is to create the 2 endpoints. Each ZFS host is an endpoint. Below is the screenshot for adding the first node.
After creating both endpoints I see them in the OKV console.
Then I click on each endpoint and ensure that
The default wallet for each endpoint is the "ZFS_ENCRYPTION_KEYS" wallet
The endpoint has the ability to manage this wallet.
Then I go back to endpoint list in the console and save the "enrollment token" for each node and logout.
Server Enrollment Token
ZFS_S3FdqkaimSpCUBfVqV
TESTCOST-A uy59ercFNjBisU12
I then go to the main screen for OKV and click on the enrollment token download
Enter the Enrollment Token and click on "Submit Token"
You see that the token is validated. Then click on Enroll and it will download the token "okvclient.jar" which I am renaming to okvclient_{zfs server}.zip. This will allow me to extract the certificates.
When completed, I have enrolled the endpoints and I am ready to add them to the ZFS.
Step #2 - Add the Certificates
When I look at the .jar files that were created for the endpoints I can see all the files that are included in the endpoint enrollment. I need to add the certificates to the ZFS servers. I can find those in the "ssl" directory contained in .jar file.
I start by uploading the "key.pem" for my first ZFS "testcost-a" in the Configuration=>SETTINGS=>Certificates=>System section of the BUI.
After uploading it I then add the "cert.pem" certificate in system also.
After uploading, I clicked in the pencil to see the details for the certificate.
NOTE: The IP Address is the primary node in my OKV cluster.
Under Certificates=>Trusted I uploaded the CA.pem certificate.
After uploading this certificate, I click on the pencil and select "kmip" identifying this certificate to be used for the KMIP service.
The certificate should now appear as a trusted KMIP services certificate.
I can now upload the certificates for my other ZFS server (zfs_s3) the same way.
Step #3 - Add the OKV/KMIP service
I now navigate to the Shares=>ENCRYPTION=>KMIP section of the BUI to add the KMIP servers to my first ZFS host. Because I have 2 possible KMIP servers (I am using an OKV cluster), I am going to uncheck the "Match Hostname against certificate subject" button. I left the default to destroy the key when removing it from the ZFS.
I added the 2 OKV servers (if I had a more than 2 nodes in my cluster I would add those nodes also). I added the port used for KMIP services on OKV (5696), and I chose the "Client TLS Authentication Certificate" I uploaded in the previous step (FLxULFbeMO).
I perform the same process on my second ZFS so that the paired ZFS servers are all configured to communicate with my OKV cluster to provide KMIP services.
NOTE: If you want to get the list of OKV hosts in the cluster you can look in the .jar file within the conf=>install.cfg file to see the OKV servers details. Below is the contents of my file.
Once I add the KMIP configuration to both of my ZFS servers I can look at my endpoints in OKV and see that they are both ENROLLED, and that OKV knows the IP address of my ZFS servers.
Step #4 - Add one or more keys.
On my upstream ZFS, I click on the "+" to add a new key and save it.
After adding it, the key appears in this section.
Step #5 - Add the keys to the shared wallet
I noticed that even though the wallet is the default wallet for the endpoints, the key did not get added to the wallet. I can see that both nodes have access to manage the wallet.
I clicked on the wallet, and then the "Add Contents", from there I am adding my new key to the wallet.
And now I login into the second ZFS (zfs_s3) and add the same key. Make sure you add the same named key on the second ZFS so that they can match.
Step #6 - Create a new encrypted project/share
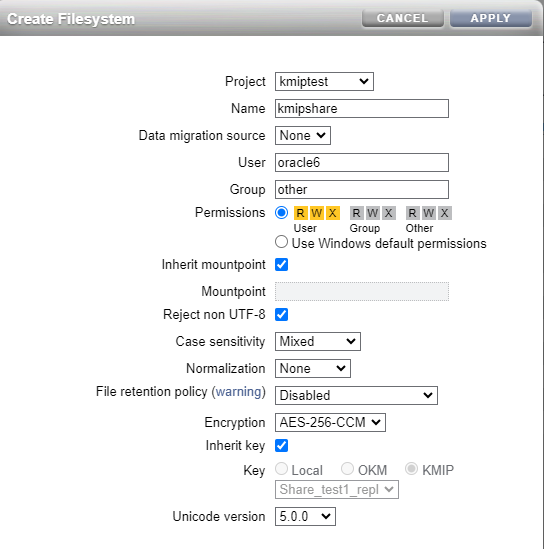
On my first ZFS (upstream - testcost-a) I am creating a new project and share that is encrypted using the key from the KMIP service.
Then within the share, I configure replication to my paired ZFS.
And now I am creating a share within this project.
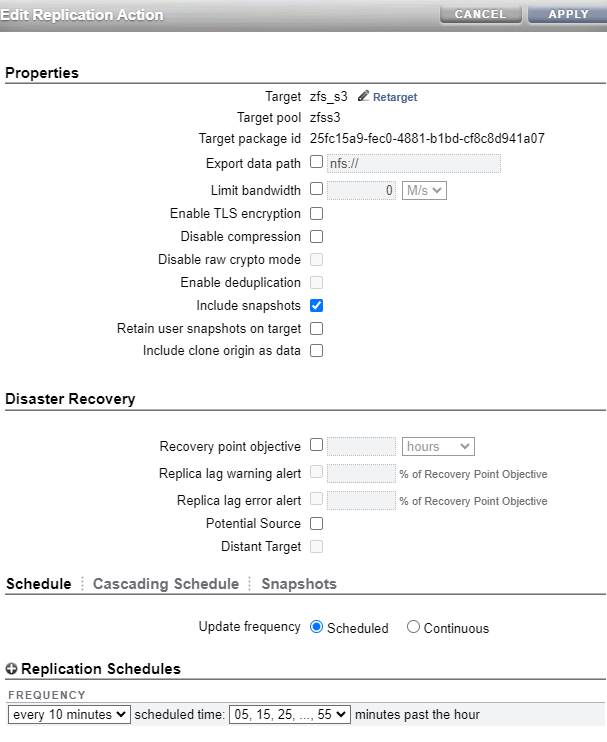
Step #7 - Configure replication
Finally I configured replication from my project in my upstream (testcost-a) to my downstream (zfs_s3). Below are the settings for my replication processing to send a snapshot every 10 minutes. Notice that I made sure that I did NOT disable raw Crypto Mode (which is what I am using for this replication). You can follow this link to learn more about Raw Crypto Replication.
Result:
I now have replication on my encrypted share working between my upstream and downstream. With this new feature, the blocks are sent in their original encrypted format, and are stored on the downstream encrypted. Since both ZFS servers can access the encryption key, both servers are able to decrypt the blocks.
I did test shutting down one of my OKV hosts, and found that the ZFS severs were able to successfully connect to the surviving node.
I even mounted the share, stored some files, replicated it, mounted a snapshot copy, and ensured that both ZFS servers presented the shares readable.